


A beginners guide for how to cut and sew clothes. This breaks down how clothing is made and how easy the step by step process is!
This post may contain affiliate links which may earn me commissions should you click through them and take certain actions. As an affiliate for Amazon, Cricut, xTool, Home Depot, and other sites, I earn from qualifying purchases. Please DIY carefully. View my full legal disclosures here.
The majority of my content is generated by me, as are 99% of the photos and videos, but I utilize technology for titles, descriptions, video editing out all of my ums, and occasionally for text overlay on images.
Please read the whole post so you don’t miss any important information!
Making clothing seems like a really intimidating prospect when you’re new to sewing. And it CAN be hard. But there’s a lot of variation between clothing styles and difficulty… some items are easy to sew and some are harder.
Like all sewing, adding zippers, fancy stitching, stabilizer, elastic, etc. can all contribute to whether or not a piece of clothing is difficult to sew. When I’m considering buying a pattern, I usually look at the supply list to eyeball how easy or hard it might be.
I am not the #1 expert in clothing construction, but I’ve found that starting to sew my own clothes has allowed me to visualize this in a different way.
Once you can SEE how clothing is constructed, it seems a lot less intimidating.
So here’s some basics to get you started and motivate you to give this a try!
If you need it broken down even more, make sure to check out my 101 Guide to Sewing first. I also have a blog post about how to tailor your clothes- aka make them bigger or smaller for a perfect fit.
If you like to geek out learning how things are made, you’ll love to read about How Fabric is Made!
Clothing Construction- and Deconstruction
I want to talk about clothing construction first. Whenever I see a piece of clothing that I like, I like to eyeball it for how it’s made. If it’s yours, you can turn it inside out and look for the seams. That’s where pieces of the clothing join. Each piece is sewn together… and the individual pieces are “the pattern” for that piece of clothing.
If I have an old piece of clothing that was worn out, I can take it apart, draw the pieces out, add a seam allowance (the portion that overlaps when you sew things together), and then cut out the pattern in new fabric. At that point, I could sew the pieces together, just like the original piece and have a new outfit in the same style as the old piece of clothing.
A note on clothing replication- I believe patterns are like artwork and that there’s a copyright on them. I wouldn’t advise stealing someone’s pattern and selling it- or even selling clothing based on it. I’m strictly talking about doing this for personal use AND for understanding how clothing is made.
It may not be legal to remake clothing for personal use either (not sure how this works honestly), but I have had a few pairs of clothing that fit nice and they weren’t items I could buy again (or else I would have!). Sometimes I wish I could buy the patterns to some of my favorite clothing pieces- I’d totally do that!
If you want to stay on the up and up, it’s fair game to take apart clothing to see how the pieces go together then not actually reuse the pattern. This is a reallllllly good way to learn about sewing without actually sewing anything.
It. Is. Eye. Opening.
Let me show you some examples of this breakdown with some store bought clothing from our donate bin.
Example 1
You can see the seams on this romper below. The black arrows show where the shirt pieces would have been separate before they were sewn together.
The red arrow indicates the neckband which is a strip (circle) of fabric that’s sewn onto the neck area to finish the edges.
The blue arrow is a normal coverstitch seam. The edges of the sleeve were just turned over once and this was sewn with the coverstitch to finish the raw edge.
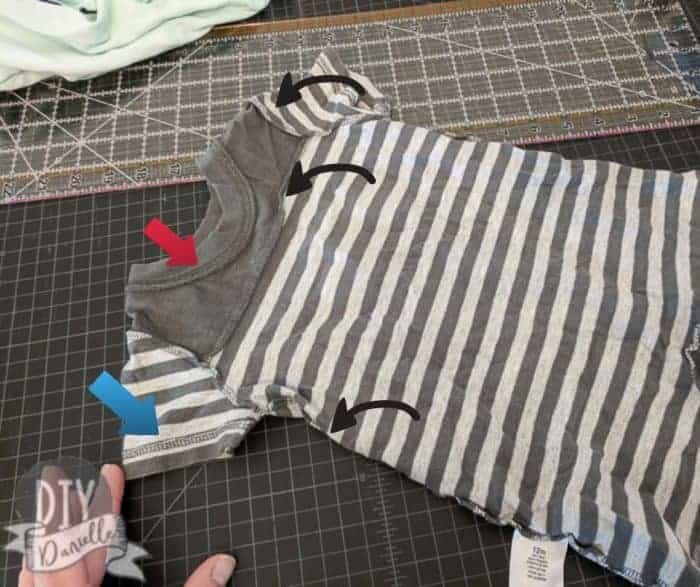
This romper is fairly complicated compared to a simple shirt or pair of pants. I didn’t show the snap together leg area either which is a little more work. But the seam across the top of the shirt (where plain gray meets stripes) is a design feature… the other side of the romper is just one cut of fabric.
Example 2
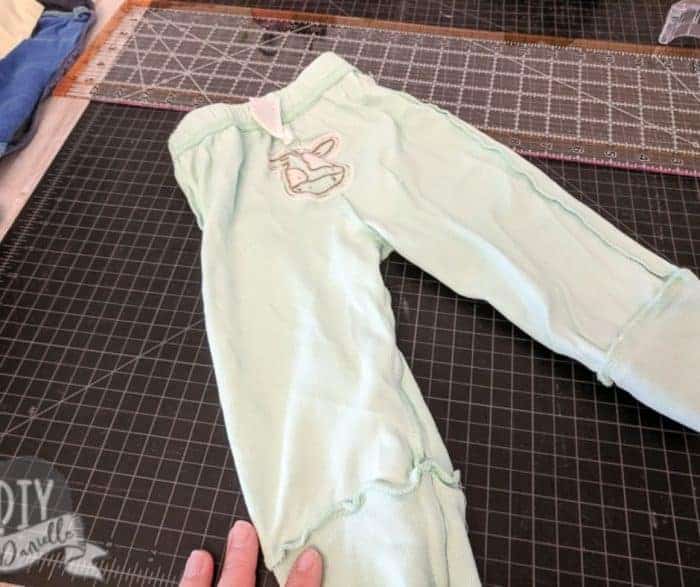
These pants have a cow embroidered on the back (I love these!). You can see the seam down the back- the seamstress would have sewn the two pant pieces together, then sewn/embroidered the cow on the back.
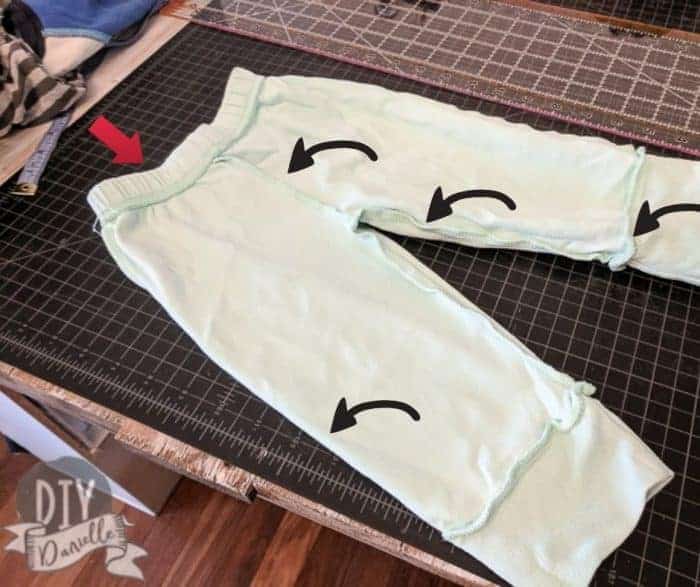
Okay so here are the seams… they’re the same as the back of the pants. As you can see, there’s NO blue arrow as there were no seams finished only with a coverstitch.
The waistband (red arrow) is sewn on similar to how a neckband is…. that’s at the top. It’s likely a piece of fabric folded over with an elastic in the middle to make it nice and stretchy around baby’s belly.
Black arrows indicate the other seams. The bottom of the legs should have been another red arrow, whoops. The end of these pants have a cuff sewn on, instead of finishing the bottoms with a coverstitch. This is a nice feature on clothing that a baby might be sleeping in so there aren’t any loose clothing bits to cause safety issues. You’ll notice most kids PJs have cuffs (or footies) that are tighter than pant legs.
The cuff is, like the waistband, a thicker piece of fabric folded over. You cut the fabric initially as one big cut of fabric. Sew the short ends right sides together. Face the fabric right sides out and fold it so the raw ends meet. Both raw edges are sewn to the raw edge of the pants.
Example 3
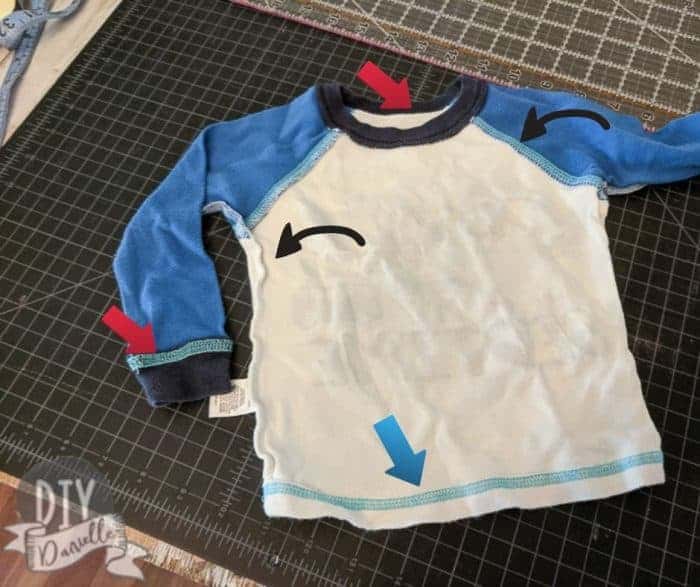
One more example. Here’s a PJ shirt. You’ll see that the shirt uses cuffs too, just like the pants. This is for safety reasons (although it can be a design feature in adult clothing- or for safety if you have a job where loose sleeves can be an issue).
The neckband is a neckband, same as before.
This shirt is a raglan style shirt like the boys shirts I’ve sewn for my sons. The sleeves are each one big cut of fabric. One side of the sleeve edge is sewn to the front of the shirt and the other to the back cut of fabric. Repeat for the other sleeve. Then you sew up the side of the shirt and up the sleeves, all in one big long seam. After that, you just add your cuffs, your neckband, and finish your edges at the bottom of the shirt with a coverstitch.
Some patterns use a band for the bottom of shirts. It’s a design feature mostly, at least from what I can tell.
Using Clothing Patterns
It is possible to make your own patterns off existing clothing, but it’s not ideal. You need to add the seam allowance in and it’s not always the easiest task, particularly as that clothing has stretched and changed to some degree over time and washing.
You can also make your clothing from scratch which requires a bit more skill.
Ideally, you want to start off using patterns. Good quality patterns will teach you the ins and outs of clothing construction, allowing your sewing skills to grow as you experiment with harder projects.
Simply, patterns are worth the money because they’ll save you time and aggravation.
Making Clothing From Scratch
I don’t make a lot of things from scratch because I find that tested, tried and true patterns are a lot more reliable. But as I get more comfortable sewing clothing, I love the idea of trying to make my own custom clothing.
If you have an idea for a clothing item, you can sketch up something, experiment with fabric drape on your body, pin the fabric on and sew where needed.
A good place to start is adjusting store bought clothing to fit your body better.
You can either use your own body and a mirror, or get a dress form that’s set to your measurements. Turn a store bought clothing item that is a bit too large inside out over your body. Pin in areas that are too loose. Remove said clothing item carefully. Then you can sew those areas up and see how you like the results.
Play around with this a bit- maybe hit up the thrift store for large-ish clothing so you can play a bit.
As you play around, you’ll see how different sizes need different size arm openings and sleeve sizes to attach, and other small details you might not realize.
Once you’re there and comfortable, you will want some advance pattern making classes! BluPrint is a potential online resource: Get a 7-day free trial to see if it’s a good option for you.
Fabric Types and Their Importance
Wovens and Knits
There’s two types of fabric types used in apparel sewing- wovens and knits.
Wovens are items like quilting cotton that you can pull and they won’t stretch.
Knits are stretchy. If you catch the terminology, the word choice is related to how the clothing is made. It’s VERY interesting to watch how fabric is made- highly recommend checking this out on YouTube!
Both wovens and knits have many, many different types of fabric that fall into their category. Some aren’t used for apparel and some are. Each fabric type has different properties that are important to understand.
Wash Instructions
Just like store bought clothing, the fabric you use all has different wash instructions. You’ll notice fabric is usually labeled with the wash instructions so it’s important to remember or record what those instructions are when you buy it.
We have an app, Sew Organized, that you can record that information with if you want!
Stretch
Different types of knit fabrics have different amounts of stretch. This is impacted by the fabric content and how it’s made. Many pattern makers will say how much stretch a fabric needs to have for their project- they may even include a little ruler for you to stretch a piece of scrap along to see if it’s enough.
For stretchy pieces of clothing like tight slip-on dresses (with no zipper), you usually need something with lots of stretch. For looser items like dress pants, you can get away with little to no stretch. It really is dependent on the pattern. Some patterns require stretch, some don’t.
Here’s an example— A men’s button up dress shirt is often a woven. Because the shirt is buttoned up, the neckband doesn’t need to stretch to fit over the person’s head. The shirt isn’t tight fitting so it doesn’t need to stretch to fit trimly over their body. But the pattern for the dress shirt has to be loose enough to allow the man to move his arms around, bend his elbows, etc. without popping a seam or ripping the fabric or feeling bound.
Good Measurements
As you might guess, good measurements are VITAL to making woven clothing that fits well… but that’s also true for knits. If you don’t make the right size, the clothing may fit too loosely or too tight. With a woven fabric, you’ll know because you’ll be uncomfortable and your movement will be hindered. You might pop a stitch or rip your clothing.
You could do all of those things if you make a knit item too small, but another issue I’ve noticed is that knit fabric will stretch out too thin… and it will be more sheer… if you sew too small of a size. And not in a sexy good way. In a “my fabric looks like I’ve been wearing it for 5 years” way.
Recovery
If you stretch a fabric and it stays stretched out, that would be considered poor recovery. It would be a bad choice for something such as bands to underwear, neckbands, etc. If you use it, you’ll stretch the bands as you pull a shirt over your head, then the neck band will look all wonky after the shirt is on.
If you make your neck band with a fabric with good recovery, you’ll pull the shirt on and it’ll quickly snap back into place.
That said, if your kid is a stinker and stretches his shirt out by pulling his knees up through it like mine do, there’s only so much of a beating the fabric can take. Clothes will stretch with wear and tear! Some fabrics will just do a better job at standing up to it all.
Funny story about recovery- I love the Doodles fabric at Joann’s which is notorious for a few special care requirements, but specifically that it has poor recovery. I bought a bunch and decided to make myself some underwear from it. Because I knew the recovery was poor, I planned to use other fabric for the waistband. I finished cutting the main pieces to the underwear and put them in the unfinished projects pile… came back to it, cut the bands from the Doodles, and sewed everything together. I pulled on these underwear that pretty much floated back down to the floor thanks to the lack of recovery in the waistband. WHOOPS. To fix this, I cut a small hole in the seam of the band and added an elastic to the waistband because I was too lazy to redo the whole thing.
Stitch Types for Fabric Types
You have several options for stitching your clothing. Different stitches are better for different types of fabric.
Stretch Stitches for Knits
Knit Fabrics require a STRETCH STITCH of some sort– these stitches stretch when your fabric stretches. If you don’t use one and you stretch out your shirt, you may find that the stitches pop.
Check your sewing machine manual to see which stitches your machine considers a stretch stitch. Zig zag stitching usually works well. Sergers and coverstitch machines have stitching that works well for knits. I’ll talk about them in the tools section.
I’ve heard some people find that they can get away with a longer straight stitch or they use longer zig zags. You can use a scrap piece of fabric and use the stitch on it, then stretch the fabric a lot to see what happens. Some shirts, such as an adult t-shirt, aren’t getting stretched much, assuming you aren’t making your clothes too small. But if you’re making something super form fitting, you probably want to be more careful about what stitch you use.
Straight Stitches for Wovens
You can use a straight stitch for woven fabric. I’ve found, however, that using a serger on the edges of my wovens helps prevent fraying. So sometimes I’ll use a serger for wovens, or both a serger for the edges AND a straight stitch for the main garment construction.
I have HEARD that sergers don’t work on woven fabric and the stitching can come out easily, but this hasn’t be my experience.
Helpful Tools for Sewing Clothing
I’m going to give you a quick rundown of some helpful tools for sewing clothing.
CUTTING EQUIPMENT
QUALITY scissors (these are my favorite) and/or a rotary cutter: Honestly you need these regardless but I figured I’d mention them. You do a lot of cutting because clothing uses quite a bit of fabric.
MEASURING TAPE
Soft measuring tape to measure yourself. Try not to stretch these out or it will throw off your measurements.
If you have children, they WILL stretch these out. I did it to my grandma’s tapes and my kids have certainly “played with” my measuring tapes. It’s never a bad idea to explain to them why we don’t do this.
TWIN NEEDLE
If you don’t own a serger or cover stitch machine (see info below), a twin needle can help create a more professional finished edge to your sewing projects, particularly if you’re sewing with knits.
Read more about twin needles or check out my full guide to sewing needles.
SERGER
One of my favorite machines to use, a serger finishes edges to knits while still allowing the fabric to stretch through the stitch. The stitches look like this…
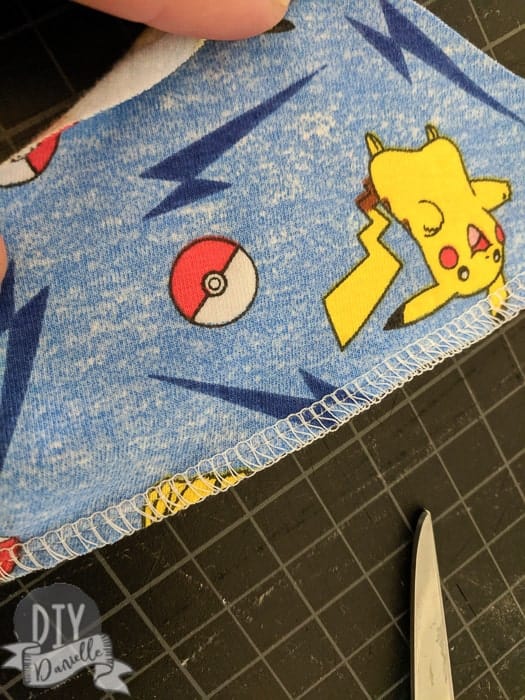
I owned a Brother 1034D which was great, but invested in a Babylock Serger/Coverstitch that I found used a year ago. It sews through a few more layers than the Brother serger. I still stand by the Brother machines though! They’re workhorses! Here’s a tutorial on threading a Brother 1034D Serger.
COVERSTITCH MACHINE
Totally unnecessary, but AWESOME to have. A coverstitch machine is what gives the same look to finished edges on clothing that you get with store bought clothes. You can fake it with a sewing machine, but if you can splurge then it’s great to have.
Here’s what the stitches with a coverstitch look like….
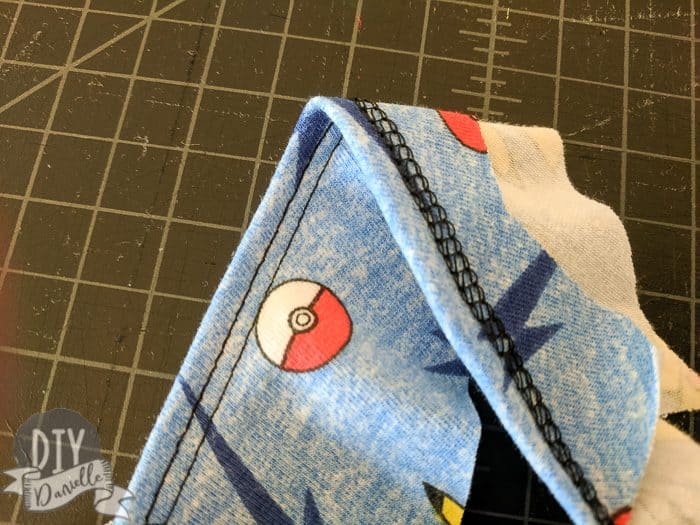
The top does a double straight stitch and the back has the fancy stitching.
The Brother 2340CV Coverstitch does a good job. I kept mine when I got my combo machine so I could switch between machines instead of rethreading all the time. It’s a fantastic machine and I found mine used on FB Marketplace which was a sweeeet deal.
Check out your store bought clothing and see what type of stitching it has! Leave a comment at the bottom and let me know what you see!
Favorite Pattern Companies for Beginners
I find the store bought patterns to be extremely intimidating- plus the thin paper is horrifying to cut.
My favorite pattern makers are online. There’s a few benefits to this.
- The big pattern makers often have Facebook groups that they nurture. Have a problem with a pattern? Post it in there and someone will likely be able to give you a hand.
- Printing on regular paper requires some work to tape together, but the paper is a lot thicker and easier to work with than the thin tissue paper of store patterns.
- There’s usually a lot of testers in different heights and weights for PDF patterns so I can see what the clothing might look like on my body type BEFORE I buy and make the pattern. This is SUPER awesome.
- The instructions usually come in a PDF file and you get photos (and sometimes a video tutorial if they do a sew a long) showing you each step. Larger font size than store patterns too!
The downfall to online patterns is that you either need to print them page by page and assemble the patterns, tracing different sizes onto other paper…. or, if the pattern maker has the option, you have them printed in large size at the local copy shop. This print size is called an “A0.” Most pattern makers allow you to print one copy. Make sure to order b&w A0 and that the copy shop prints it correctly (see below). It can get pricey if you accidentally order color.
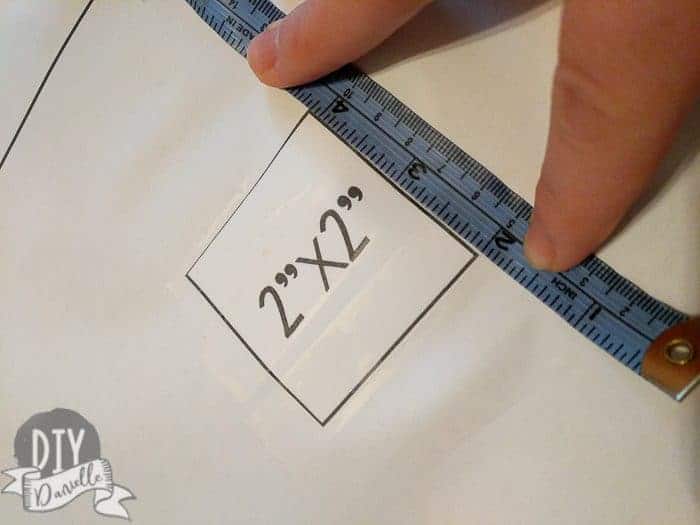
When you print your online patterns, ALWAYS make sure you’re printing them true to size- no adjusting to fit the page. When it prints, you’ll see most pattern makers add a little box that they’ll say is 1″x1″ (or something). You NEED to measure that box. IF the box is off, the print is off. Just keep in mind that soft measuring tapes CAN stretch out over time so it’s always good to double check the box with a hard ruler before you decide you need a print a new copy.
See this picture below? The box is off. That means the pattern is off- and a small difference in the box size can make a HUGE difference when wearing your clothing item.
How To Make COOL Clothes for the Kids
Do you remember grandparents or parents making you clothes as a kid? Did you HATE what they made? Did you love it? If nobody sewed, did your parents shop for your clothes and you hated those?
Here’s the deal: if you want your kids to WANT the clothes you make for them, you need to have some respect for their likes and dislikes. It’s the same as if you go shopping for them.
This comes down to two things- STYLE and FABRIC.
When you’re looking at style, you can look at the types of things you see on the shelves at the store. What does your child pick out when you do school shopping? You want something in that style. Knits are extremely popular. T-shirts are a great place to start. Underwear is great.
Find patterns that they like. You can even ask for their input. “Would you wear this circle skirt? Do you prefer pants?”
As a kid, I HATED skirts and dresses so if you made or bought me one, I wouldn’t be likely to appreciate it. But I would have KILLED to have someone make me bell bottoms as a teen.
The other piece is fabric choice. This is important. There are some really awesome fabrics to choose from. Let the kids choose! I like to let my kids pick out a fabric at the store or online, but I make sure to explain what type of fabric I need for the project.
The Licensed Character Fabrics Section is MY FAVORITE (and their’s). Joann’s and Fabric.com sometimes have slightly different stuff in stock so I like to check both when I’m looking for something specific.
If you’re going to Disney, pick out some fun Mickey Mouse fabric. Do they love Pokemon? Well there’s several Pikachu fabrics. It’s a lot of fun and they tend to instantly love fabric that represents who they are. When you pick out the right one, you’re showing them that you can see them and their interests.
Good Starter Patterns
These are all clothing items that I’ve made and/or written posts about. You can read the posts and if you think they’re of interest to you, go ahead and buy the patterns!
- Grow with Me Pants Post (baby/toddler) or Buy The Pattern on Etsy
- Grow with Me Romper Post (baby/toddler) or Buy The Pattern on Etsy
- Reversible Romper (baby/toddler) or Buy the Pattern from The Scientific Seamstress
- Summer Kimono (women): Buy the Pattern On Etsy
- Free Spirit Tank (women): Buy the Pattern on Etsy
- Jolly Roger Raglan (children): Buy the Pattern on Etsy
- Boy’s Boxer Briefs (children): Buy the Pattern on Etsy
Tutorials to Help
Here’s a few tutorials I’ve done on different aspects of sewing that will be useful for apparel sewing.
- Adding Snaps
- How to Measure Yourself
- Adding an elastic casing
- Prewashing Fabric
- How to Tailor your own clothes
Did you have something else you think I should add? Let me know in the comments.
Information about Fabric Types
Fabric can make a big difference in what type of clothes you can make and how they turn out. Here are a few tutorials about different fabrics:
• EcoFriendly Fabrics
• What is Wool Fabric?
• What is Linen Fabric?
• What is Silk Fabric?
• What is Cotton Fabric?
• What is Hemp Fabric?
• What is PUL Fabric?
• What is Polyester Fabric?
• What is Tencel Fabric?
• What is Minky Fabric?
Please share and pin this post! You can also post your project and tag the DIYDanielle team on Instagram @doityourselfdanielle!
How to cut and sew clothes
@Okoro David Ude,
Wow, what an awesome tutorial! So detailed! I am very intimidated attempting to sew and make my own clothes! I have started working on some cute crafts and can hand sow just fine! But sewing machines and such are on a whole other level! I am super jealous of people that have mastered this skill and can make amazing items. I love your blog and style here! This is a serious gem!
Thank you for the kind words! Once you ‘get it’ sewing by machine is so much easier and it starts to all make sense <3 -Danielle