
How to Install Snaps and Use Snap Pliers: An Easy Way to Add Closures to Clothing or Diapers.

This post may contain affiliate links. Using these links helps support my blog. Thank you!
When I started sewing, I wanted to learn to sew cloth diapers so snap pliers were one of the first things I learned to use. Snaps are necessary for sewing cloth diapers and they’ve come in useful for other items as well. Recently, I’ve been adding them to clothes.
There are different brands of snaps and snap pliers, but I’m going to specifically cover the plastic snaps and snap pliers that I’ve been using since 2011 from KamSnaps. I’ve had the same pliers this entire time, used them frequently, and they’re still working great. I like products that last so this makes me happy.
I know learning a new skill when sewing can be intimidating so I wanted to put together a tutorial to explain how to install snaps and use the snap applying tools. Skip to the end if you just want to watch the video!
New to sewing? Check out my basic Sewing Guide.
Supplies for Installing Snaps
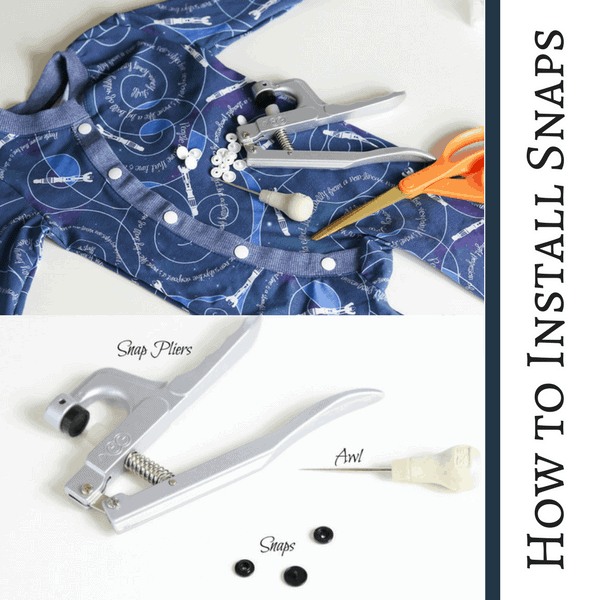
You’ll need snaps, an awl, and snap pliers to install snaps. While there are other brands, I highly recommend using KamSnaps. They’re a favorite brand and they’re reliable. There are other brands, but I’ve found that they break easily and don’t always perform reliably, even when they don’t break. (Make sure Amazon doesn’t pop a non KamSnaps ad into the search results if you use my link)
Introduction to Snaps and Snap Tools

When you get a snap set, you’ll need a few things. There’s snap pliers which help pinch the cap and stud or socket to each other over the fabric.
There’s the awl which is the tool you can use to poke a hole in the fabric and stabilizer for the cap to go through.
You’ll also need your item that you want to add snaps to and generally, you want some type of stabilizer as well. In the case of cloth diapers, we reinforce the snap area with pieces of scrap PUL (fabric used for cloth diapers). The pattern that I use for the baby outfit uses a medium/heavy fusible interfacing as a stabilizer. The extra fabric or stabilizer keeps the snaps from pulling through the fabric which is necessary for projects where there’s only a thin layer of knit fabric. I have forgotten the extra PUL scraps for a cloth diaper snap once and the snap ripped through the diaper when I went to unsnap it. I wasn’t happy and it is NOT easy/attractive to fix.
Ah yes, and scissors come in handy too. I recommend using your second or third best pair of scissors, not your quality fabric scissors.

What you need to know is that snaps come in different sizes and the sizes can differ between manufacturers. I use the Size 20 Kamsnaps for most items, but in particular for my cloth diapers.
If I use too many layers for items like cloth menstrual pads, sometimes the prong on these isn’t long enough to close over the fabrics. This would indicate that I should probably buy some longer pronged snaps, but I usually just tweak my patterns to make it work with the snaps I have. My particular snap pliers won’t work with longer prongs so I try to save money by using the ones I have.
How to Install Snaps

Poke your hole with the awl through the markings for your snaps.Put your cap through the hole, adding your socket or stud to the other side of the fabric. If your prong on the cap is a lot longer than needed for the thickness of your fabric, you can snip a bit of the tip off with your scissors.
Now you’ll want your snap pliers. The flat end of the cap goes against the black portion of your snap pliers. The white/clear end goes against the socket/stud. It should feel like it all fits together well. Squeeze. The pliers should have squeezed the tip of the cap down, smooshing it over the interior of the stud/socket. This holds the socket/stud on.
You want to do the same thing except with the opposite stud/socket on the other side. Ie. If you used a socket on the top, use a stud on the bottom or vice versa.
For this baby outfit I alternated my studs and sockets, but usually people want all studs on top and all sockets on the bottom (or vice versa). That is how products are generally sold.
I wanted to use stud-socket-stud-socket-stud-socket on top and the opposite on the bottom for these outfits because I tend to snap outfits on crooked when I’m delirious for lack of sleep. If I alternate, it’s harder to snap the wrong one on.

If you are using snaps for cloth diapers, make sure to check out my post about my book on How to Sew Cloth Diapers and check out my homemade cloth diaper stash tour!
Video on How to Install Snaps
Love it? Pin it!
Please share and pin this post! You can also post your project and tag the DIYDanielle team on Instagram @doityourselfdanielle!
Web Story: What are Snaps and Snap Pliers?