

Information on building a goat house, the cost for a 6×8′ DIY shed with no flooring, and how to build the frame.
When we decided to get goats, I had two worries- how to make the perfect goat house and how to put up the perfect fencing. My friend Scottie at SavedbyScottie helped walk me through how they made their portable goat house. You’ll want to check out her Instagram channel if you want to see lots of pictures about it (and of her super cute bottle baby goat that she’s been diapering and snuggling)… she blogs, but she hasn’t done a goat house post yet.
I did mine a little different from how she did hers, but mostly followed her instructions. I ended up doing heavier framing because I decided I DID NOT want to move this around. Keep scrolling for the full tutorial.
This post may contain affiliate links which may earn me commissions should you click through them and take certain actions. As an affiliate for Amazon, Cricut, xTool, Home Depot, and other sites, I earn from qualifying purchases. Please DIY carefully. View my full legal disclosures here.
The majority of my content is generated by me, as are 99% of the photos and videos, but I utilize technology for titles, descriptions, video editing out all of my ums, and occasionally for text overlay on images.
Please read the whole post so you don’t miss any important information!
Table of contents
What Do You Need in a Goat House?
I had a few things that I wanted in a goat house:
- Sturdy
- Provides cover from rain, wind, snow, and sun.
- Fairly predator proof: our area doesn’t have many large predators so it mostly needs to protect against dogs… but the fencing should do that also.
- A door that closes and can be locked.
- Good ventilation to keep it from getting stuffy in the summer.
- Tall enough for me to get in and clean.
Wants:
- Ledge for the goats to sleep on if they want to get off the ground.
- Hay rack inside (I am hesitant to put feed outside, even though people seem to do it)
As I have another place to store supplies and hay, I wasn’t worried about storage space for those items.
Goat House Supplies
I’ll list the price I paid for most of these items, although these may vary from area to area and store to store.
Make sure to get straight wood without a lot of flaws or issues.
- You need a whole bunch of 2x4s… here’s what you cut them to:
- The front is 6.5′ tall. You need (4) 6.5′ pieces and (1) 8′ piece for the top
- The back is 5.5′ tall. You need (5) 5.5′ pieces and (1) 8′ piece for the top
- Sides: You need (2) 8′ pieces for the roof piece plus 6 more 8′ pieces that you’ll cut down… more explanation on this later.
- Roof: You already included 2 of these pieces in the calculations for the side framing. I did 3 more pieces so they could be placed every 2′. I’ll talk a bit later on how I probably should have done the roof differently so you may want to adjust accordingly once you read this.
- Note on price: This ended up being $3.40 per 8′ 2×4 at our local store. They didn’t have 6′ cuts for sale. Total of (22) 8′ pieces at $74.80
- (4) 2x4x8 Pressure Treated: $17.20
- (2) 8′ for the front and back.
- (2) 6′ for the sides
- Hinges and lock for the door
- (2) Lifespan Heavy T Hinge 4″ $17.50
- Outswing Gate Latch Zinc $6.25
- For the siding, (5) 5/8″ T1-11 siding (these were 4×8) $219
- #10 3″ Exterior Wood Screws (2 lbs) $13.80 (probably only needed 1 lb of these to be honest)… I also needed some shorter screws in some areas, but I already had those on hand.
- 10′ Everlast II 29GA GAL Roofing (5) $154
- Screws for the roofing: The local store only sold these in a large bag which I think ended up being $20. I recommend buying a smaller quantity for less if possible. You won’t need tons. $20
- Square edge
- Wood for the door
Total Cost: $522.55 (not including the wood for the door, the Primer, or the paint)
If you want the simplified plan for this project, check it out in my shop.
If you’re new to woodworking, I recommend taking some classes or at minimum, checking out some basic safety rules for using power tools. It’s sometimes easier to learn on smaller scale, easy woodworking projects rather than starting with a large structure.
Preparation to Build
A quick note on preparing the area to build. You need to consider how you are going to level the area that your barn will be. I did not do this… I just found a mostly level location to place it. This has worked out okay for me, but I also had issues building my door because the door frame wasn’t perfectly square. I THINK the problem was that we built the barn on uneven soil. But I’m not 100%. The barn doesn’t wobble or seem to have any obvious issues from being on an imperfect surface.
It also makes sense to build the frame pieces on a level surface. I was working with what I had- my driveway.
My husband said that building a pole barn might have been a better option to avoid this… lessons were learned.
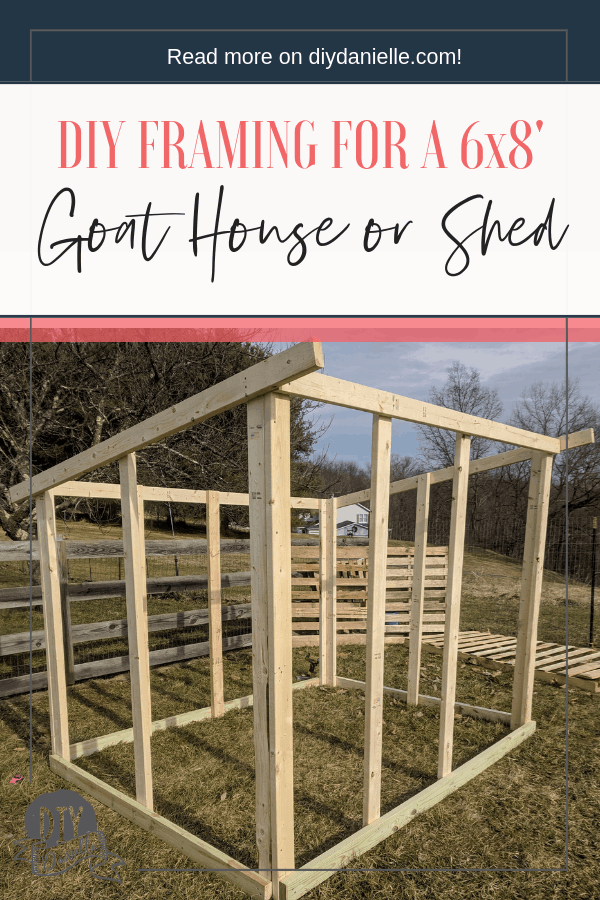
How to Build a Frame for the Goat Shed
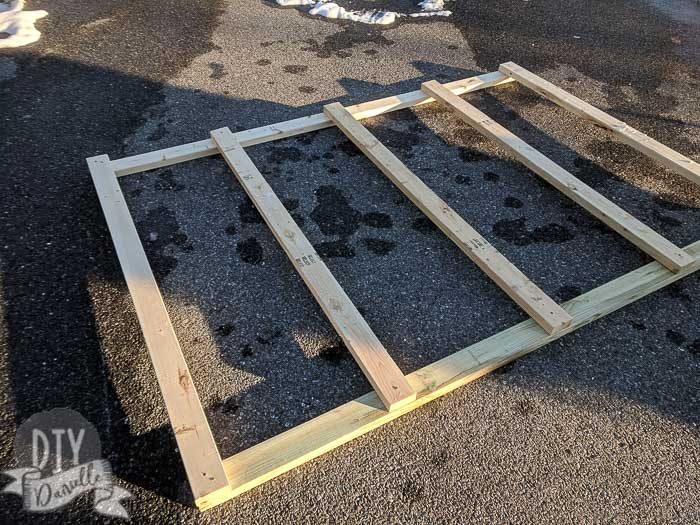
Cutting the Wood for the Sides
Start by laying out your 6′ pressure treated 2×4 for each side. Then lay out three 8′ regular 2x4s. You want one at each end of the 6′ board, flush with the end. Mark the middle of the 6′ board and center your third 8′ board over that mark.
On one end board, mark where 6.5′ is. On the opposite end, mark 5.5′.
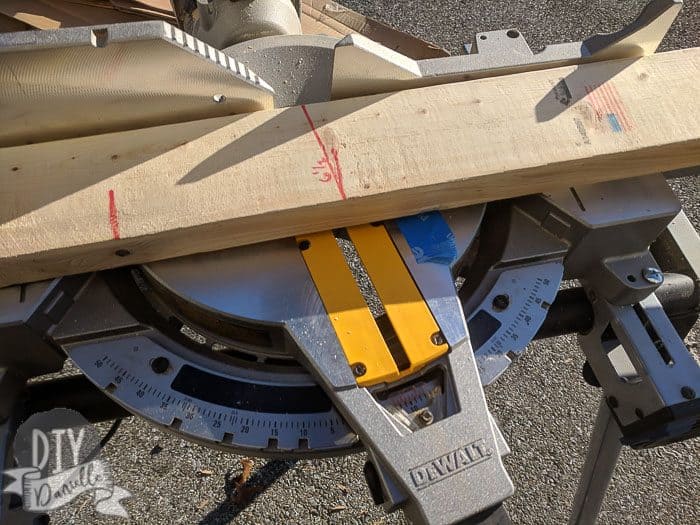
Take the 8′ 2×4 that you plan to use for your roof piece and place it over your three boards. You’re lining it up with the 6.5′ and 5.5′ marks. You can then draw a line to show the diagonal that you need to cut your (3) 2×4’s at. Mark all three boards.
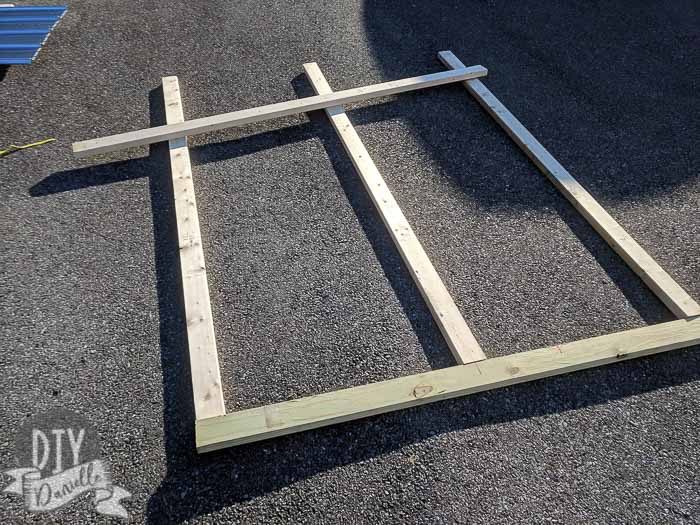
Now you can use your miter saw to cut those boards at that angle. Or you can use a regular saw, but the miter saw makes it soooooo very easy. It’s amazing.
Assembling the Frame for the Sides
REMEMBER THAT YOUR SIDES WILL BE OPPOSITE. I forgot and had to take mine apart, whoopsies.
Your diagonals on the 2x4s have been cut so lay the 2x4s back out UNDER your 6′ pressured treated piece. Make sure you line them up in the same order so the diagonal is lined up. Again- do BOTH sides of the frame and make sure they’re opposite. I lined them up like an idiot so they were perfectly matched. And then when we went to put it together, realized that we needed a left side and a right side. You think I would have learned my lesson from how many times I’ve made this mistake sewing, but nope.
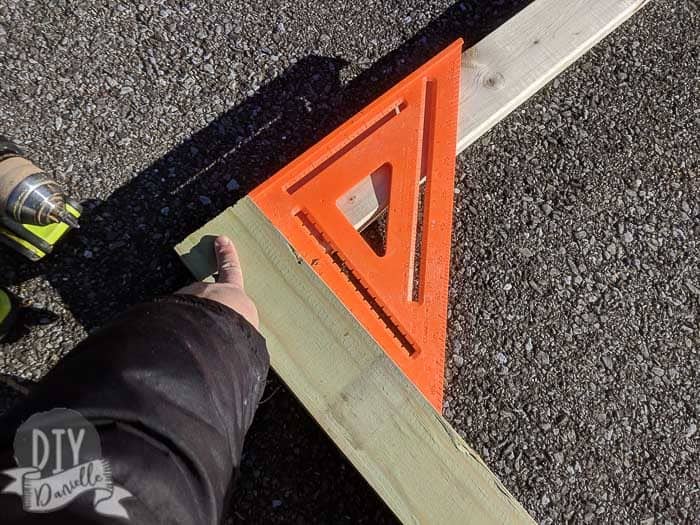
Use a square edge to make sure each piece is a 90 degrees. Straight goat houses are happy goat houses.
I used (2) 3″ screws per board to attach them to the pressured treated 2×4. Then I placed the 8′ piece for the angled roof on top of the angled boards. I decided to try to keep the amount of overhang in the front and back approximately equal, then lined up the edges to be flush with the angles on my cut boards.
Screwed in with 2 screws per board.

At this point you should have two side frames (assuming you duplicated this for both)… note that the bottom and top boards are on opposite sides.
To note: I thought I’d need to predrill these and you may want to, depending on your wood. But my drill easily managed the 2x4s without any issues.
Assembling the Back Frame
Don’t forget that the back is the SHORTEST side of your goat hut. So it will be the 5.5′ side. I decided to space the 2x4s 2′ apart so there’s 5 total boards cut to 5.5′.
The 8′ pressured treated board goes on the bottom… an 8′ 2×4 goes on the top. You can line up your 5.5′ 2x4s every 2′ on these. Make sure they’re all at a 90 degree angle and screw them in.
That’s all there is to that… in this case, both the bottom and top piece are on the same side.
Here are some products in my store that you might be interested in! Keep scrolling to see the rest of the tutorial!
Assembling the Front Frame
The front will be the 6.5′ side and it needs to have space for a door. I set aside (4) 6.5′ boards for the front. One for either end, a 4′ gap on one side for the door, and every 2′ after.
Again, you’re using an 8′ pressured treated board for the bottom and a regular 8′ 2×4 for the top.
You’ll assemble just like you did the back frame.

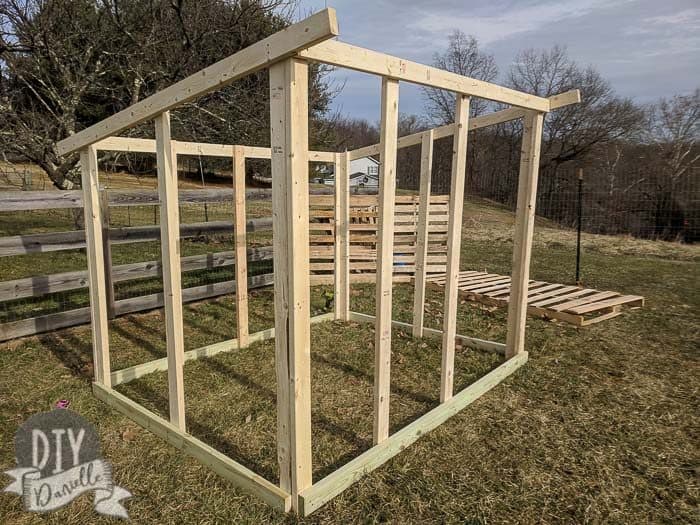
Putting the Frames Together
Make sure you move your pieces to where you want to setup the goat house. The area needs to be level. I was told that I would want to make sure that my goat house door was faced away from the typical direction of the wind. You don’t want the wind battering the door. Of course that makes complete sense, but I might not have considered it.
You’ll need two people for this job.. which is why I didn’t get any video here. We had a very short window to do this part because when our 1 year old is awake, nothing gets done.
You mostly just Lego the pieces together here… see how the back is over the 2×4 for the sides? You screw into the back into the 2×4 for the sides using 3″ screws.
Once the back is attached, you can attach the front.
Note that the pressure treated wood is on the OUTSIDE. This allows you to place the siding on top. I didn’t want the siding against the ground (particularly as I didn’t paint it before putting it on).
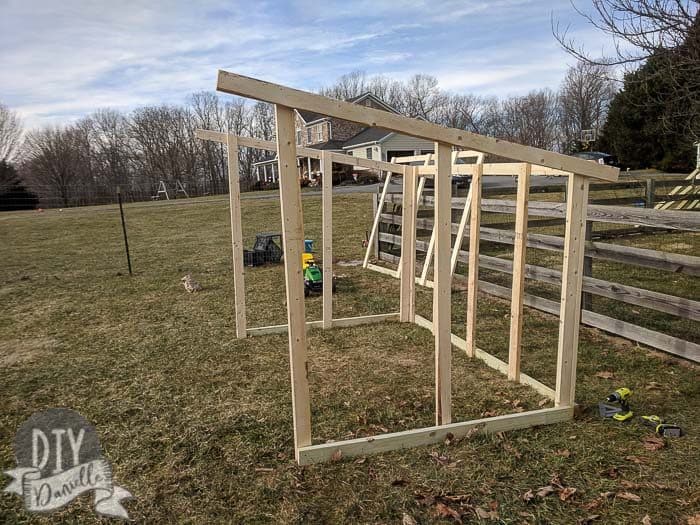
Now we attached the front in the same way…
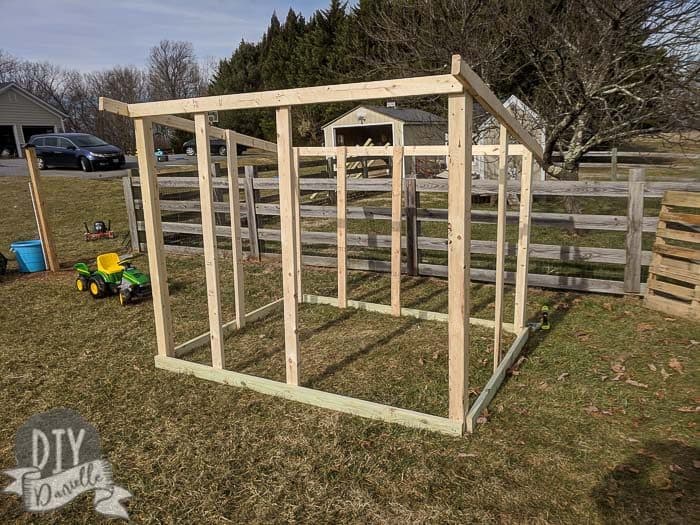
Additional Supports
As you can see here, I added additional supports at the corners along the top and bottom. This is a perfect use for shorter scraps of 2x4s if you have a bunch like I did. Each side of the braces was cut at 45 degrees using my miter saw.
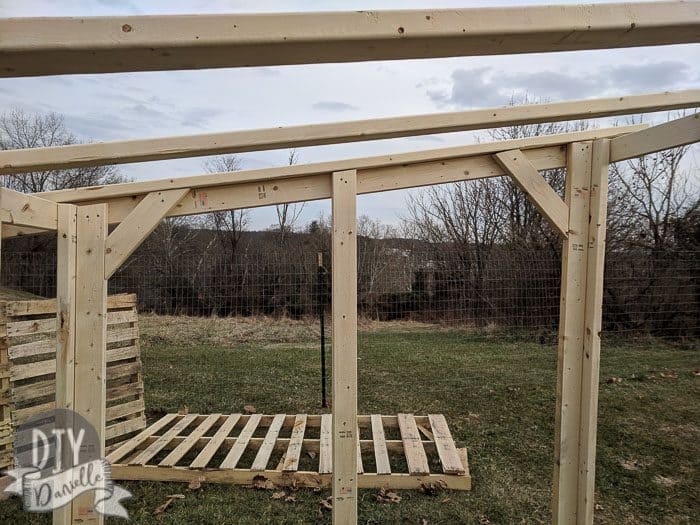
One screw goes from the inside of the 2×4 brace to the exterior 2×4. Then you use a longer screw to go into the 2×4 brace from the side… I hope that makes sense.
CLICK HERE TO READ THE NEXT POST IN THE SERIES
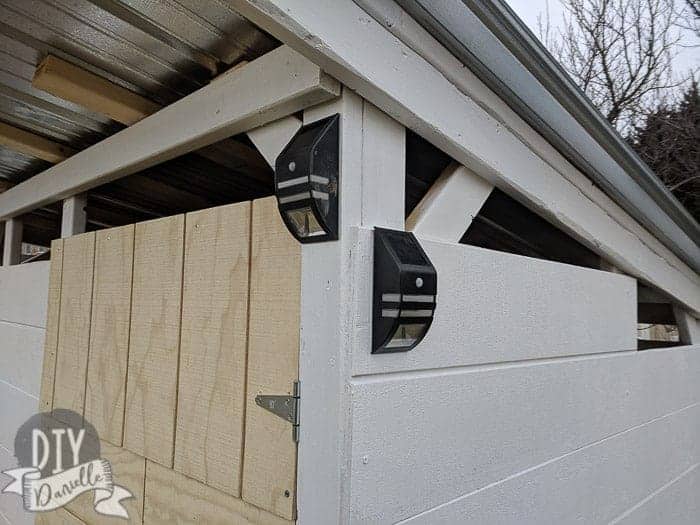
Building a Goat House: Siding and Roofing
Video Tutorial
Here’s a spoiler full video if you want to skip the other posts… but the posts have a bit more detailed information.
Please pin this!
How to Build a Goat House: Supplies & Framing
Materials
- (4) 6.5′ pieces and (1) 8′ piece for the top
- (5) 5.5′ pieces and (1) 8′ piece for the top
- (2) 8′ pieces for the roof piece plus 6 more 8′ pieces that you’ll cut down
- (2) 8′ for the front and back
- (2) 6′ for the sides
- Hinges and lock for the door
- (2) Lifespan Heavy T Hinge 4″
- Outswing Gate Latch Zinc
- For the siding, (5) 5/8″ T1-11 siding
- #10 3″ Exterior Wood Screws (2 lbs)
- 10′ Everlast II 29GA GAL Roofing (5)
- Screws for the roofing
- Square edge
- Wood for the door
Instructions
- Lay out your 6′ pressure treated 2×4 for each side.
- Lay out three 8′ regular 2x4s.
- Mark the middle of the 6′ board and center your third 8′ board over that mark.
- Mark where 6.5′ is.
- On the opposite end, mark 5.5′.
- Place the 8′ 2×4 over your three boards.
- Line it up with the 6.5′ and 5.5′ marks.
- Draw a line to show the diagonal that you need to cut your (3) 2×4’s at.
- Mark all three boards.
- Use your miter saw to cut those boards at that angle.
- Lay the 2x4s back out under your 6′ pressure treated piece.
- Line them up in the same order.
- Use a square edge to make sure each piece is a 90 degrees.
- Use (2) 3″ screws per board to attach them to the pressured treated 2×4.
- Place the 8′ piece for the angled roof on top of the angled boards.
- Line up the edges flush with the angles on the cut boards.
- Screw in with 2 screws per board.
- The 8′ pressure treated board goes on the bottom.
- The 8′ 2×4 goes on top.
- Line up your 5.5′ 2x4s every 2′ on these at a 90 degree angle and screw them in.
- The front will be the 6.5′ side and needs a space for a door.
- Set aside (4) 6.5′ boards for the front.
- Assemble like you did the back frame.
- Screw the back into the 2×4 for the sides using 3″ screws.
- Attach the front. Add additional supports at the corners along the top and bottom.
- Add a screw from the inside of the 2×4 brace to the exterior 2×4.
- Use a longer screw to go into the 2×4 brace.
Google Web Story: How to Make a Run-In Goat House Shed, Framing
Thank you for showing this! Helped me wrap my mind around how to get started. Really happy with how ours turned out 🙂