
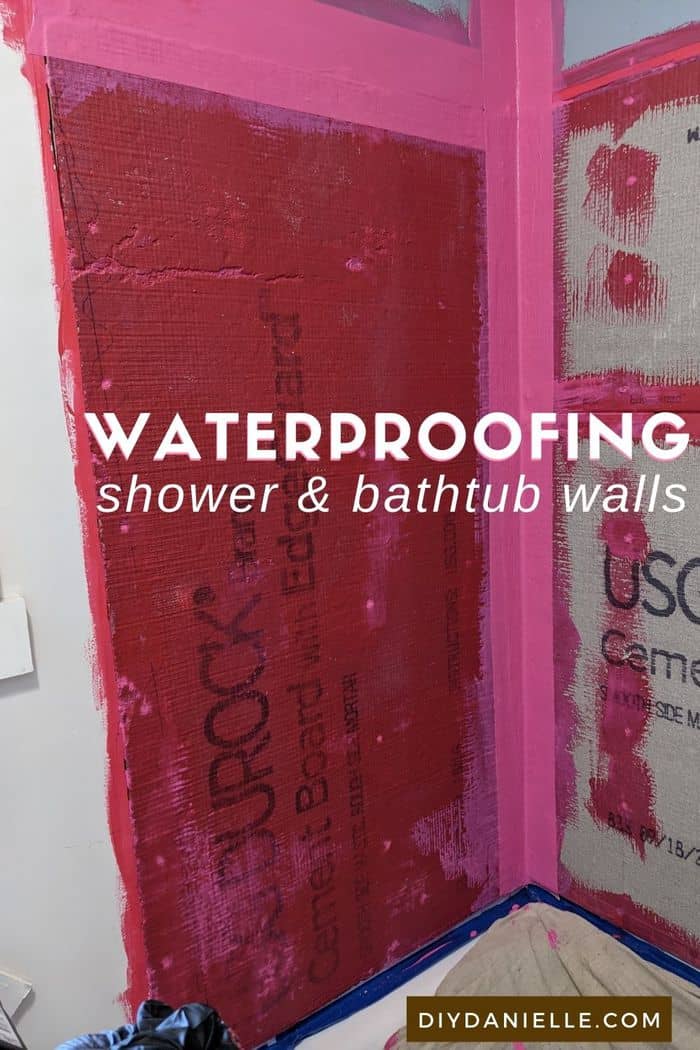

How to waterproof bathtub and shower walls with Redgard. This is one way to add waterproofing over cement backerboard.
This post may contain affiliate links which may earn me commissions should you click through them and take certain actions. As an affiliate for Amazon, Cricut, xTool, Home Depot, and other sites, I earn from qualifying purchases. Please DIY carefully. View my full legal disclosures here.
The majority of my content is generated by me, as are 99% of the photos and videos, but I utilize technology for titles, descriptions, video editing out all of my ums, and occasionally for text overlay on images.
Please read the whole post so you don’t miss any important information!
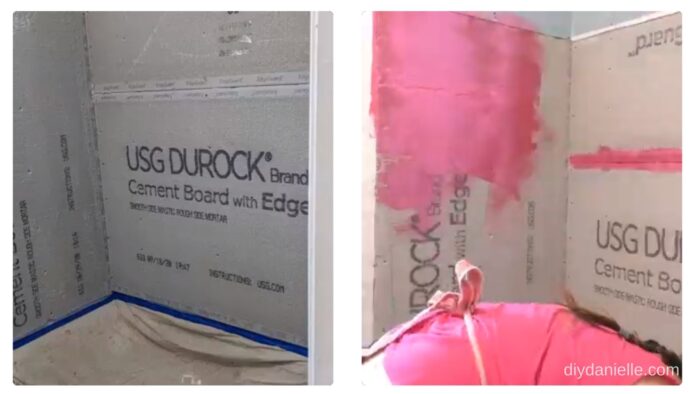
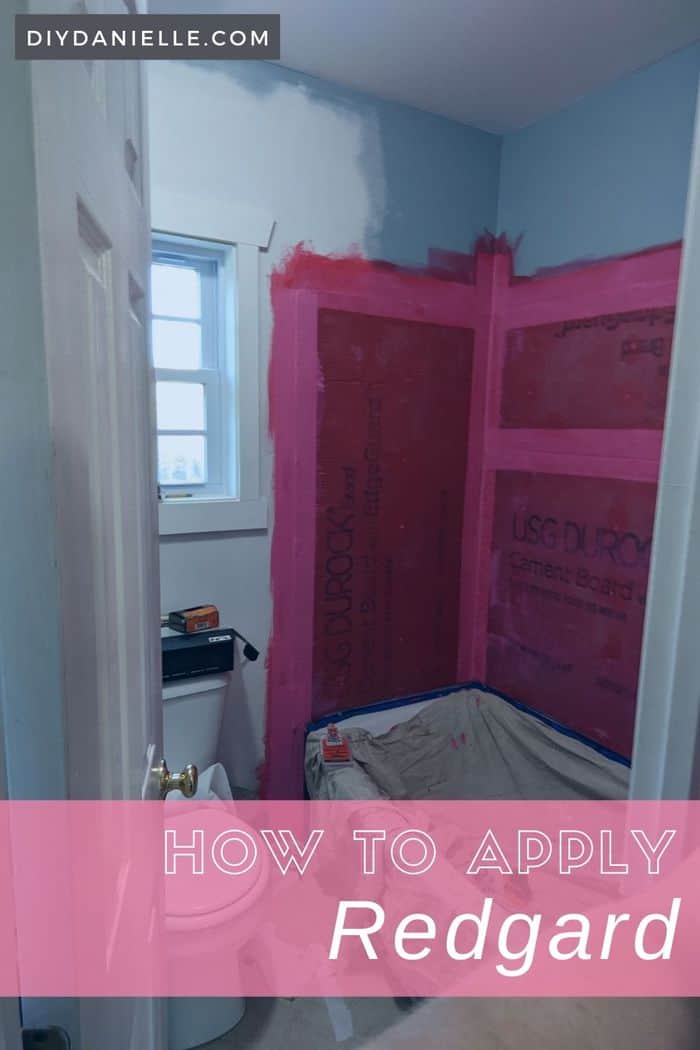
This year we decided to update our sons’ bathroom. It was outdated and we wanted a more practical space for them to use. While we often DIY projects, we hired part of the job out; a contractor installed a window in the bathroom, removed the old tub, and installed the new tub. He also added Durock Cement Board for the walls. You should never use normal drywall for wet environments.; drywall disintegrates when water hits it.
While he took care of this portion of the project, we needed to waterproof the shower walls after he was finished.
Durock is meant for use in wet environments, but it’s not truly waterproof by itself. You need to add a membrane over the Durock, and add a mesh barrier on seams where the sheets of Durock meet each other or the drywall above.
This is not difficult to apply, but you need to make sure you do a good job or you may run into issues with water seeping through to insulation and long term problems with mold.
For safety, make sure to wear nitrile gloves, a respirator, and eye protection during application.
Tips for Using Redgard
This is not a substitute for reading the label on your product. Please pay attention to the labels on all products you use to avoid expensive mistakes or mistakes that are hazardous to your health.
- Temperature of the Room: The temperature of the area you’re waterproofing must be 40 degrees Fahrenheit or great for 72 hours following application.
- Apply Product To: Redguard can be applied to concrete slabs, concrete blocks, backer boards, gypsum drywall, plywood and exterior decks.
- Safety: Wear chemical resistant gloves, a respirator, and eye protection when applying this product.
- Surface Prep: Make sure the surface that you’re applying the Redgard to is smooth, level, clean, and that all defects are repaired.
- Applying the Product: Redgard can be applied with the flat side of a trowel, a roller, or a brush. I have also seen people use a sprayer for it, but I would not suggest this due to the involved cleanup. I found a paintbrush to be the easiest way to apply the product smoothly.
- Drying Time: The product cures within one to one and a half hours dependent on the conditions inside the room. Cold, heat, or humidity can impact the drying time so it could take up to 12 hours to dry. You can tell when Redgard is dry because it turns from pink to red.
- How Much Redgard to Use: For use as a waterproof membrane, you need one gallon of Redgard per 55 ft² of space. I used a 1 gal container for our bathtub surround.
- How Many Coats of Redgard? You need a minimum of two coats for waterproofing, and the second coat should be painted on at a right angle to the first coat. Total thickness of your Redgard should be under 125 mils
How to Waterproof Shower Walls Using Redgard
Supplies:
- Redgard
- Paint Brush
- Roller
- Drop Cloth
- 6″ waterproofing membrane fabric
- Paint Roller Frame
- Disposable Gloves
- Painters Tape
- Respirator
Video:
Tutorial:
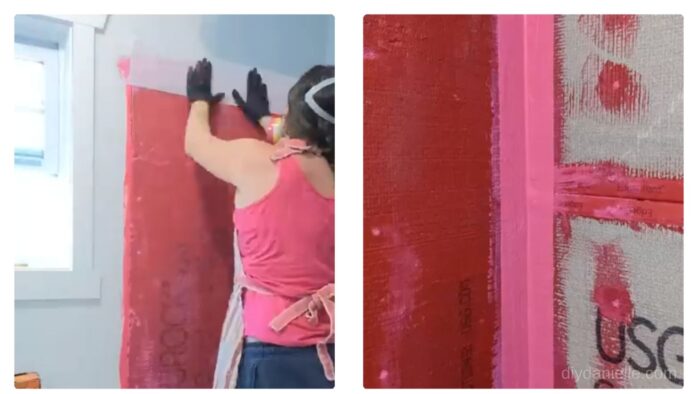
1. Apply painters tape to protect your tub and fixtures. You should tape plastic or lay a drop cloth to protect the whole tub.
2. Apply Redgard to your cement board: I started by adding it along any seams, then I moved on to do the whole area. When it’s pink, it’s still wet. When it’s red, it’s dry (or getting there).
You can use a roller to apply it, but it was quite thick so it’s more difficult to roll on to the appropriate thickness than normal paint. I tried it, then switched to a paint brush for the first layer because it was less painful to roll on. I did use the roller for the second layer, however.
3. Add 6″ waterproofing membrane fabric along seams.
To apply this, you need to paint the seams with Redgard, then lay the membrane over it. Make sure the membrane completely covers all seams.
4. Apply Redgard over the tape. Let dry for 1.5-2 hrs or until it turns red.
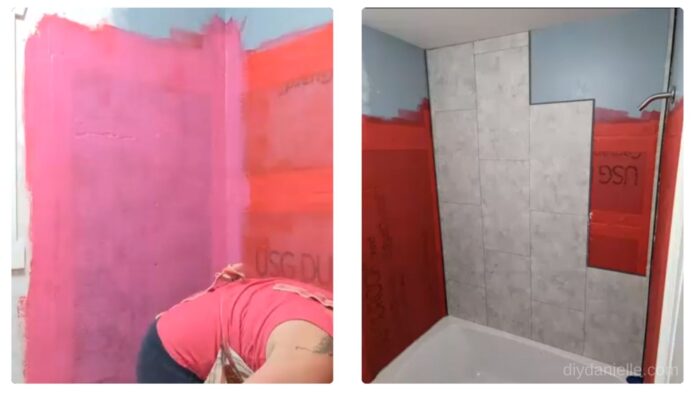
5. Apply a second coat of Redgard to the cement boards and seams. Let dry.
6. Apply your tiles or other wall coverings within 72 hours, or protect the dry Redgard.
Redgard Cleanup
- Use a drop cloth over your tub or shower pan before using the Redgard. This makes for easier cleanup!
- Use disposable products to apply the Redgard. I’m very careful about what I wash down my drain (we’re on septic) so I usually dispose of paint brushes and rollers for products like this.
- Redgard should be cleaned up being it dries. It is much easier to remove from tools, hands, and your bathroom before it dries into a solid coat. I like to use a wet paper towel so I can toss the
- Once dry, thicker layers of Redgard should peel off smooth surfaces such as tile or the tub. It helps if you can use something to scrape it off, but be careful not to scratch your tub or tiles.
If you’re having a hard time removing it this way, try to use a hair dryer to heat it up; sometimes heat can help remove items like stickers and decals. I haven’t tried it on Redgard because fortunately I didn’t spill any, but it’s a last ditch idea if nothing else works for you!
After installing the Redgard, we applied a product called Dumawall Shower Tiles. These waterproof tiles as an easy to DIY alternative to using normal tiles. Keep an eye out for my other projects and tutorials in this bathroom.
For another bathroom in our house we used Palisade Wall Planks and those are also really pretty if you want to check them out as an alternative to the Dumawall Tiles.
Interested in other bathroom projects? Here are some ideas from this renovation project and others!
- Installing Palisades Shower Tiles
- Installing DumaWall Shower Tiles
- How to Install Laminate Flooring
- How to Use Caulk
- 17 DIY Bathroom Vanity Ideas
- 20 DIY Bathroom Decor Ideas
- 17 Small Bathroom Makeovers
- Small Condo Bathroom Renovation Project
- How to Waterproof Shower or Bath Walls
- Behind the Door Bathroom Shelving
- How to Install the Ovation Bathtub Door
- How to Install Dreamline French Corner Shower Doors (these are stunning)
- How to Install a Pull Out Shelf in a Bathroom (without drilling into your cabinet!)
- Full Basement Bathroom Renovation Project REVEAL!
- Kids Bathroom Renovation Project REVEAL!
Please share and pin this post! You can also post your project and tag the DIYDanielle team on Instagram @doityourselfdanielle!

How to Apply Redgard
Learn step by step how to apply Redgard. Please see full post for the details of this project.
Materials
- Redgard
- Paint Brush
- Roller
- Drop Cloth
- 6" waterproofing membrane fabric
- Paint Roller Frame
- Gloves
- Painters Tape
- Respirator
Instructions
- Apply painters tape to protect your tub and fixtures.
- Apply Redgard with a roller or paint brush.
- Add 6" waterproofing membrane fabric along seams.
- Apply Redgard over the tape. Let dry for 1.5-2 hrs or until it turns red.
- Apply a second coat of Redgard. Let dry.
- Apply your tiles or other wall coverings within 72 hours or protect the dry Redgard.