
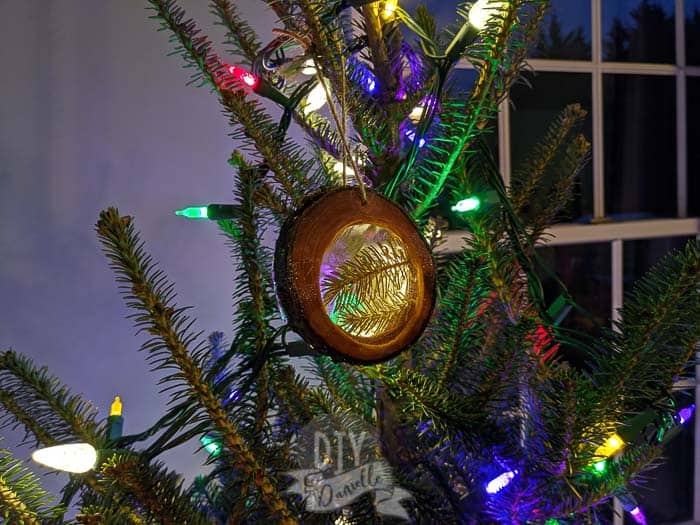
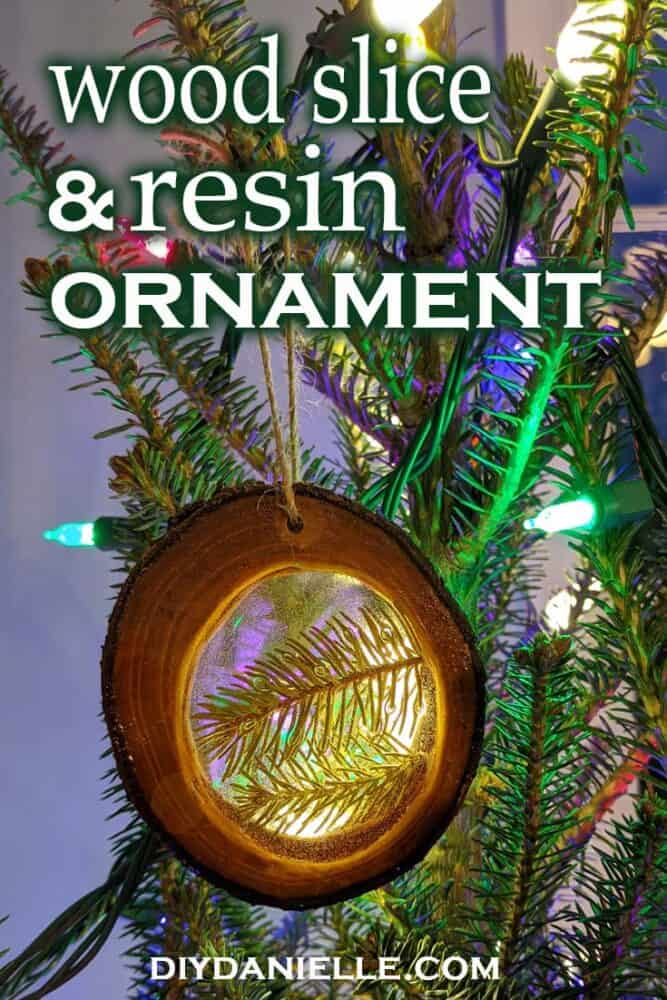
How to make your own wood slice ornament with the bottom cut off your Christmas tree! Remove that bottom slice before bringing your tree inside to water.
This post may contain affiliate links which may earn me commissions should you click through them and take certain actions. As an affiliate for Amazon, Cricut, xTool, Home Depot, and other sites, I earn from qualifying purchases. Please DIY carefully. View my full legal disclosures here.
The majority of my content is generated by me, as are 99% of the photos and videos, but I utilize technology for titles, descriptions, video editing out all of my ums, and occasionally for text overlay on images.
Please read the whole post so you don’t miss any important information!
This project was the MOST EXCITING project that I thought up for the Deck the Home Challenge. I was SO happy to start this- I started it a couple months ago. But it steadily went downhill from there…
First of all, this was SUPPOSED to be my 2 hour project. I had to use my ornament project, a wedding dress ornament, for the 2 hour project when it became clear that this wasn’t going to be finished in time.
And sure, it might take two hours of work time IF you had a tutorial to learn from or IF you had a better plan. It took me weeks, I developed golfer’s elbow from trying to make the hole in the middle of the wood slice, and there’s a graveyard of wood slices on the floor in my garage. I should probably pick those up.
BUT I DID IT! I think I’m going to keep plugging away at it until I perfect my skills, but I’ll share what I’ve done so far! Hopefully you can recreate this without as many problems.
This is a great way to save a piece of your tree each year as a memento!
Why Cut Off the Bottom of Your Christmas Tree?
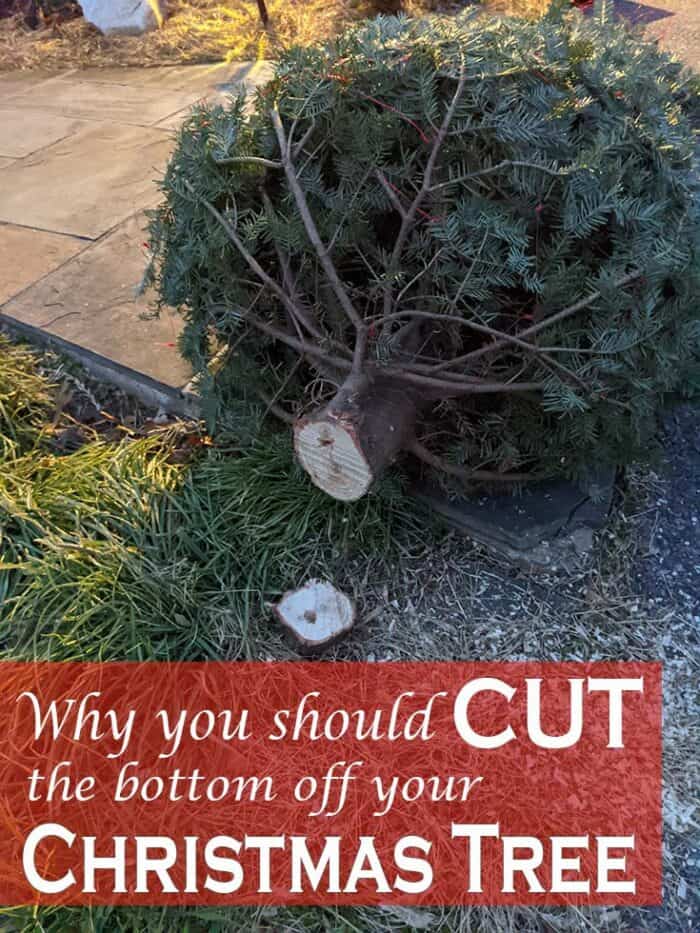
It’s important to cut off the bottom of your Christmas tree… you want to take 1/2″ or more off to open up the pores and allow the tree to absorb the water into its trunk. Any tree cut and left out more than 3-6 hours needs this done.
With so many people getting their trees early and the fire risks of live trees, it’s important to make sure our trees are watered properly so they don’t dry out!
If your local tree place takes off the bottom for you, ask if you can take the slice home (or collect a bunch of them!). If you cut your tree down yourself, you can take a few slices from the tree when you dispose of it after Christmas.
Best Way to Cut Wood Slices
The best way to cut off the end is by using a chainsaw, but I also managed to use a circular saw (somewhat dangerously) to take a few cuts off a log too. And a jig saw. And pretty much every tool in my arsenal.
To get a lot of slices, wait until the tree is ready to be disposed of, cut off the trunk below the lowest branches with a chainsaw (or remove branches then you have more trunk to work with), then use a miter saw to cut your slices.
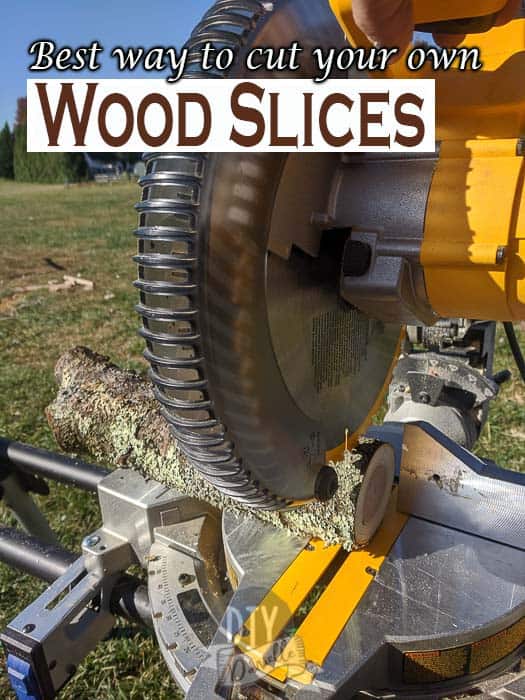
The width of your slice will be dependent on how much you want to fit inside it. You need it to be wide enough to hold a piece of the Christmas tree branch, but not so wide that it weighs down your tree.
I found that I was able to cut the needles on the back of my tree branch off to make it thinner for putting inside the wood slice. If you want a really thin wood slice, consider preserving only the needles.
Preparing Your Wood Slices
Preventing Cracking and Splitting
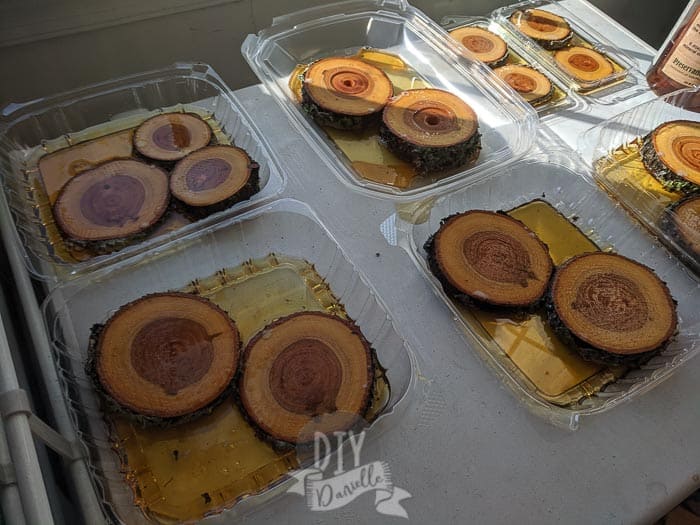
This project takes time. You need to prevent your wood from cracking and splitting. If you let the slices dry out too fast, particularly without stabilizer, they will split and crack. It will get worse when you go to cut the center hole. This is how I got my garage wood slice graveyard.
To avoid this, soak your newly cut wood slices in wood stabilizer per the instructions on your container. Here’s a detailed tutorial on what wood stabilizer is and how to use it.
I used a stabilizer called Pentacryl that I purchased on Amazon because I couldn’t find it at the store.
The wood slices sit in the solution for around 24 hours, then you leave them to dry for weeks (I can’t remember how many, but it’s a good period of time).
Cutting the Center Hole
This gave me some serious gray hairs AND golfer’s elbow.
Part of the problem was that I used limbs from the peach tree that we cut down this summer. I needed to finish this project BEFORE I had access to a Christmas tree slice (I wouldn’t have finished in time otherwise).
HEY! Guess what Danielle learned? Peach trees are a hardwood.
What is a hardwood? Hardwoods are generally the trees that lose their leaves every fall. Evergreens are soft woods. Because the hardwood trees grow more slowly, they are more dense.
I’m still not clear on whether hardwood is, actually, harder to cut than soft wood (Google wasn’t helpful)… but I’m going to take some context clues from the name, along with my own experience, and state that peach tree wood was definitely harder to cut than the wood slice from my Christmas tree.
The Christmas tree slice was slightly easier. Slightly.
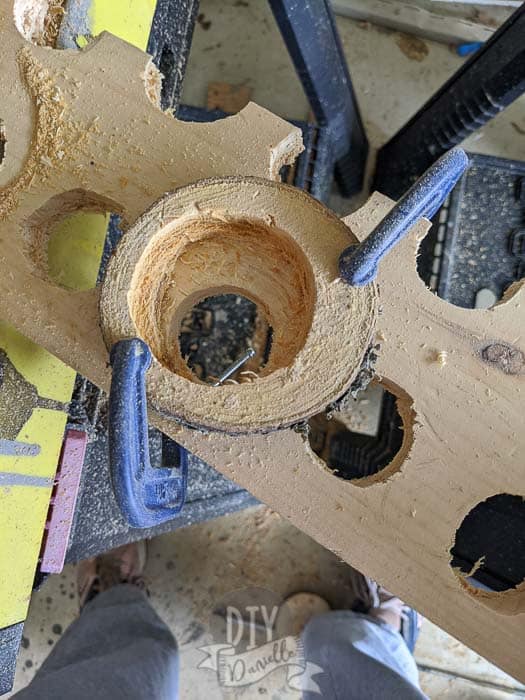
You need to cut a circular hole through the center of your wood slice. Cutting the slices was easy- getting a perfect circle in the middle was ridiculous.
I tried SEVERAL options…
Method 1: Spade bit
Attempt #1… worked okay, but so slow. It also creates a hole in the bottom of your slice so you are committed to going all the way through.
Method 2: Router
This might have worked, but I couldn’t find a way to clamp it down without the clamps blocking the router from moving freely.
Method 3: Forstner bit
Worked-ish. Slow. But I bought brand new bits in hopes they’d be faster than the spade bit and hole saw that I tried.
Theoretically you could use the forstner bit to create the hole without going all of the way through, but we’re working with such a thin slice that it doesn’t seem realistic.
Method 4: Jig Saw
Started to try this, thought I might like all of my fingers and toes right where they are and put it away.
I’m pretty comfortable using this tool normally, but yikes. No. The slice just felt too small for this tool. I bet it would work well for LARGE slices from tree trunks.
Method 5: Hole Saw
I think this was my top choice for going all the way through. It seemed to be the better option. Still a bit slow. Naturally it was the very last tool I tried…
I clamped the wood slice down to scrap wood using baby clamps. These things were a LIFE SAVER (probably literally).
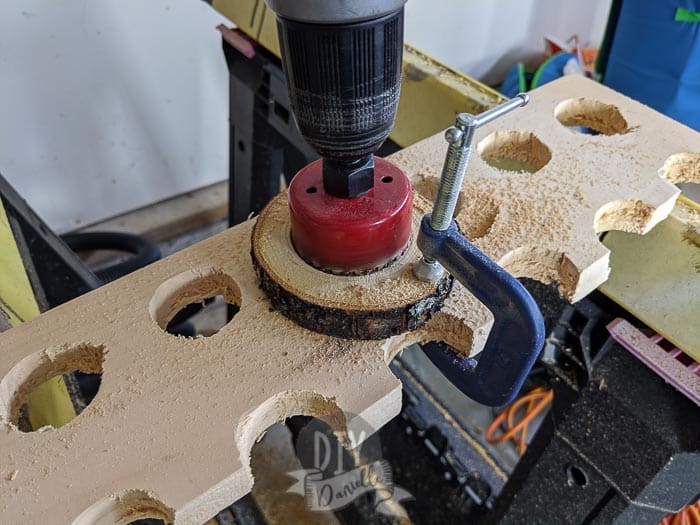
This job just sucked. My elbow is killing me from drilling down… but I had to apply a decent amount of pressure so the drill didn’t move and throw off my cut.
My friend Scottie from Saved By Scottie recommended that I use a drill press for future attempts. It’s on the wish list. I nearly bought one specifically to finish this ornament, but the store was sold out.
Make sure you get a vise or some decent clamps and take safety precautions for this… pretttttty sure I almost took full advantage of our 2019 health insurance benefits. I would go out to my garage to do this, mess up and nearly injure myself, put it away like, “Nope, not today Satan…” and go back in.
Also… you may notice smoke coming up from your wood. That’s a good indication that you should stop and wait a few minutes for your wood/bit to cool down. Gosh this was a fun project.
Setting Your Tree Needles in Resin
Don’t worry, the fun doesn’t stop at cutting the center of your wood slice! There’s more!
Actually to be honest, the resin wasn’t too bad. I did some experimenting a bit as this was my first time using resin… so needless to say it wasn’t fantastic.
You’ll need resin, a heat gun to pop the bubbles, and something to keep the resin from spilling out the back. The spilling issue was my biggest challenge- painters tape doesn’t work. Duct tape DOES work a bit, but make sure to cover the whole back. Any gaps will give the resin an area to leak out.
I spoke with Adam from Lazy Guy DIY about my project as he does a lot of resin projects. He recommended a 2:1 epoxy with medium hardener and aluminum foil tape like they use on ducts to keep the epoxy from leaking out. I bought the epoxy he suggested (I was using the more expensive kind used for jewelry), but I haven’t grabbed the tape yet to try. Next time.
Prepping your wood slice for resin
Start by doing any sanding that you want to do. Wipe down your wood slice. Add tape to the back of the slice, covering completely. Place your slice(s) inside something that you don’t mind getting resin on in case it leaks out.
The resin leaked every. single. attempt. for me. Fortunately, usually some stayed inside so I let the resin cure, then poured the rest.
The main issue with leaking is that it will stick to whatever it leaked under onto. I used plastic under mine at one point which was a bad idea- the heat gun melted it and when the resin leaked, it permanently adhered to the ornament. This project was the worst. Haha. I made every single mistake so learn from me!
I’m hoping the foil tape will do the trick next time!
Mixing and Adding Resin
Follow the directions for your resin/epoxy. You need to make exact measurements and mix it thoroughly before pouring it into your slice.
Make sure to wear a mask and do this outdoors. Yes, both. I have asthma so I’m sensitive to smells, but it seems like a good idea to be cautious. Masks are sexy, hacking coughs are not.
Once you have the resin poured in there, you can stick your pine needles/branch in. It has to be a pretty small piece and you can slim it down a bit by cutting the needles off the back of it. Use a toothpick to push it to the bottom of the slice. You may want to consider drying your branch first using these instructions.
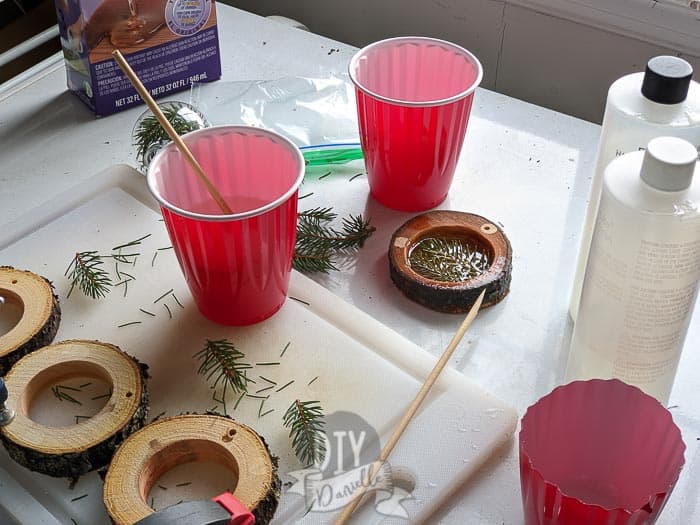
I was only able to get enough resin to cover it part way for first pour. Make sure to use your heat gun to pop the bubbles. The one thing I struggled with was not burning the greenery with the heat gun.
I let it dry, then poured a second layer the next day. Repeat process with heat gun to pop the bubbles.
To finish, I used a drill bit to create a hole in the top of the ornament, then added some twine for hanging it on the tree.
Fun Facts about Resin Learned
- It heats up so you need to make sure it doesn’t burn the item inside. This is a common issue for flowers and people dry the flowers in advance. Flattened dry flowers are best.
- Keep an eye on it so that if it leaks, you can clean it up quickly. It’s a lot easier to clean up wet than dry.
- Silicone molds make resin projects much, much easier.
Ideas for Your Ornament
I did not get to play with all of the ideas for this ornament that I had, but I wanted to share some easy ideas for you!
Initially I wanted to try a few different styles and ideas, but alas… time.
- If you use a wood burner or a Cricut, try adding the year or details of your year to the back or front of the wood on the ornament.
- Use epoxy dye to color the bottom layer of epoxy.
- Try adding dried flowers! I’ve seen these projects and they’re sooooo pretty. I want to try this next.
- If you have a big tree, you could make a coaster each year instead of an ornament.
If you decide you don’t want to spend $90 in craft supplies to make a project you could buy for $50, check out these amazing resin products that you can buy on Etsy: Wood Slice with Wild Flowers | Wildflower on Wood Pendant | Wood Slice Ornaments with Mushrooms and Wild Flowers
I think the end result was quite pretty, but it wasn’t everything I was hoping… and don’t ask me how many slices are in the graveyard in various stages of completion! I’m going to keep trying because I’m stubborn AF.
Here are some more wood Christmas ornament ideas.
Learn how to dry and wet felt soap using my DIY Kits including: DIY Christmas Tree Felted Soap | DIY Sus’ Felted Soap | DIY Video Game Controller Soap
Please share and pin this post! You can also post your project and tag the DIYDanielle team on Instagram @doityourselfdanielle!


I’m assuming that you can grab trees being trashed after Christmas for this project?
Don’t see why not!
I love the resin to help preserve the slice. Also your tips about cutting the bottom of your tree are awesome! Thanks Danielle.
Oh, Hunny, this looks like waaay too much work for me!
I think I’ll do a slice, drill a hole to hang with ribbon and Sharpie the year on it! Voila! Done! (But totally good for YOU; you’re more patient and creative than I!)
LOL! That’s probably a good idea! Bahaha… I’m sure if someone didn’t try 3 different tools before getting it right and knew how to work with resin it would come out better. I LOVE the dried flowers in resin so I’ll probably keep trying until I perfect it. 😉
Wow! You made doing this project sound SO FUN! Not! Thanks for sharing! Your final outcome is lovely!