How to make easy DIY plant markers with your Cricut Maker and some scrap wood. This is a great project to label plants in your garden!
I have a crazy garden. My gardens have strawberries, blueberry bushes, thyme, bee balm, and many other plants that are happily providing a rich environment for pollinators. While I love giving tours of my garden and pointing out each plant, I thought it’d be nice to make some simple garden markers to identify my plants. I love this idea in my front garden because I want to encourage others to incorporate herbs and other edible plants in their landscaping.
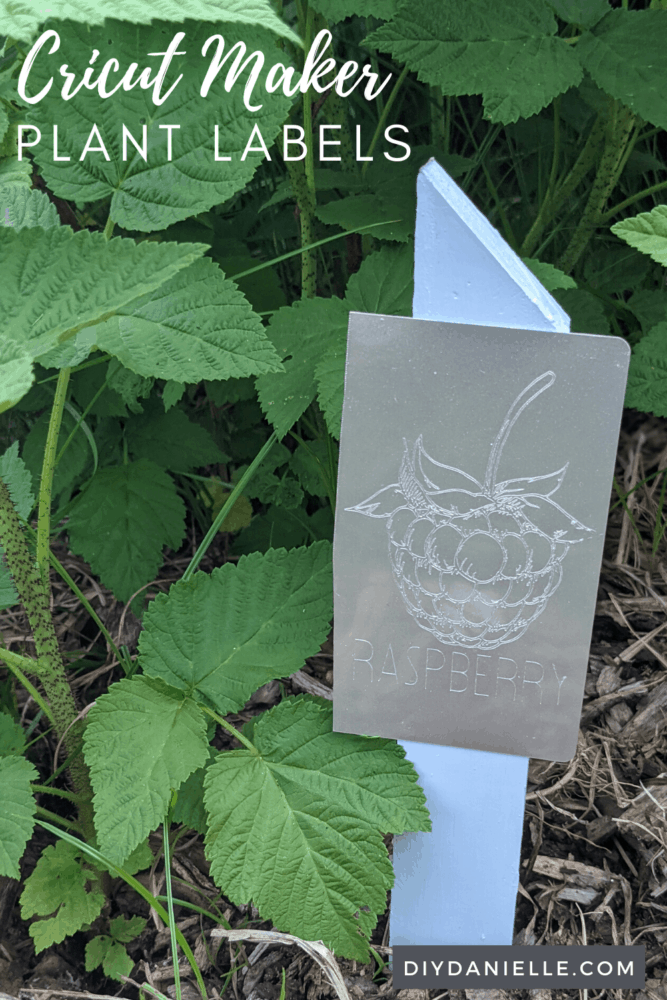
For this project, I wanted to create attractive plant markers that wouldn’t fade, fly away, or get lost when mulch was being spread. This project was completed with my Cricut Maker, an engraving tip, and Cricut Aluminum Sheets.
This post may contain affiliate links which may earn me commissions should you click through them and take certain actions. As an affiliate for Amazon, Cricut, xTool, Home Depot, and other sites, I earn from qualifying purchases. Please DIY carefully. View my full legal disclosures here.
The majority of my content is generated by me, as are 99% of the photos and videos, but I utilize technology for titles, descriptions, video editing out all of my ums, and occasionally for text overlay on images.
Please read the whole post so you don’t miss any important information!
Many thanks to Cricut for sponsoring this post. As a partner with Cricut, I receive free product and/or monetary compensation for sharing information about their products. As always, I will provide an honest review of products. This post contains affiliate links which may earn me commissions should you click through them and take certain actions. As an affiliate for Cricut, Amazon and other sites, I earn from qualifying purchases. Please DIY carefully. View my full legal disclosures here.
I love the versatility of the Cricut Maker. I can “cut” aluminum sheets, some types of wood, acrylic, fabric, vinyl, paper, and more. This one machine can do a lot of different jobs, saving me storage space; I store my machine on a rolling Cricut cart, then store all of my supplies on the shelves under it.
How to Make Garden Markers with the Cricut Maker
This is fairly simple. I like that the aluminum and wood are heavy enough that they won’t fly away in the wind. The Cricut does most of the hard work and this project is a great use for scrap wood.
Table of Contents
Tips for Using Aluminum Sheets with the Cricut
You Can Engrave or Use Infusible Ink
Aluminum sheets can be engraved or sublimated with Infusible Ink. Personally, I think the Infusible Ink design looks a bit flat on the aluminum sheets; I would rather save my infusible ink sheets for other projects. I love that the engraving tip gives the sheets depth.
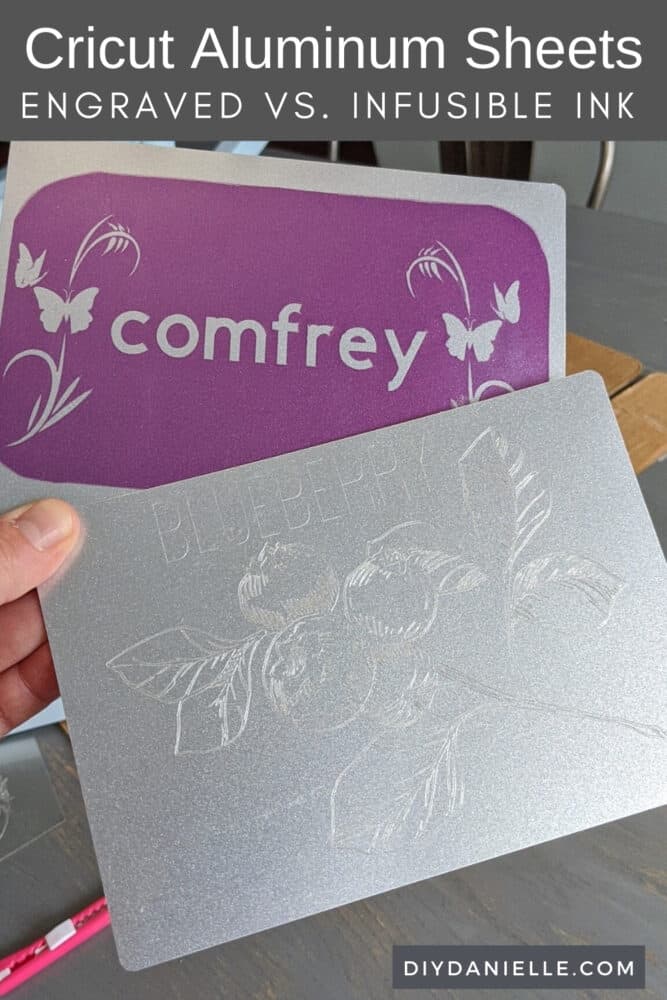
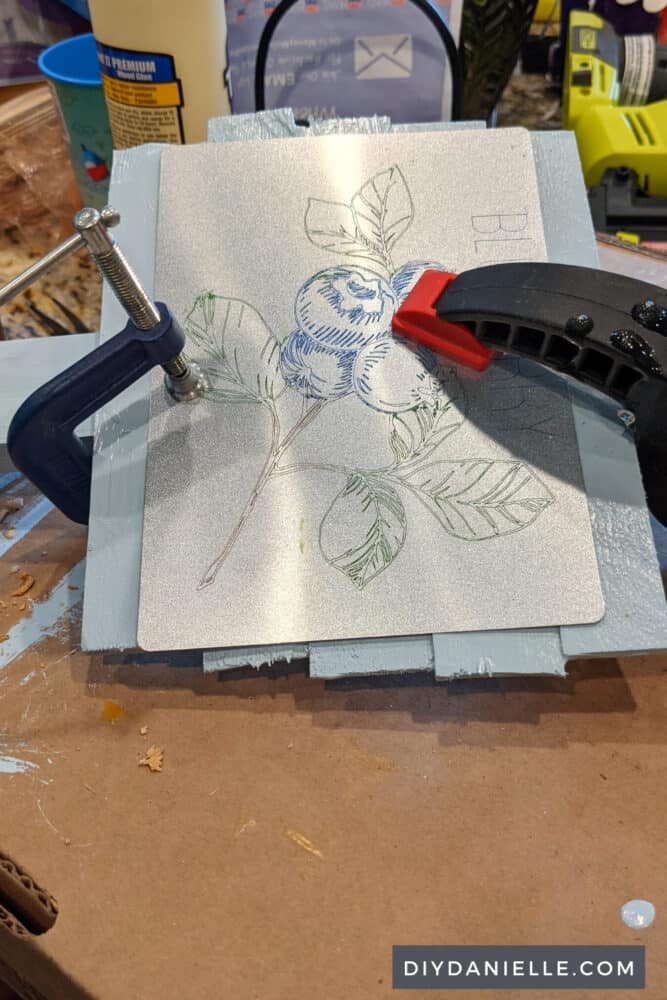
The tip is also able to do much more detailed images that you could manage with vinyl or infusible ink. The blueberry, strawberry, and tomato designs are so detailed and beautiful; I used some SVGs that I created on Canva. I had to do a LOT of cleaning up of the designs once I uploaded them to Design Space because the images were so detailed.
Use the Discount Code DIYDANIELLE on cricut.com for 10% off any cutting machine or heatpress (no minimum). Excludes: materials/accessories/mystery boxes/etc. Applies to US/CA only, code expires 12/31/23.
Aluminum Sheet Sizes
The aluminum sheets are sold in three different sizes:
- 4×4 Aluminum Sheets : https://cricut.pxf.io/15NEDD
- 8×8 Aluminum Sheets : https://cricut.pxf.io/Vy5ob6
- 5×7 Aluminum Sheets : https://cricut.pxf.io/GjNr0n
That said, you can cut the sheets down with tin snips if you want to add more than one design to each sheet. I recommend engraving cut lines when you engrave your design so you can follow those lines with your tin snips.
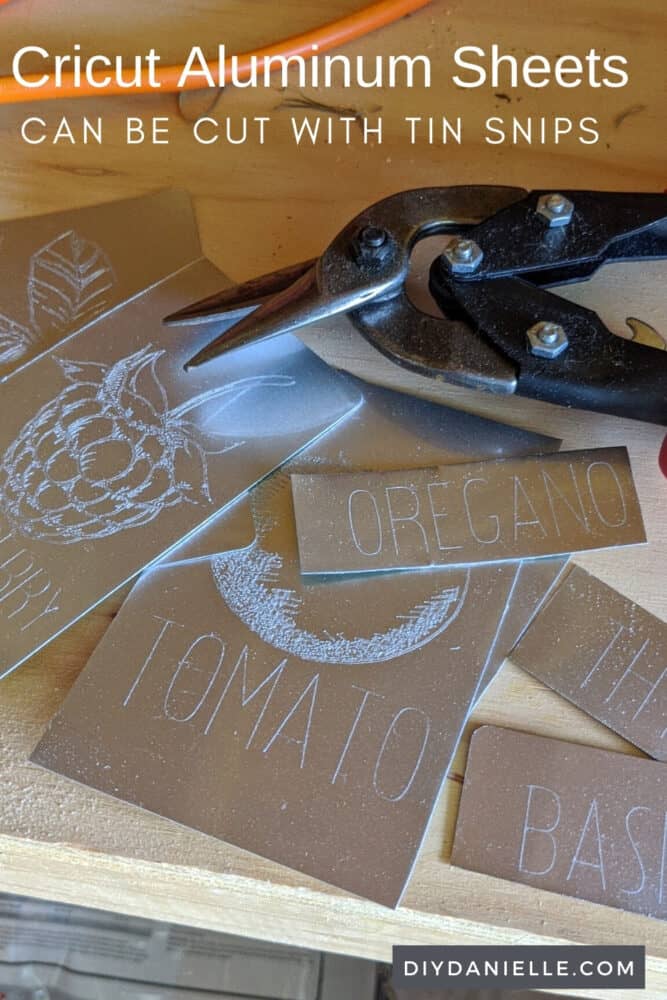
Make sure to sand any cut edges down as they’ll be sharp. The nice thing about using the whole panel is that you can skip that step. I’m hoping the eventually sell smaller panels because these aluminum plates would be fantastic for adding engraved metal to horse halters, bracelets, dog tags etc. The best sandpaper for aluminum is silicon carbide.
Helpful Tutorials about Engraving with the Cricut Maker
Make sure to check out my post on engraving metal with the Cricut Maker. I also have a blog post about engraving acrylic with the Cricut.
Products Used
- Cricut Maker: https://cricut.pxf.io/GjNaNm
- Cricut Strong Grip Mat: https://cricut.pxf.io/doz4R3
- Cricut Engraving Blade: https://cricut.pxf.io/MXLaQY
- 4×4 Aluminum Sheets : https://cricut.pxf.io/15NEDD
- 8×8 Aluminum Sheets : https://cricut.pxf.io/Vy5ob6
- 5×7 Aluminum Sheets : https://cricut.pxf.io/GjNr0n
- Scrap wood
- Outdoor paint/stain
- Adhesive
- Duct Tape
- Lint Roller (you could also just use your used duct tape)
- Clamps (for thin wood, large binder clips may work)
DIY Plant Markers with Cricut Maker
I did a little experimenting and made these three different ways with my Cricut:
- Plain Engraving
- Engraving with Paint
- Infusible Ink.
As I said earlier, I prefer the engraved look for these as it adds depth.
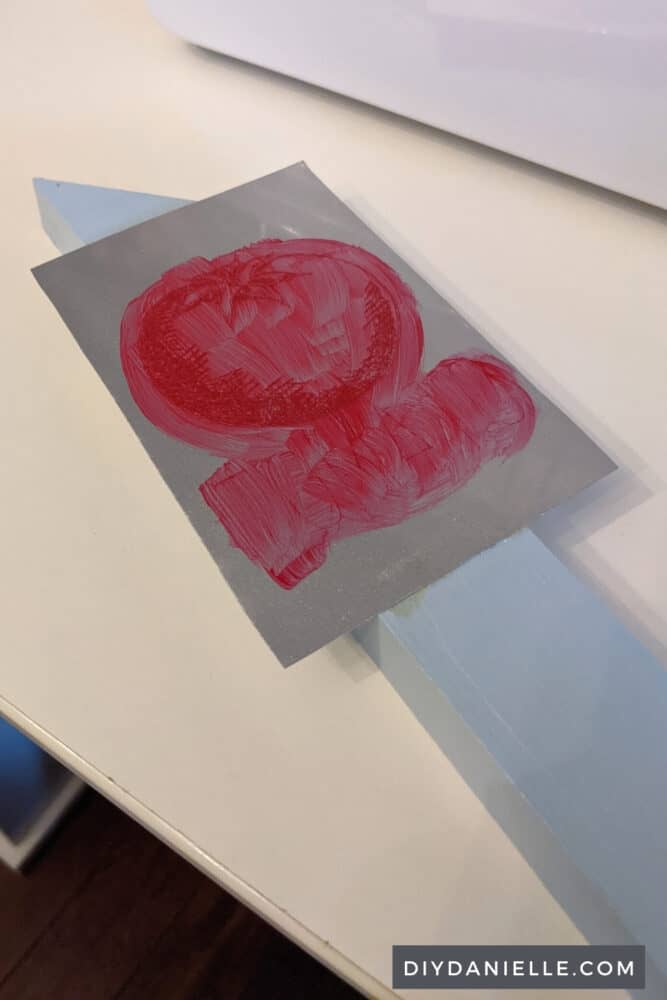
The paint is really beautiful too. After engraving, I used a paint brush to get paint into all of the engraved crevices. I used a dry cloth to wipe off the extra paint.
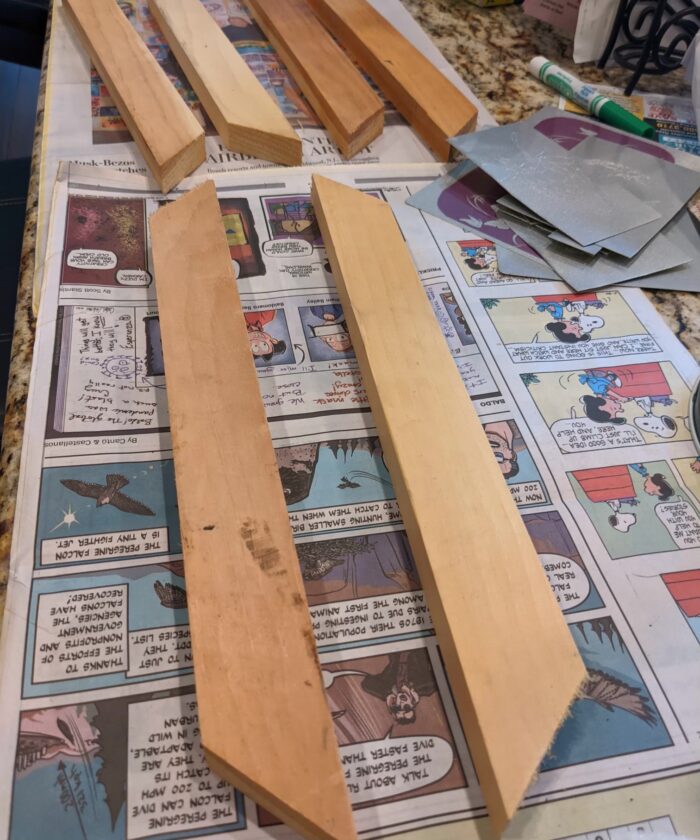
I also used a single wood stake for most of these, but then used some shims later to make a sign to back the larger aluminum sheets.
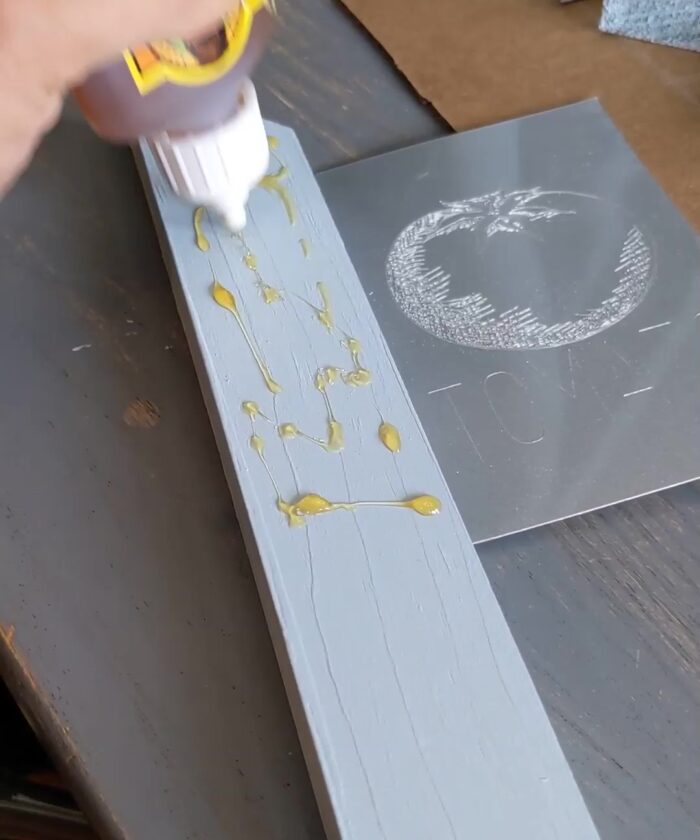
For the marker with shims, I used wood glue to attach the shims together. Wood glue is better for all wood projects. I used Gorilla Glue, a polyurethane adhesive, to attach the metal panels to the wood. I HIGHLY recommend using some face clamps for holding the panels to the wood until the glue dries. If you don’t have clamps, binder clips might work or you could sit something heavy on top of your panels to hold it down.
Tutorial to Make DIY Garden Markers


Step 1
Move the white rollers on your Cricut Maker all the way to the right. The rollers help vinyl on a mat roll through your machine easier, but can get in the way for thicker materials.
Step 2
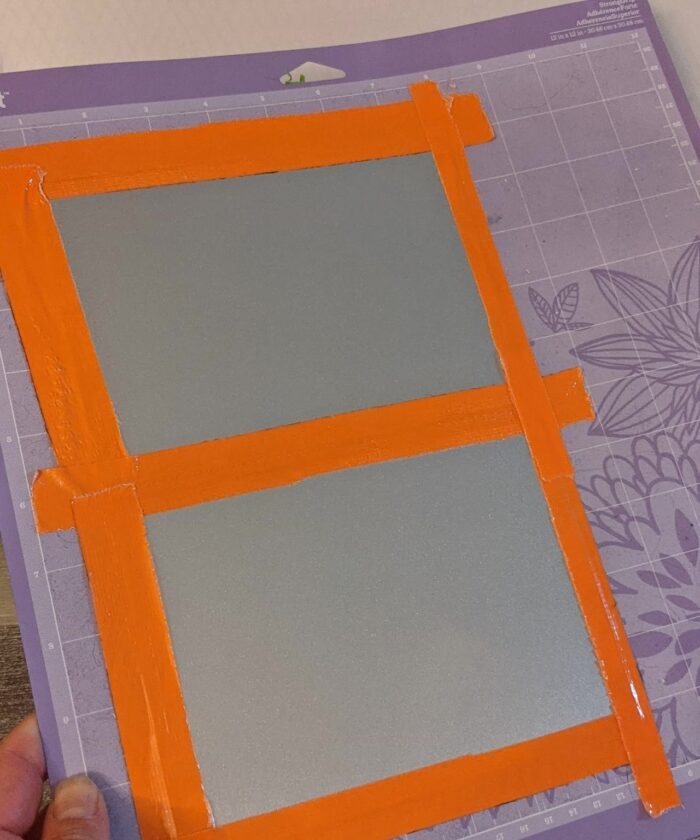
Attach your aluminum plates to your strong grip mat. Use duct tape around the edges to hold them in place.
Make sure that the duct tape is blocking as little of the aluminum plate as possible.
Step 3
Design your SVG. I have a great tutorial on how to create SVGs in a program called Canva if you’re interested, but DesignSpace works too!
Step 4
Once you finish, you can click to start cutting your project. You should pull up the mat and center your image in Design Space so it will cut on your panels. I usually keep my mat on my lap to make sure it’s correct.
Step 5
Cut with the Cricut Maker
Step 6
Use a lint roller to remove metal bits left behind in engraving process. Make sure to use the excess duct tape to clean up any bits and pieces that were left on your machine.
Step 7
Cut your aluminum sheet in half if needed for your design. If you do this, you’ll want to sand down any sharp edges. If the edges of your engraving are sharp, you can lightly sand over them as well. Mine weren’t sharp.
Step 8
Cut a “stake” for your wood panel. This will have ground contact so pressure treated wood is preferable.
Step 9
Stain or prime/paint wood if desired. This is important if you’re not using pressure treated wood.
Step 10
Attach aluminum sheet to your wood. I used Gorilla Glue for this.
Step 11
Insert in the ground! You’re done!
For one larger engraving, I put together some scrap wood (technically they are shims) and made a small frame with them.
If you prefer, you can use Infusible Ink Transfer Sheets instead of engraving with your Cricut Aluminum Sheets. You can also brush outdoor paint over your engraving. Wipe off with a dry cloth wipe and it’ll leave behind paint in the engraving.
OH! And if you don’t have a Cricut Maker yet to engrave with, check out my review of the Cricut Maker 3. The new machine cuts faster, wider, and longer designs. It also will cut Smart Materials without the mat! I wrote a post about how to use the Smart Sticker Cardstock which is AMAZING.
Here’s a video tutorial.
Please share and pin this post! You can also post your project and tag the DIYDanielle team on Instagram @doityourselfdanielle!