How to build a simple DIY laptop stand to use when working from the couch. This was a quick build from a woodworking plan found on the Ana White website. We added a small storage area for my blogging binder.
This post may contain affiliate links which may earn me commissions should you click through them and take certain actions. As an affiliate for Amazon, Cricut, xTool, Home Depot, and other sites, I earn from qualifying purchases. Please DIY carefully. View my full legal disclosures here.
Please read the whole post so you don’t miss any important information!
My husband built this for me as a Christmas gift and I LOVE it. I do recommend checking the height on it because you may need to make adjustments depending on the height of your couch (more on this later). The original tutorial from Ana White is for it to act as a rolling end table- which has a different height requirement than a laptop desk has.
He even took pictures of the process and wrote a blog post for me— which is half the gift! Haha.
Here’s his post!
DIY Laptop Stand on Wheels
My wife made it pretty obvious that she wanted me to build her a stand to use for her laptop while she was sitting on the sofa. The flimsy TV trays were just not cutting it and her laptop was in a constant state of alert pending the inevitable collision with child/dog. I would make her one, but I was hoping for it to not be too complicated since I am not the best at woodworking and I didn’t want to spend weeks on the project.
Found this rolling end table project from Ana White. It looked exactly like what I was looking for. This project would be simple and functional and the tutorial has all instructions well spelled out.
There is really no need to go into instructions since the tutorial from Ana White is very thorough. I followed every step exactly and it came out great.
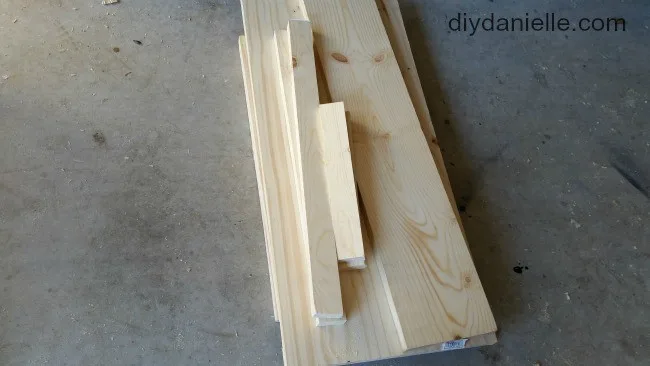
All the wood cut to specified lengths:

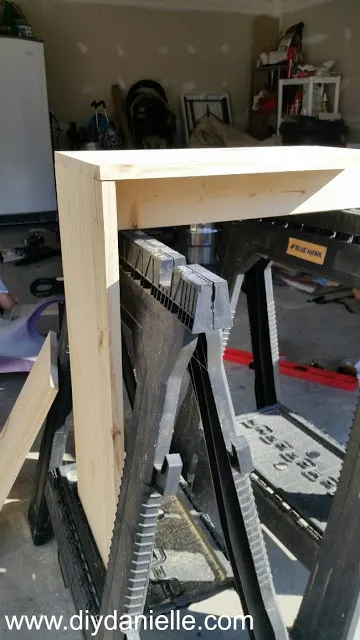
One thing I thought worth mentioning is at the start of the project I needed to find a good technique to attach two 1×12 boards at a corner at 90°. What I ended up doing was propping one board up on the saw horse and aligning the edges as seen in the image below. This enabled me to drill and screw the boards together using downward force.

So easy to do that I was able to mostly finish in a day while the wife was out of town and I had to take care of the two kids (note that I bribed them by buying them a kiddy tool box).
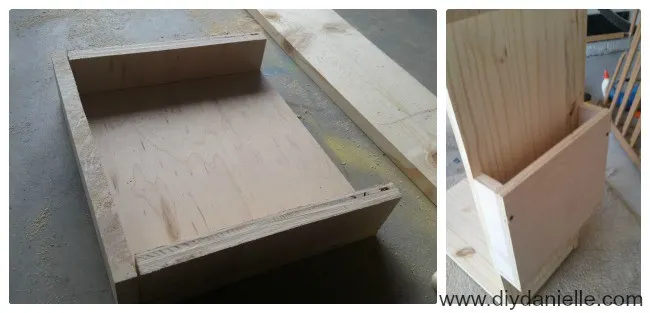
The only modification I made to the original design is to add a side compartment to hold books/paper or anything else that fits. I cut boards to match the width of the side and glued, screwed them together.
Then I screwed the compartment on to the side like so.

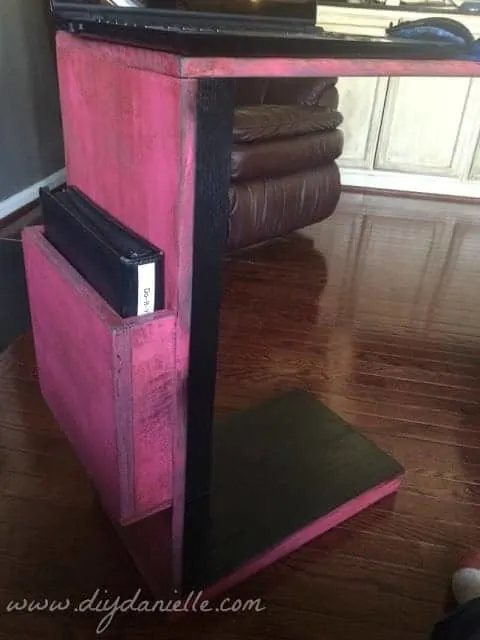
That’s the finished laptop stand.
Pro tip: paint the inside of the compartment before adding it on.
Adjusting the Size of the Desk
This was too tall for me to use comfortably on my couch (at typing height) so AFTER I’d already painted it my husband cut off about 4-5″ or so. He pulled off the base and took the approx. 5″ off the middle portion. It was a pain to saw at this point so it would be helpful to build this to the correct height to begin with.
To determine the correct height, you want to sit on your couch and see where your hands and wrists would be when at a 90 degree angle with your body. If you make it this height, it might not fit over the arm of your couch like this project was intended, but I LOVE it this way because I was very uncomfortable at the previous height for how much time I spend on this computer.
Finishing the Table
My husband said, “If I made you something for Christmas, do you want me to paint it or do you want to?” I wanted to. So over holiday break, I painted and distressed it. I have two boys so I don’t often get to make things girly so I opted for pink. I ended up distressing it with stain twice because I wasn’t happy with the initial try- the second try was darker which made me happy.
If you don’t know how to distress furniture, here’s my method here: Drab to Dreamy Lego Desk, Easy Distressing.
I spray painted a portion of the laptop stand black.
I HIGHLY recommend painting the inside of the box BEFORE you build this. I wasn’t able to do a good job on that, but I wasn’t too stressed about it because my blogging portfolio will be in there hiding my bad paint job.
Love furniture? Here are some other furniture projects we’ve done: Distressed Lego Desk | Easy Living Room Storage Cabinets | Built In Entertainment Center | Quick and Easy Drawer Stoppers | Gaming Table | DIY Rustic Outdoor Chairs
Please share and pin this post!


Kathe
Thursday 21st of January 2016
Cute & I love the color!
Elaina Newton
Tuesday 19th of January 2016
What a sweet and thoughtful gift! I love that both of you ended up working on it together. I really need something like this down the line since trying to use a laptop on a couch without a table of some sort puts a lot of stress on your neck & shoulders from staring down so much! Pinning this for later. :)
Charlene Morunga
Monday 18th of January 2016
What a great idea! It feels weird seeing a laptop stored on it's side but I really like the look of this :)
Ally | The Speckled Goat Blog
Monday 18th of January 2016
Cuuute! As soon as I have a couch again, I'm going to need one of these babies!! Love it.