
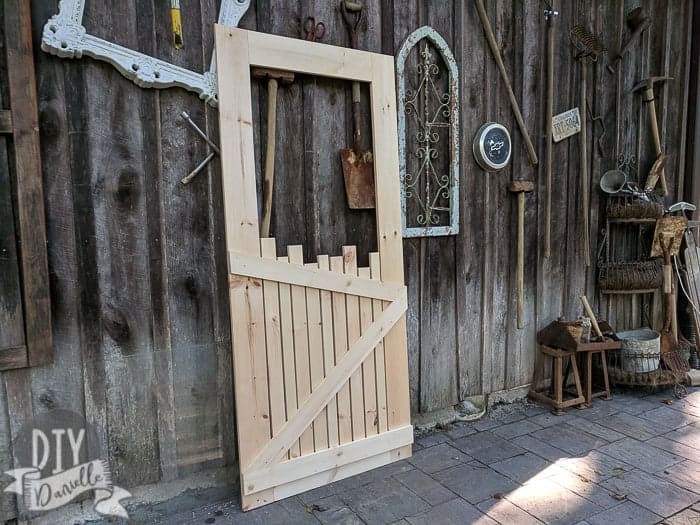
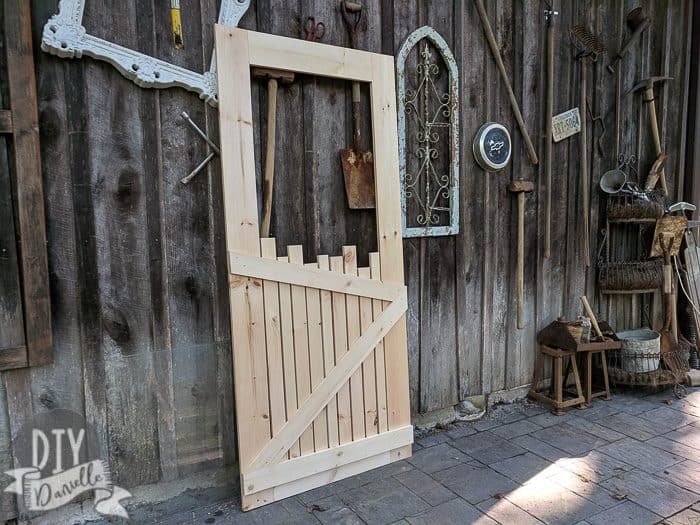
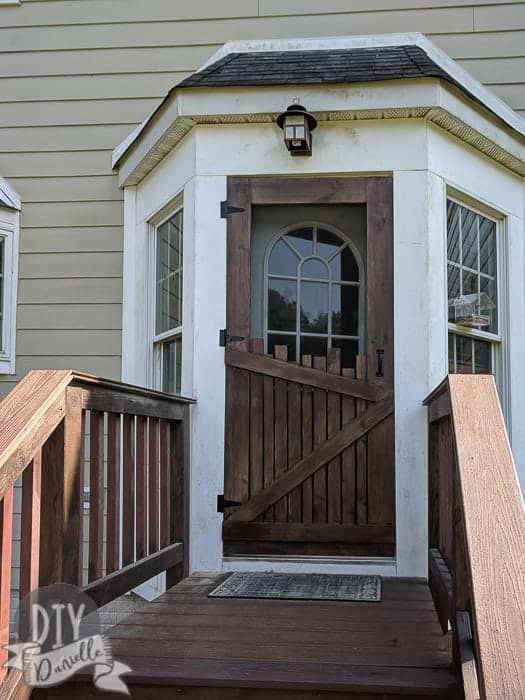
How to build a custom wood screen door that is heavy duty enough to withstand a dog and kids coming in and out of it all day. This is a 36×80 wood screen door.
This post may contain affiliate links which may earn me commissions should you click through them and take certain actions. As an affiliate for Amazon, Cricut, xTool, Home Depot, and other sites, I earn from qualifying purchases. Please DIY carefully. View my full legal disclosures here.
The majority of my content is generated by me, as are 99% of the photos and videos, but I utilize technology for titles, descriptions, video editing out all of my ums, and occasionally for text overlay on images.
Please read the whole post so you don’t miss any important information!
A while back, I saw a pin on Pinterest that linked to this image, but there was no tutorial or further instructions that I could find. The image was used in a few round ups but again- the link/imagine didn’t lead anywhere. So I decided to wing it to see if I could replicate it.
When I discussed the project with my husband, he was skeptical that I could pull it off. So I told my friend Scottie from SavedbyScottie and we decided we’d get together at her place to put this together and prove him wrong. #girlpower
We did adjust the design a little.
First, my doorway is 36×80. When you buy a screen door, they sell 36×80 doors. These are actually a bit smaller to leave room for hinges and such.
So we are making adjustments to our measurements for wood as a result. You have to adjust for several factors:
- Wood pieces aren’t actually 1×6 or 1×4. For example, most of our 1×6’s were 5.5″ wide. One was wider. You want to measure the actual width of YOUR cut of wood to double check your measurements.
- It’s standard to leave an 1/8″ gap around the sides and the top, and 3/8″ gap or larger at the bottom.
I’m going to give you my numbers for my doorway. Your doorway may be a different size and you’ll need to adjust accordingly. Please don’t trust my math… do your own math. I hate math. And technically my math was wrong and I should have made this taller… just due to the lip on the outside of my doorway being lower than the inner part (the part I measured, whoops).
Having straight wood is really important so check the wood you buy carefully.
DIY Custom Wood Screen Door
Supplies
- (4) 8′ 1x6s $26.64: https://homedepot.sjv.io/GjAgm6
- (4) 8′ 1x4s $16.96: https://homedepot.sjv.io/n1mdY9
- Screening
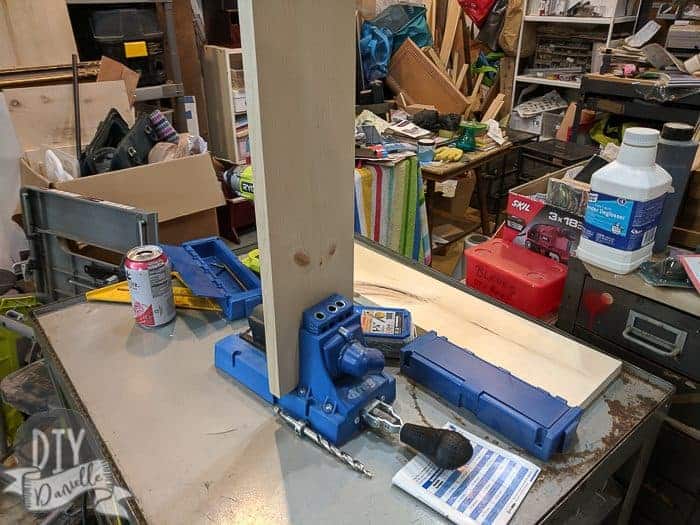
- Kreg Jig pocket hole system and pocket hole screws (1.25″ coarse). I recommend picking up this pocket hole screw kit.
- Saw
- Measuring tape
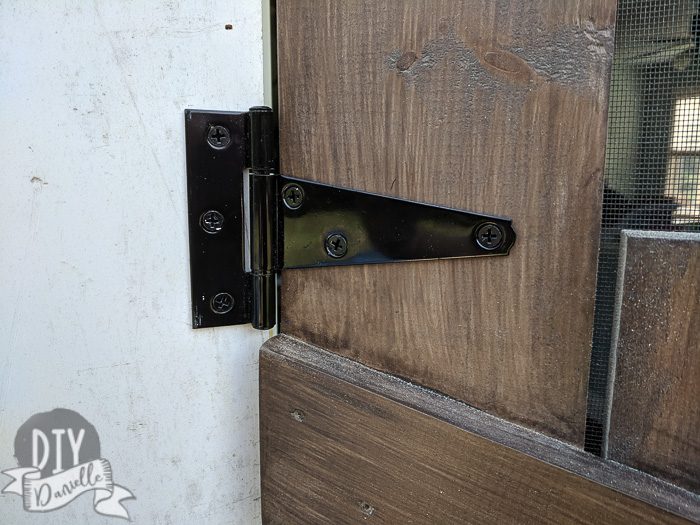
- Quality Hinge set: 4″ Heavy T-Hinge Black (2 pk) x 2 $25.98 (I got mine at Tractor Supply, but here’s a similar product at Home Depot for cheaper and you could buy three instead of getting four and having a leftover)
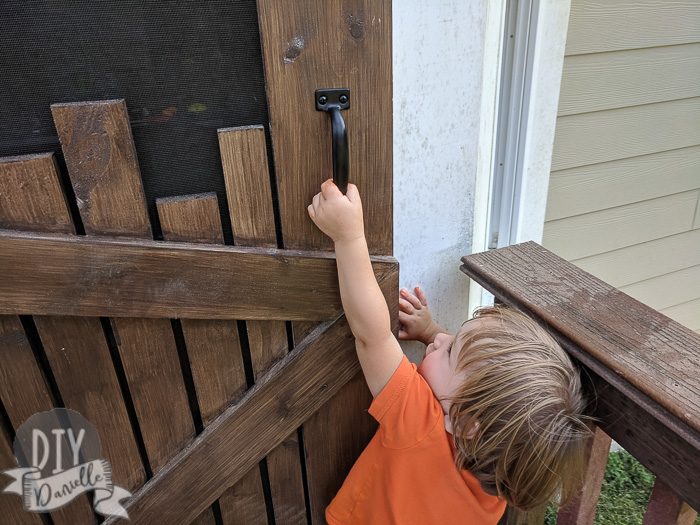
- Handle: Utility Pull Black 5-1/2 $5.49
- Standard Duty Pneumatic Door Closer- Black $9.98
- Speed square
- Wood glue
- Stain: Behr Premium Waterproof Stain-Semi Transparent Cordovan Brown
- Screws: We used 1.25″ Trim Screws from GSK for the front of the Z and the vertical boards in the back. Nice small screw head so it’s more subtle than the larger screws.
- Shorter screws for my hinges, 9×3/4″ $2.36
- Total Cost: $87.41
Changes to the Original Plan
A couple notes on things we did different.
No mitered corners. We are doing a simple rectangular edged frame.
It looks like they didn’t do a bottom piece for their door, except the Z bottom. Hope that makes sense. We opted to make the whole frame, then add the Z bottom separate. The overlap at the bottom gave us a good place to screw in the vertical 1x4s
How We Built It
Building a Wood Screen Door Frame
First, we started by cutting our wood for the frame. We are using 1x6s for the frame and the cross pieces. The 1x4s are for the vertical pieces.
Cuts:
- (2) 24 5/8″
- (2) 79 1/2″
We used pocket holes to put these together for the frame. Make sure to check every corner to make sure they’re squared.
Checking to make sure the corners are squared.
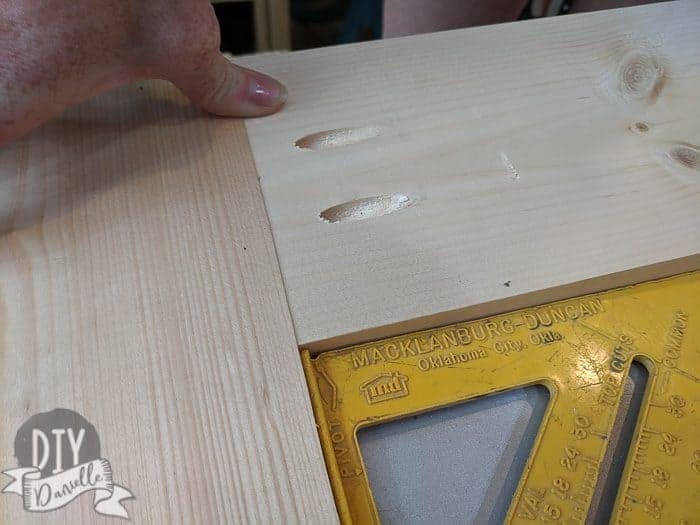
We used wood glue along with the pocket screws to attach the pieces for the frame.
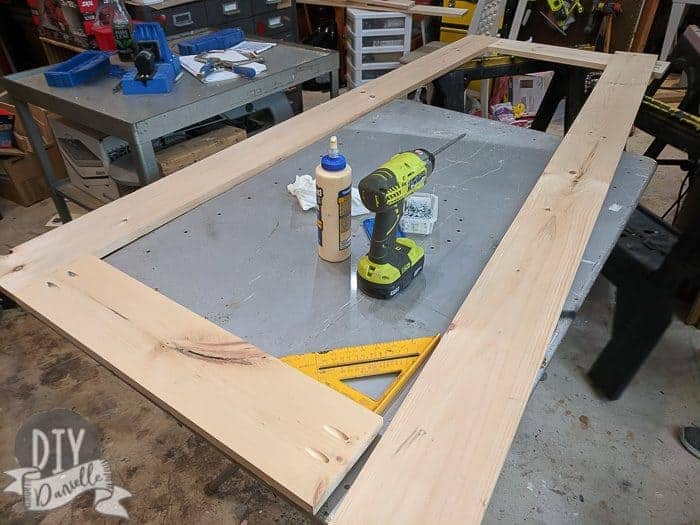
Once you’ve got the frame together, now is a good time to double check that the frame is perfectly rectangular and the size you need it to be!
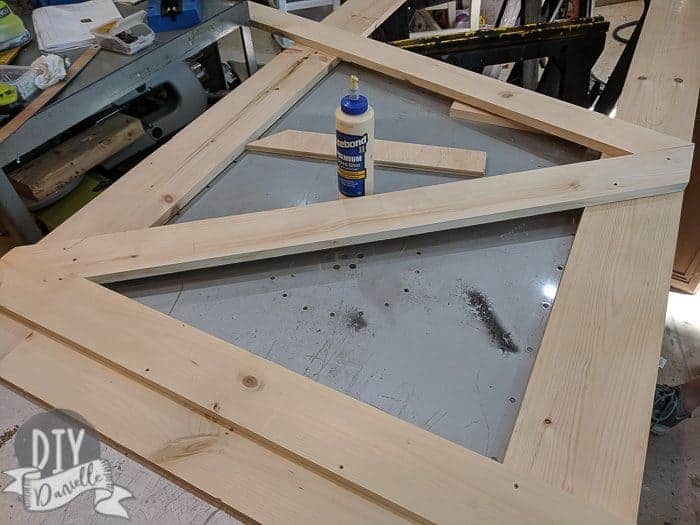
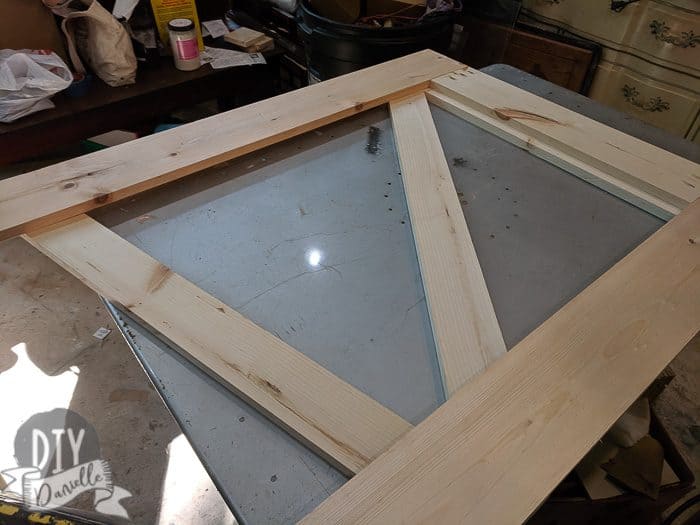
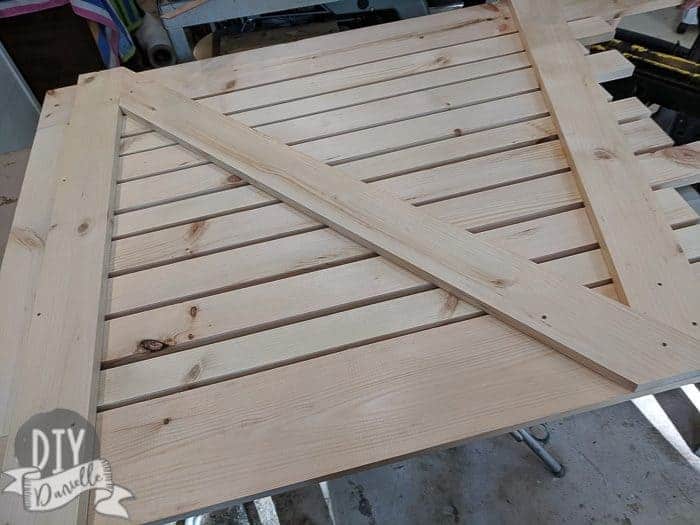
Adding the “Z” Decoration to the Door
At this point, we wanted to create the “Z” shape. We used 1×6’s for this too.
Most of this work was setting up the first piece of wood in the direction we wanted, drawing the angle it’d need to be cut at, then cutting the angle with the miter saw. You need to figure out approximately where you want each piece before starting to cut, simply because you need to account for where you plan to place your handle. I recommend drawing a mark where your handle will be.
Our top Z piece ended up being around 36 1/8″, the second was 45″ and the third was 35 3/8″.
The first piece (bottom of the Z) is straight across with no mitered cuts. There’s a slight overlap with the bottom of the frame so that it creates a lip on the back side. This will give us a place to add our vertical boards.
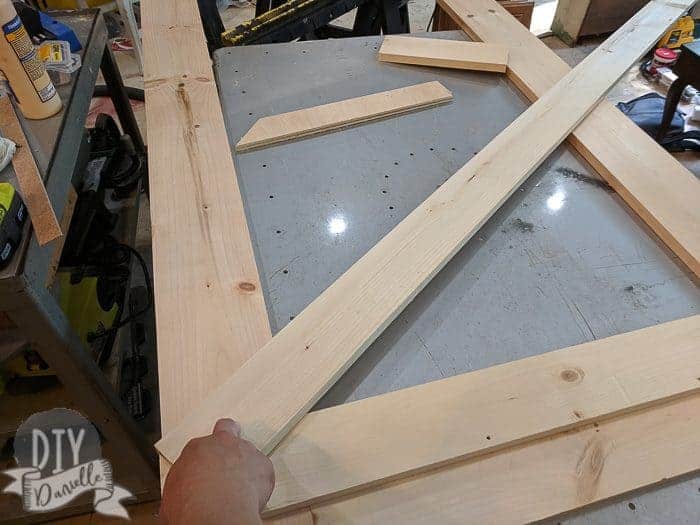
Then we did the next piece, then the following. I simply used a pencil to draw the angle when I had it laid out how I liked… and repeated.
When they were cut, we laid them out. We glued the first piece down, then used screws to screw them into the rectangular frame. Followed by doing the second, then the last piece.
The screw heads were tiny for this which is nice because they’re more subtle.
Adding the Vertical Boards
Now all we needed to do was add our vertical boards. We flipped our screen door. As you can see, the bottom of the Z gives us a bit of a lip to screw the vertical boards to.
We cut the boards a variety of lengths then laid them out how we liked. You can place yours close together or further apart. I needed the door to be solid enough that the dog couldn’t scratch through it (from the outside in), but I wanted the door to be as light as possible so less wood was more ideal.
The length of these pieces ranges from 33 1/4″ to 39 1/2″ but this was based on the height and position of our Z.
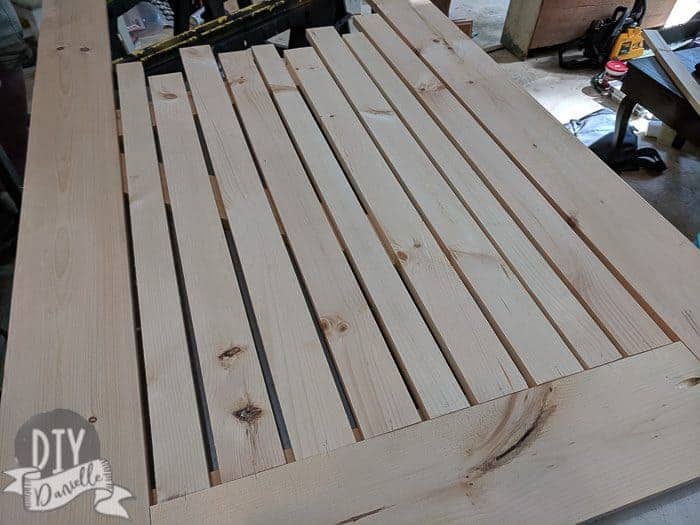
When I lined up all of the wood, I made little marks and wrote the number for each. That way I could line them up exactly as is when I went to put them back on.
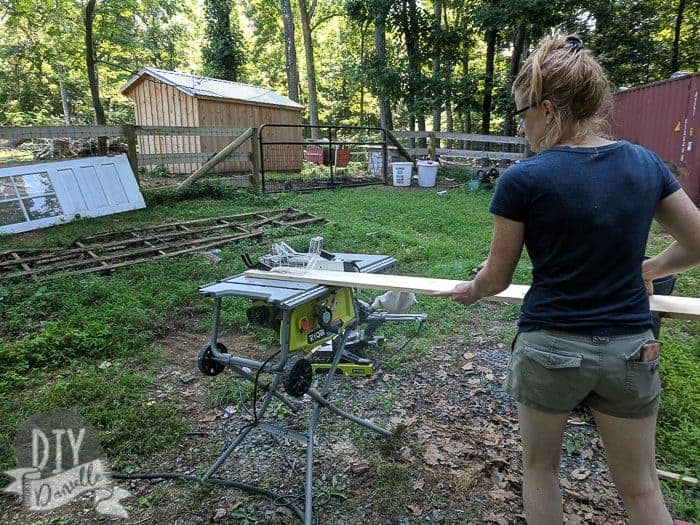
We did strip a couple of 1x6s with Scottie’s table saw to make some 1x3s to put in there too. By “we,” I mean Scottie because circular saws stress me out. Haha.
Each board was glued and screwed on. The screws are on the back side.
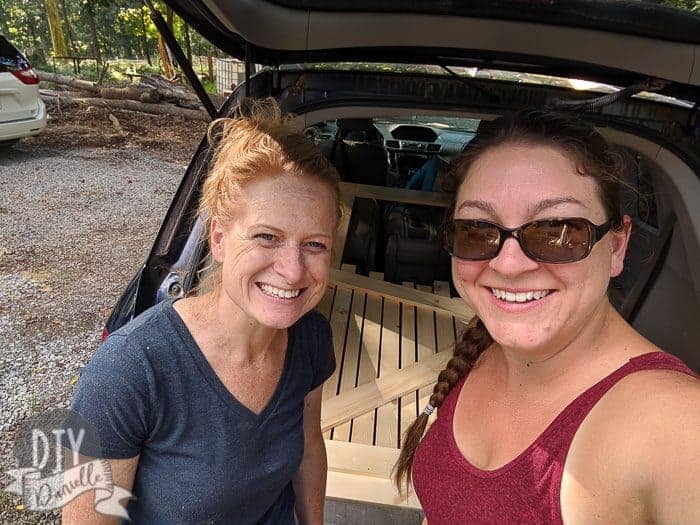
I brought the door home like this. I didn’t want to deal with stain drying or worry about screening ripping in the process of transporting it.
Also, it was SO MUCH FUN to be able to build with a friend. I just wish Scottie lived right down the street… we’re about an hour away from each other which isn’t too bad, but still.
How to Paint a Wood Screen Door
While I could have opted for a paint, I liked the idea of using a durable stain. I used the same stain I used for the chairs I built for the front porch. The plan is to stain the back deck (to be built), the play house, and the swing set to match.
The stain pictured for the project is Behr Premium Waterproof Stain-Semi Transparent Cordovan Brown .
I always use a small paint brush to get stain into all of the crevices first. In this case, there are a lot of crevices. Ideally, you could save a lot of time by staining in advance. I highly recommend doing that.
Once the crevices are filled in, you stain by brushing in the direction of your wood grain. Let dry. Flip and do the other side. You may want more than one layer.
Adding Screening to a Wood Screen Door
Unlike a store bought screen door, this screen door doesn’t have the crevices that you’d normally stick your screen in. I suppose you could add it, but personally, I like to keep things easy.
After the stain dried, I added my screening using a staple gun. I could have used trim over the edges of the screening, but chose not to because *time*. I may go back and do it though because you can tell that it is ripping in a few spots… although I was moving this door around a lot after I put the screening on so it might’ve held up better otherwise.
Adding Hardware for the Screen Door
Once that is done, I added my hinges and door handle.
I installed the hinges incorrectly the first time because that’s how I always do it. Every. Time. Never learn.
I used a piece of scrap wood to help hold up the door while I mounted it to our exterior.
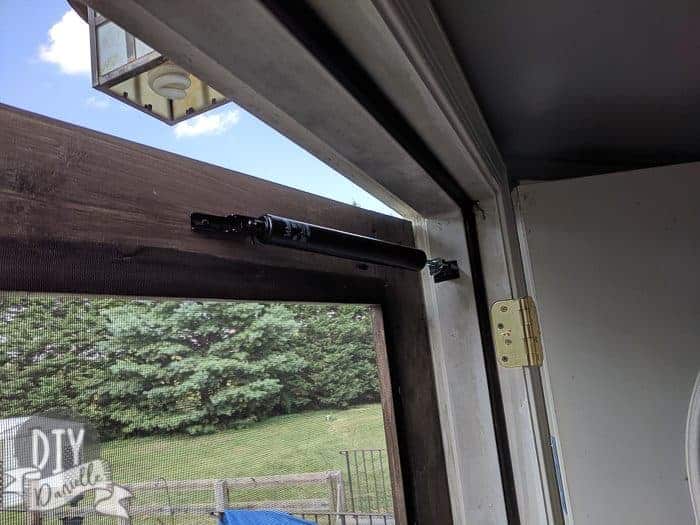
I also added a screen door closer, seeing I didn’t use spring loaded screen door hinges. Otherwise it wouldn’t close and stay closed.
Done!
Things I’d Do Differently Next Time
I like to learn things the hard way usually. Here are some mistakes that were made or things that could be improved:
- Measure the door size from the outside- not the inside. I realized that I should have made my door a bit taller. I had taken my measurements from the inside but the inside has the bottom built up- the outside dips down. So I needed a taller door. It works as is, but I mounted it slightly higher so the gap wasn’t so obvious.
- The door ended up being too wide by a bit. I think at some point we didn’t check our measurements. I was able to sand off the excess on one side so that it would fit.
- The hinges I used were not special screen door hinges. This means that the door doesn’t close on its own. This isn’t a big deal, but you need to plan for the problem… you could do a latch/knob that can be opened on both sides or use a screen door closer like I did.
- Because the door has the “Z” that sticks out, you’re mounting your hardware to the inner wood (not the Z) and then the inner wood needs to be flush with the lip of the door way. Otherwise the “Z” wouldn’t allow your door to open… it would get stuck on the lip. Hope that makes sense. Unfortunately, this meant that there was a bit of a gap on the right side. When the door closes completely, you can see that the Z actually lines up with the frame on the right side. My father-in-law suggested just building out the inside of the doorway. It’s not super obvious though so I’ll probably leave it.
The Verdict
The best thing about this style door is that hopefully my dog won’t claw his way through it trying to ask to go outside. I love that it’s a strong, sturdy door and doesn’t feel like it’ll fall apart like the cheap ones you get at the store.
Also this may be my pride and joy forever. I cannot wait to build our deck in front of this… it’s going to be so pretty.
We need to do some serious repainting on the white trim around the door and such, but I’ll wait until we’re out there doing the other projects.
Love furniture? Here are some other furniture projects we’ve done: Distressed Lego Desk | Easy Living Room Storage Cabinets | Built In Entertainment Center | Quick and Easy Drawer Stoppers | Gaming Table | DIY Rustic Outdoor Chairs
Please share and pin this post! It’s super super helpful and appreciated!
I love the door. My wife has been on me for a while to build a rustic style screen door for our cabin. My worries have been the warping of the wood at the joints over time because I don’t have the tools to make finger or dovetail type joints. I see it’s only been a few months since the post, but I was wandering how old the door is and if you’ve had any troubles with warpage(don’t think that’s a real word).
It’s only a couple of months old so it’s probably too soon to tell, but we haven’t had any issues. The dog does scratch at it to ask to come in so I’ll probably have to sand and refinish one area at some point… it’s not bad yet. The good news is that he hasn’t torn through a screen like he would if I only had a screen on there. 😉 Just make sure to get all of your measurements correct… ours was off by a bit but it works.
I love this door! you did so good on it! My question is did you attach the screen the whole way down the door on the back since you left gaps between the wood pieces on the bottom or did you just attach the screen to the top part that is open? Thank you!
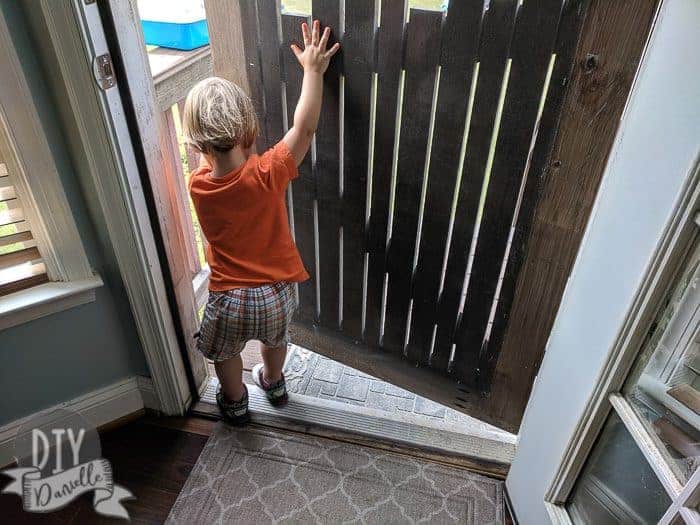
The whole way down! You can see the screening if you look close at the picture of my son in the orange shirt opening the door. You’d let bugs in otherwise 🙂
add hardware cloth to inside and dog can’t damage door or screen.