
Tips for composting horse manure with an aerated static pile system. Here’s our system and how it’s working for our farm!
So you’ve got a lot of horse manure laying around and you’d like to put it to use on your farm or homestead without having to pay professionals to haul it off? You’ve come to the right place! Using an Aerated Static Pile system, you’ll be able to break down your excess manure into usable, fertile compost for use around your property.
It might sound complicated–and the science behind it is nothing to throw a stick at–but with a few pointers, you’ll catch on to the fundamentals quickly and get your own Aerated Static Pile system up and running in no time.
What’s An Aerated Static Pile System?
Aerated Static Pile (ASP for short) is a means of composting naturally occurring materials rapidly by introducing air flow to the compost pile. The circulation of air helps get oxygen to the aerobic bacteria that break down waste while producing carbon dioxide, heat, water, and humus. Humus is the desired byproduct of composting–it’s the nutrient-rich, moisture-loving organic matter left over after plant material decomposes. It’s often called “black gold” for its earth-enhancing properties, which explains why people would endorse seemingly complicated systems like this one to get their hands on it. Because of the constant flow of fresh air, this type of compost pile gets hotter and breaks down faster than other traditional methods of composting.
How to Set up an Aerated Static Pile System for Composting Horse Manure
Setting up an ASP is a multi-step process and is best done in bite-sized pieces so you don’t get overwhelmed. Pro tip: plan out your system from start to finish before starting the process. This isn’t an easy one to wing and requires a bit of precision, so it’s best not to dive in until you understand the big picture.
Select a Space for Composting Horse Manure
You’ll need to find a well-ventilated area to build your system. It should have plenty of room to house the amount of material you need to break down. If you have a ton of available space, you may be able to run multiple active piles at once or in succession by creating a network of manifolds to run from one air flow source (if it’s strong enough) through the separate bins.
Design Your ASP System
To design your Aerated Static Pile system, you need to plan for a few key hardware components:
Air Flow Source
The source of the air flow is one of the most important parts of an ASP system! Without air flow, you’ll just be creating a regular compost pile, which doesn’t break down as quickly as an aerated pile. A motorized fan or blower usually does the trick here. You may be able to find one compatible with a timing mechanism to automate air flow intervals.
Manifold
The manifold is responsible for distributing air from the air flow source through the pile. This can easily be made from a framework of PVC pipe with holes drilled at intervals to ensure even air flow.
Container
The container can be an extra large plastic tote, trash can, horse stall, industrial size bin, or you can forgo a container altogether and opt for an open-air pile instead.
Add Organic Matter
This is where things get a little more complicated. You need to plan to add organic matter in layers and in specific concentrations to allow air to flow while also providing the right amount of different nutrients for the aerobic bacteria to do their thing. These layers go from bottom to top:
Plenum Layer
This layer is essentially a transition from the manifold to the active layer of composting material and facilitates even air flow throughout the pile. It’s typically made of wood chips and cushions the hot organic matter from cooler blasts of air so that it doesn’t disrupt the composting process. Create this layer by mounding wood chips evenly in to cover the entirety of the manifold, top and sides included. Make sure there is enough room between the plenum layer and the sides of the container to heap active compost around it, essentially creating an air bubble effect. This will help air flow evenly throughout the pile and keep pockets from forming.
Active Layer
The active layer, or “mix”, is the star of the show. This is where the magic happens. In the mix, all of the organic matter to be broken down (including the horse manure) is combined and the aerobic bacteria is actively breaking down the components. You should aim for a carbon to nitrogen ratio of more than 25:1 and around 50% moisture content. This layer should be loosely and evenly piled around the plenum–if you compact it too much, air won’t be able to get through.
Biofiltration Layer
The biofiltration layer is the topmost layer and acts as a shell to the mix and plenum. You can use either mulch or completely finished compost for this layer. Ensure it’s an even thickness (about one foot thick) and covers the entire surface of the active layer. This is an absolutely necessary step and cannot be skipped, as it’s essential to preserve moisture, prevent heat loss, control odor and keep out insects.
Check the Temperature to Track Progress
After following steps 1-3, you can now take a more passive role in the composting process. The aerobic bacteria will take over and you’ll really only be responsible for keeping the air flow regulated to ensure there are no snares in the process, and keeping track of the temperature.
Keeping track of the temperature helps you know if the process is working properly. Within a week of filling the pile, the temperature should reach over 130°F. That’s how you know it’s working! You don’t want it to get too hot too quickly, however, because temperatures over ∼150°F will start to kill the bacteria that are breaking down the material. Regulate airflow to control temperature and keep your aerobic bacteria working happily. After 3-5 weeks of active decomposition and a few weeks of curing, you’ll have completely finished compost ready to use!
What Kind of Material Can I Compost?
It’s wise to consider what kind of materials are meant to be composted in an ASP system before you start the project so that you can consider logistics. There are a few different kinds of organic matter that you will add regularly to the pile to continue the composting process. As you read through the following list of compostable matter, ask yourself a few questions. How much of each of these types of matter do you generate on a weekly or monthly basis? Does it warrant a larger or a smaller pile? Will you have to supplement a source of green or brown matter to make sure the pile has the right balance? Where will you source extra materials? These are all things to think about while planning your ASP system. Here are some things you can add to your active layer to compost down:
- Horse manure (and other kinds of livestock manure)
- Lawn clippings and landscape waste
- Produce waste
- Kitchen scraps like vegetable peels, rinds, eggshells, etc
- Paper products
What Can I Use the Finished Compost For?
As mentioned above, finished compost is known as black gold and can be used in almost any landscaping or gardening capacity. Use it to amend the soil in flower beds, raised vegetable gardens, outdoor pots – anywhere your plants need extra nutrients!
Looking for more homesteading or farming tips? You’re in the right place! Check out the Home & Gardening section for more information on all kinds of DIY outdoor projects.
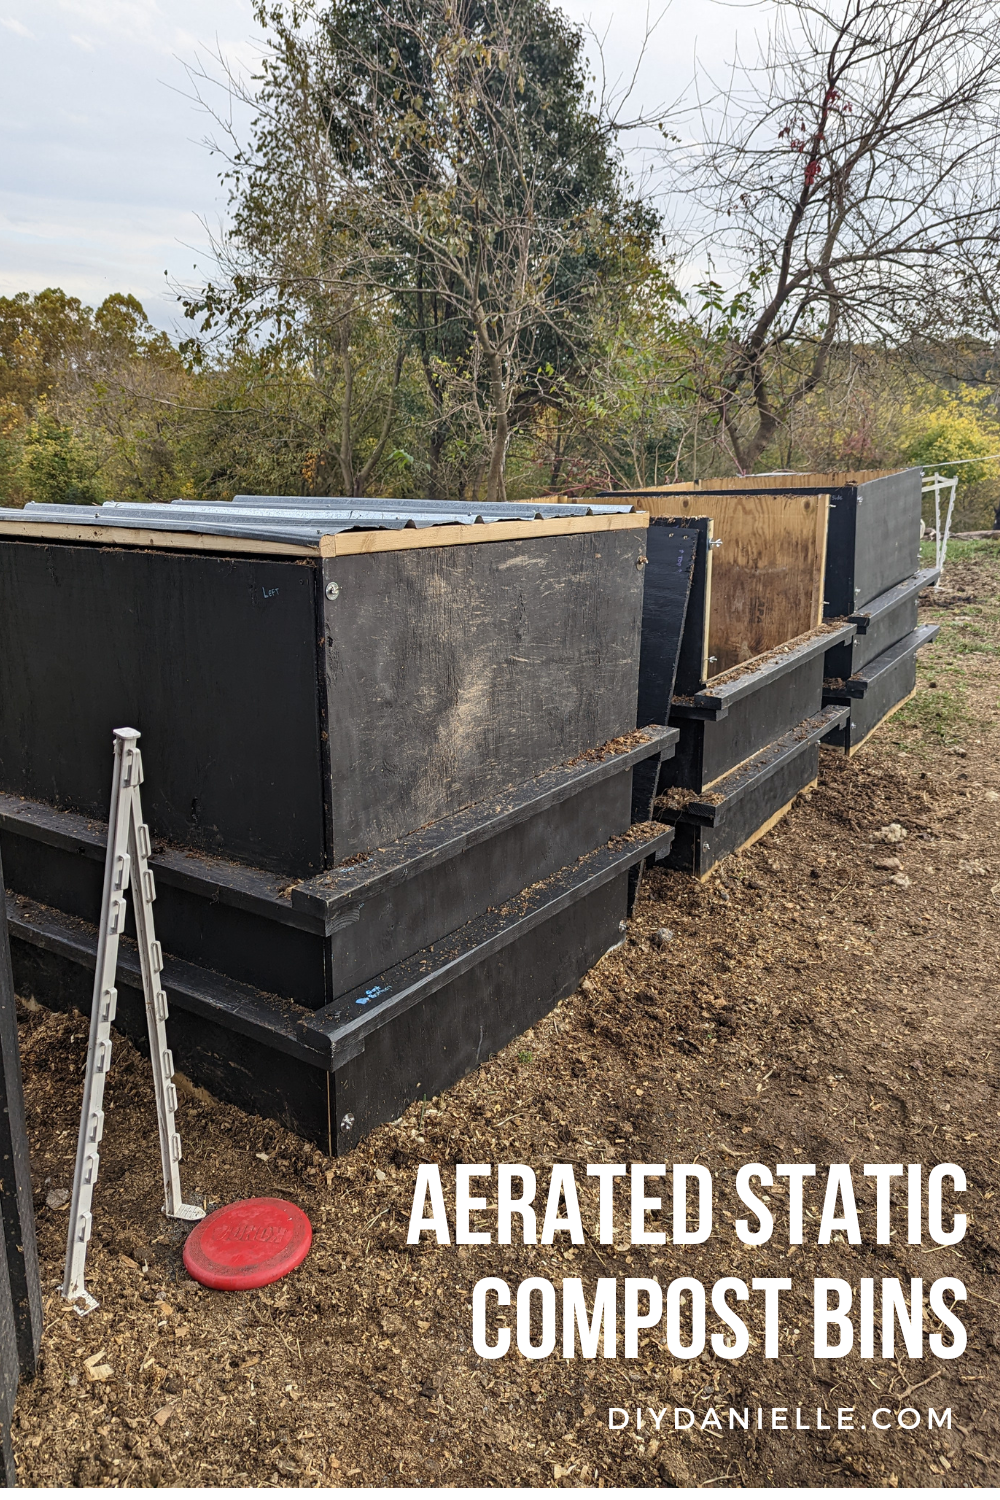
Our Aerated Static Compost Bin
We recently got our aerated static compost bins up and working. I purchased the MicroBin plans (which came with some of the PVC tubing and the blower) through O2 Composting. It’s fairly pricey, and I was debating just putting something together myself, but having the plans, supply list, and timer made it easier for me to get up and running. I may eventually develop something better, but these should work for now.
With four horses and frequent manure pickup in the field, I’ve almost filled all three bins before the first bin has had time to fully compost, but this is partially my fault due to filling the first bin up with manure from our old pile. However, I wanted to get the process started in the first bin as soon as possible.
Here is a look at our bins and the progress in the first bin- the progress part of the video is from BEFORE I consistently had the blower on every day or a top for the bins (I finally finished those in October). I think I’ll see better results now that it’s all complete.
Since adding the lids and running the blower consistently (10 sec every 30 minutes) I’ve seen the bin get close to 160F and I didn’t want it to go over 160F because that could harm the organisms that help speed up the composting process. In that case, I moved the lid off the bin slightly to let some of the heat out. This seemed to do the trick. If it had gotten higher, I would have adjusted the blower settings, but I didn’t want to adjust them too much where the weather is starting to cool off.
I think I could use one or two more of these for our four horses. One of the horses is going back to his original home soon so I’ll see where we’re at when he’s gone, but we produce a lot of manure here AND we use a lot of compost.
Wish list for my next set of bins:
- Compost bin opening as wide as the tractor bucket so I can add manure and remove compost without disassembling the bins.
- Concrete base with gaps for the tubes. This will allow me to use the tractor bucket without damaging the tubes.
- Either to build a ramp to make dumping manure into the bins easier, or to create a hill of dirt as a ramp to the bins.
I’d like to purchase a manure vacuum for field cleanup eventually (around $3-4k), but we’ve been using a cheap $400 lawn sweeper with some success to quickly pickup manure in the field. It just doesn’t get manure that’s close to the fence and it requires a lot of a passes to get everything. It’s also very heavy to empty if full, the device isn’t made for this type of heavy work (ripped the bottom of this a bit already), and it cannot be backed up (at all). Our bigger issue is that hay and brush can catch the wheels, causing the whole thing to lock up. That requires a lot of fixing- it’s like cleaning hair out of your vacuum cleaner, just grosser (but dry and honestly, horse manure doesn’t gross me out that much).
The manure vacuum is the purchase I’d like to make once I finally get my arena setup because I think it’ll make manure/worm control easier… but that costs so much money and I don’t have a huge income. The manure vacuums tend to cut up the manure when they collect it which should speed up composting. It can also be backed up a ramp to dump into the bins. I DO wish the manure vacuum had a feature to use the hose to back spray the manure into the bin though… that would be fun and easier than dealing with a ramp. It’s on my list of things to make, but… the list… it’s so long. (sob)
I was curious if using clear panels (like you can purchase for greenhouses) would speed up the process for heating, but the snow load might be problematic in our area. I also didn’t want it to get too hot. The heat from air blowing through the pile is fine… heat by itself isn’t necessarily beneficial, particularly if it gets too hot.
Other Blog Posts about Composting:
- Composting 101: How to Start Composting
- Open Bin Composting
- Closed Bin Composting/Tumblers
- Worm Bin Composting
Love horses? Check out: What Can Horses Eat? | DIY Saddle Rack | Rolling Feed Bins | Custom Tote Bag for Horse Lover. Check out more horse care tips and tricks from DIY Danielle here!
Please share and pin this post! You can also post your project and tag the DIYDanielle team on Instagram @doityourselfdanielle!

