

How to add DIY built in bookshelves for your living room to add storage space and visual appeal. This simple woodworking project is a great DIY project.
This post may contain affiliate links which may earn me commissions should you click through them and take certain actions. As an affiliate for Amazon, Cricut, xTool, Home Depot, and other sites, I earn from qualifying purchases. Please DIY carefully. View my full legal disclosures here.
The majority of my content is generated by me, as are 99% of the photos and videos, but I utilize technology for titles, descriptions, video editing out all of my ums, and occasionally for text overlay on images.
Please read the whole post so you don’t miss any important information!
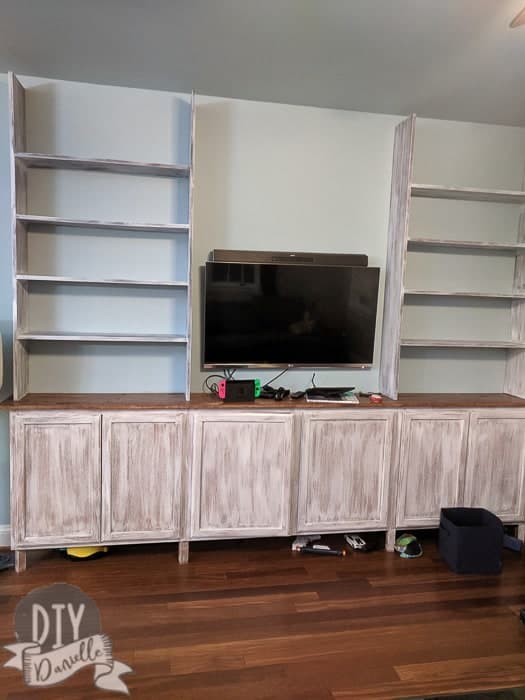
We built an enormous built-in entertainment center at our old house and when we moved, we knew we wanted to recreate the project at our new home. Now that we have more knowledge, however, we’ve adjusted our build and created something a little more custom. I am sooooo in love with the final results.
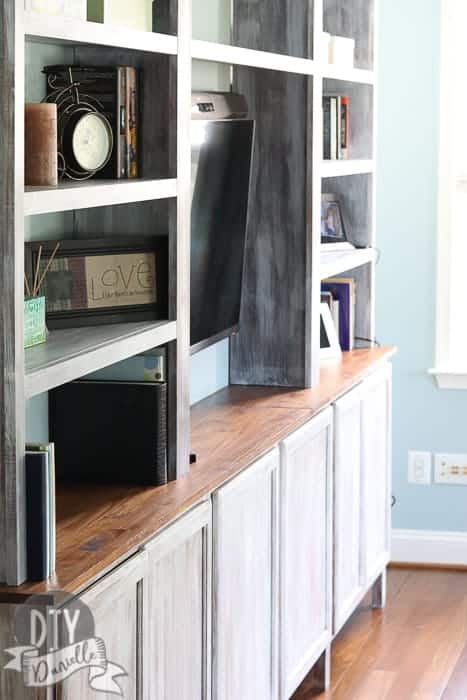
To begin, we put in storage cabinets for under the television. These hold items we want out of sight. They were easy to install and cheap, unfinished base cabinets. The counter top is pine wood.
We let the bookshelves part of the project wait as we completed other projects around the home, but finally we had some time to finish up the shelves. I was so excited to start unpacking books that we still had packed away.
Make sure to also check out the recessed bookshelves that we added next to the couch. They’re AWESOME.
DIY Built-In Living Room Bookshelves
Check out my post, Living Room Cabinets, to read about how we installed those. This post focuses exclusively on the bookshelves surrounding and above our TV.
The Supplies & Cost of Built-In Bookshelves
I’m typing this off my receipt here… hopefully it’s helpful information. The numbers don’t pull up on the Home Depot website, but I’m including them “just in case” they’re helpful. I will also try to link the products I find… some products I found, but the prices were different so I didn’t link them. It’s a really nice time saver to order online for in-store pickup.
- 095624519977 Casing 9/16 X3-5/8 MDF WM49 Crown [email protected] $19.94
- 9421901888015 1×2 6′ Select Pine Board [email protected] $20.58
- 9421901888169 1×6 6′ Select Pine Board [email protected] $21.84
- 9421901888022 1×2 8′ Select Pine Board $4.42
- 9421901888114 1×4 6′ Select Pine Board [email protected] $13.06
- 9421901888275 1×10 8′ Select Pine Board [email protected] $158.56
- Stain, Paint
- Screws
- Kreg Pocket Hole System
- Stain / Paint / Polyurethane: I used white paint and my stain is Minwax Red Mahogany.
Total Cost of Bookshelves: $238.40*
*This is the cost of the bookshelves alone, we also had to purchase the cabinets underneath. I had the stain/paint/poly leftover from those.
You can really use any wood you choose for this project. We chose pine because it is the least expensive and easiest to work with. Plus, I planned on staining and dry brushing them, so the initial appearance of the wood wasn’t top priority.
If you are looking for wood that you can finish off with poly, here are some other ideas for beautiful shelving options:
- cherry
- red oak
- mahogany
- birch
- or any other MDF wood
How to Build Bookshelves for Built-ins
Cutting the Wood and Building the Shelves
My husband did the building portion of this project. We take turns on project steps while the other person keeps an eye on the kids. And swap back and forth. While I enjoy the toddler at age 2, I’ll be excited to have time to work with my husband on projects again once he’s a bit older and not so dangerous.
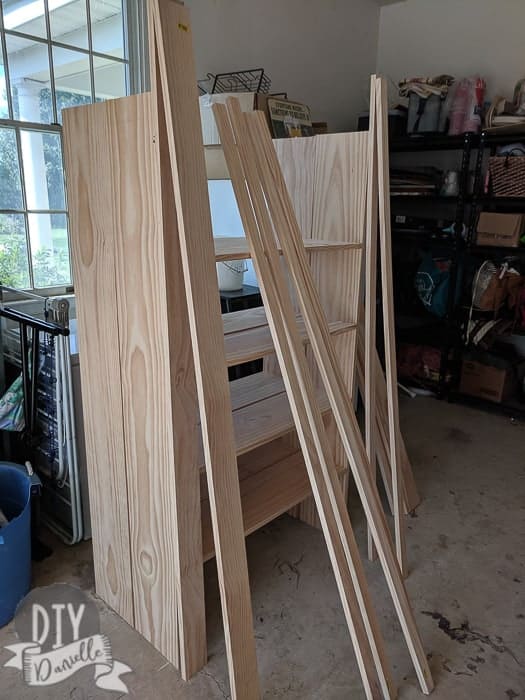
All wood was cut to the desired length and the shelves were built in the garage on a level surface.
To figure out our measurements for wood:
- Shelf sides: 1x10s cut to the height needed from the countertop to the ceiling.
- Shelves for the exterior bookshelves: 1x10s cut to the width desired for the bookshelf (which was based on the width of our cabinets underneath the bookshelves)
I could give you our exact measurements, but this isn’t a great idea considering that ceiling heights differ from house to house, and you may have a different setup for your cabinets. You REALLY want to measure this all out for yourself before cutting your wood- measure twice (or ten times), cut once.
Each shelf was installed with pocket holes and a Kreg Jig.
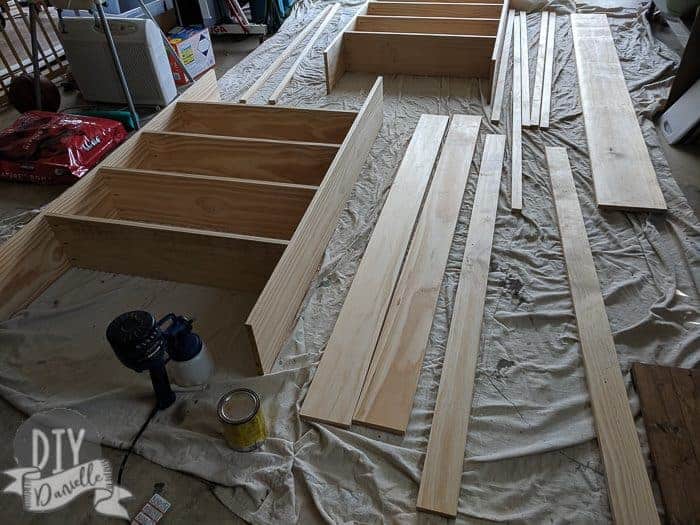
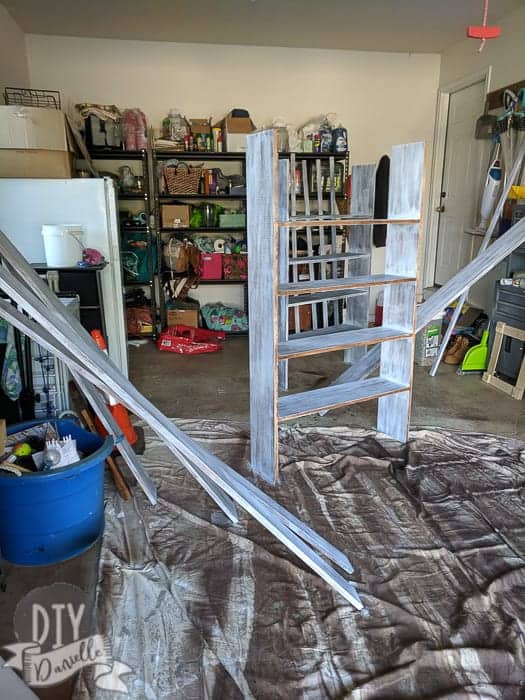
NONE of the trim pieces were cut ahead of time- neither was the wood for the middle shelves. I stained/painted/poly FIRST and we cut trim/middle shelves after installing the two main shelves. As you can see below, this is the pile of items I finished all at once (there’s a few pieces behind the shelves that you can’t see).
Stain, Dry Brushing Paint, & Poly Shelving Planks
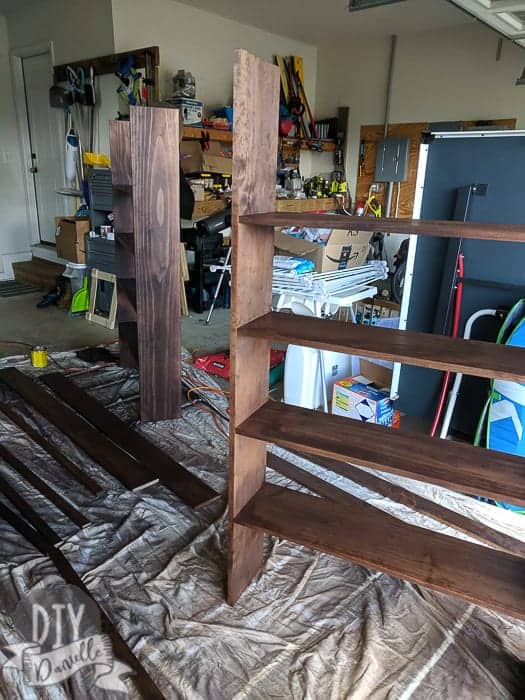
Once they were ready to install, I laid out the painting drop cloth, put everything out on the cloth in the garage, and used my Home Right Finish Max Sprayer to stain the shelves and wood. The piece of wood for the long middle shelf needed to be stain on both sides.
I had a bit of a panicky moment when I realized that the stain hadn’t been mixed well originally so the last shelf was much darker. I ended up going back to the store for more stain and redoing the other shelf so they mostly match. One shelf is still a bit darker but it’s hard to tell under the white dry brushing.
I let the stain dry, then dry brushed white paint over the stain. You can read more about that in my post about the cabinets.
The back of my shelves weren’t stained/dry brushed because they’ll be against the wall.
Once the white paint dried, I added one layer of water-based polyurethane. I am trying the water-based out in hopes it’ll be easier cleanup, but to be honest I used a foam brush and tossed it after I was done. I prefer to toss a cheap brush rather than wash chemicals out in my sink/septic.
While several layers might have been better, the finish looked good with one layer and I didn’t feel the extra poly was necessary for this project.
Installing the Shelves
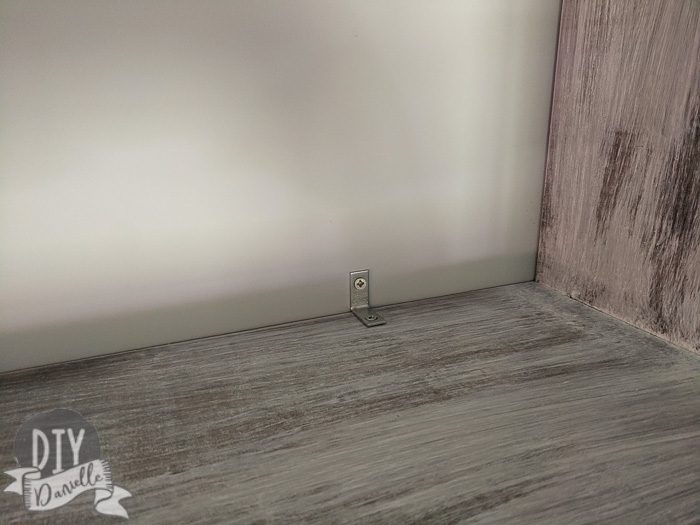
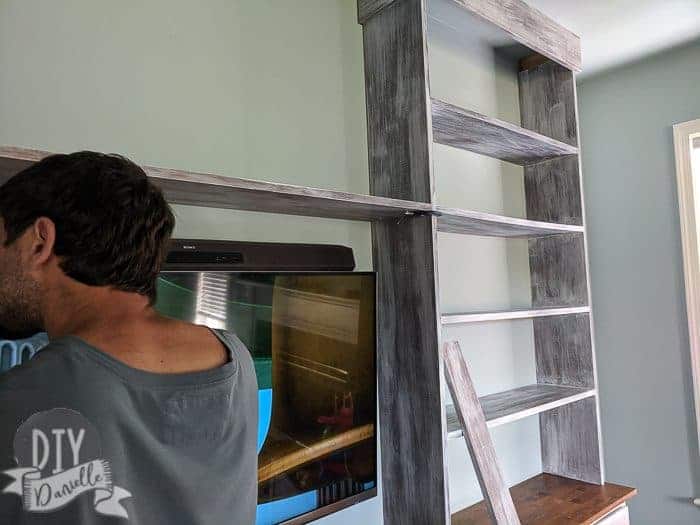
Each shelf was attached to the wall using an L bracket. The screw attached to a stud- this is important. He only used one bracket per shelf and it was located above the top shelf where it wouldn’t be seen.
The shelves were centered above the two outside lower cabinets.
Installing the Trim to the Shelves
Once the shelves were on, we added the trim.
First we started by cutting 1×6’s with an angled end.
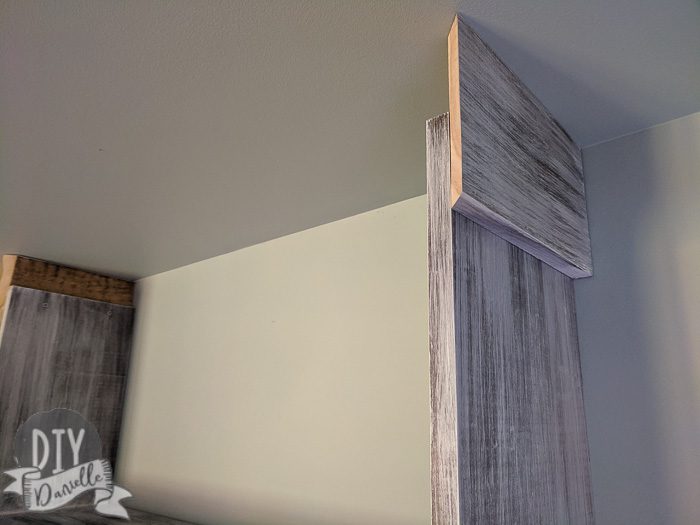
These meet up at the front with a longer piece for the top.

Adding the Middle Shelf
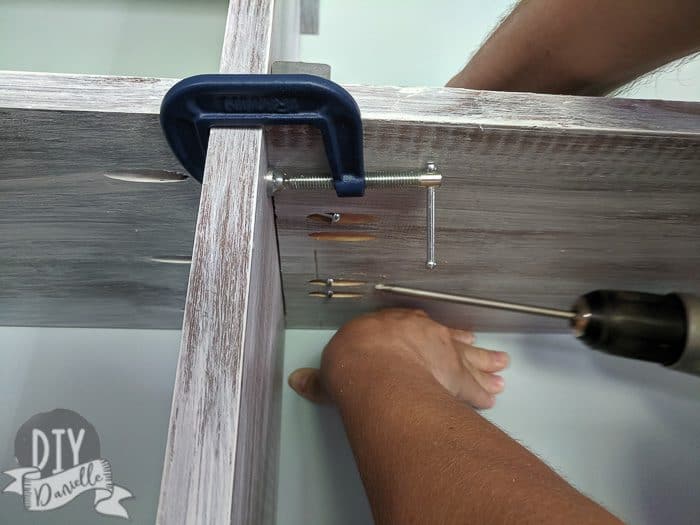
My husband made the pocket holes for the middle shelves in the garage. He made sure the pocket holes were in different places that the ones on the outer shelves.
A couple of clamps held the shelves in place so my husband could screw them in.
After this, he added trim to the front of the shelves and the sides using our nail gun.
The trim makes a big difference in the finished look to the bookshelves!
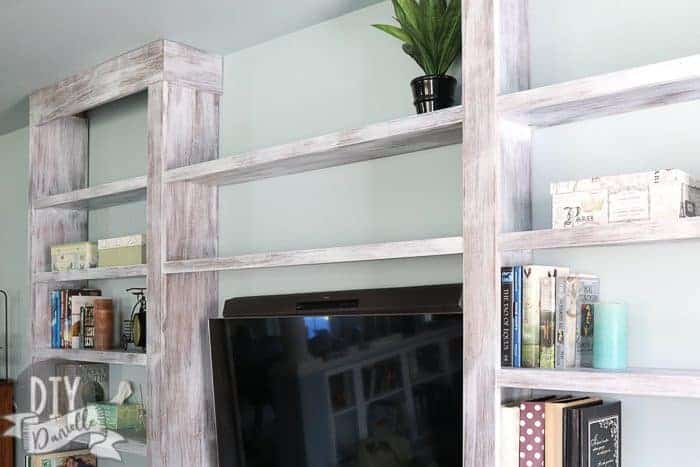
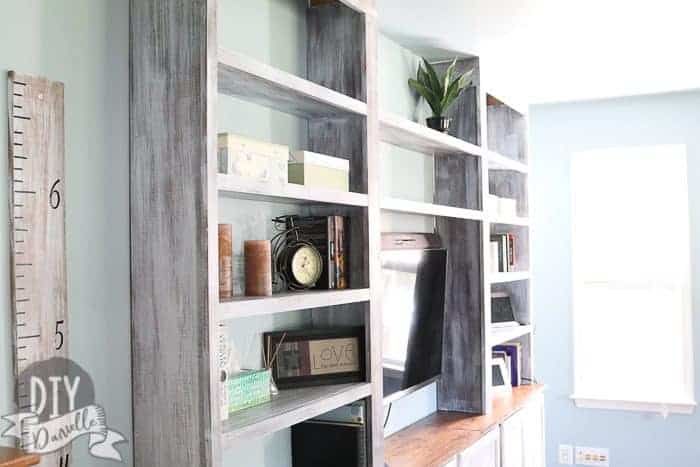
If you notice the minor issue, yeah… we should probably fix that. At the inner top of the cabinets, there’s some raw wood showing. But we’re trying to decide if we should just pop some scraps in there or what.
We have some additional trim/moulding pieces that we may add later, but I am not sure I want to fix perfection. I really like how it looks as is. Eventually we’ll also install DIY under cabinet lighting like we did at the last house.
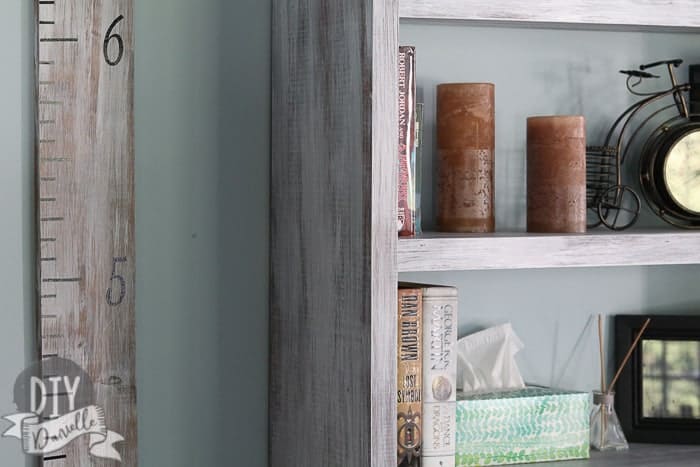
Make sure to check out my tutorial for the matching distressed growth ruler. It’s perfect for the space beside the built-ins! Check out these other Built-In Entertainment Center ideas. These unique drawer pulls might be a great way to customize your built-ins! Need a place to put the remote? Check out this sofa table build with recessed outlet!
Please share and pin this post! You can also post your project and tag the DIYDanielle team on Instagram @doityourselfdanielle!
Google Web Story: DIY Built-In Bookshelves
DIY Built In Bookshelves for the Living Room
Add beautiful built in bookshelves to your home with this simple woodworking project.
Materials
- 1×2 6′ Select Pine Board 6
- 1×6 6′ Select Pine Board 2
- 1×2 8′ Select Pine Board
- 1×4 6′ Select Pine Board 2
- 1×10 8′ Select Pine Board 8
- Stain, Paint
- Screws
- Stain / Paint / Polyurethane
Tools
- Kreg Pocket Hole System
Instructions
- Shelf sides: 1x10s cut to the height needed from the countertop to the ceiling.
- Shelves for the exterior bookshelves: 1x10s cut to the width desired for the bookshelf.
- Install the shelves with pocket holes and a Kreg Jig.
- Stain/paint/poly FIRST.
- Cut trim/middle shelves after installing the two main shelves.
- Lay out a painting drop cloth and use Paint Sprayer to stain the shelves and wood.
- Once the white paint is dry, add one layer of water-based polyurethane.
- Attach to the wall using an L bracket.
- Center the shelves above the two outside lower cabinets.
- Once the shelves are on, add the trim.
- Start by cutting 1×6’s with an angled end.
- Make the pocket holes for the middle and outer shelves.
- Add a couple of clamps to hold the shelves in place so you can screw them in.
- Add trim to the front of the shelves and the sides using a nail gun.
Recommended Products
As an Amazon Associate and member of other affiliate programs, I earn from qualifying purchases.

