

We hired a contractor to build an inground concrete pool, and these are inground pool construction progress photos of the process.
This was NOT a DIY swimming pool. After watching the construction process, I’m pretty sure I DEFINITELY WOULD NOT want to do this project myself. A couple of years ago, I spoke with this awesome family who DIY’ed their own natural swimming pond which I LOVE. But I couldn’t get my husband on board and using a contractor for this GIANT project made sense. We opted to hire a contractor to do an inground pool with concrete versus opting for a liner. This seemed to be the general recommendation for our area in Maryland.
Prior to saving up for the inground pool, we would setup an affordable above ground pool each year, then set the pool up to be as safe and fun as possible for our kids when they were toddlers. We’d patch holes. We would try to repair dead grass when we took down the pool for the winter. Having an above ground pool was a great option for when our kids were too small to swim well. It gave us time to save money for an inground pool and it was still FUN for the summer. But now that the littlest is 5 years old and a decent swimmer, we’re thrilled to have the inground pool!
Our Pool Details
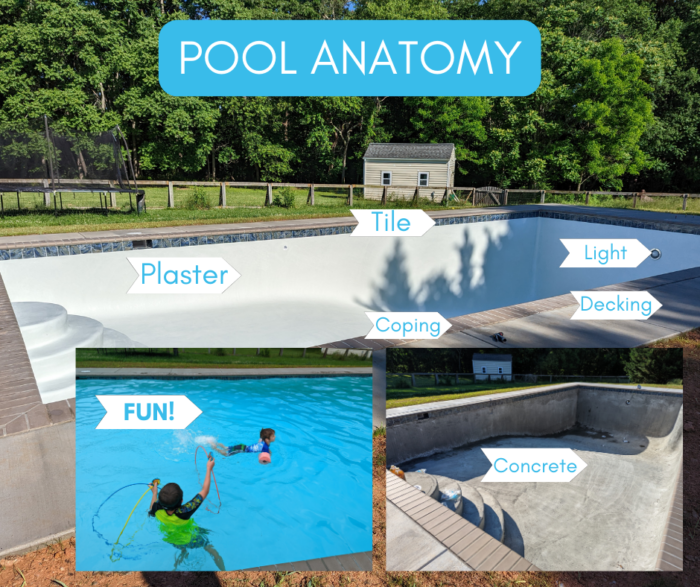
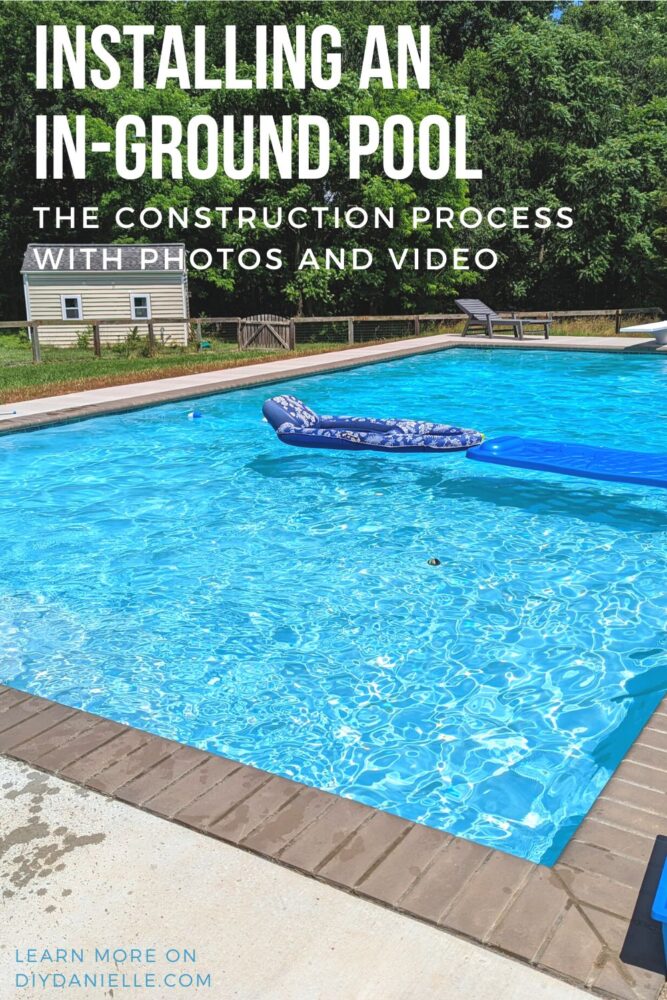
Our pool is a 20×40′ inground concrete pool with brushed concrete decking. It is a salt water pool, although initially you run it as a chlorine pool for a period of 30 days (it might have been longer, but it’s due to the plaster curing I believe). We decided on salt water because the cost of pool chemicals can be quite high and using the salt water system is supposed to reduce how much chemical you need.
We have white marbalite hand toweled plaster over the concrete. There is a 4′ inside “love seat” at the deep end, and steps at the shallow end of the pool. It is 8′ deep at the deepest section. We choose standard tile and coping as we found selections of both that we liked (and they didn’t cost extra which was nice). Our contract included 5 loads of water.
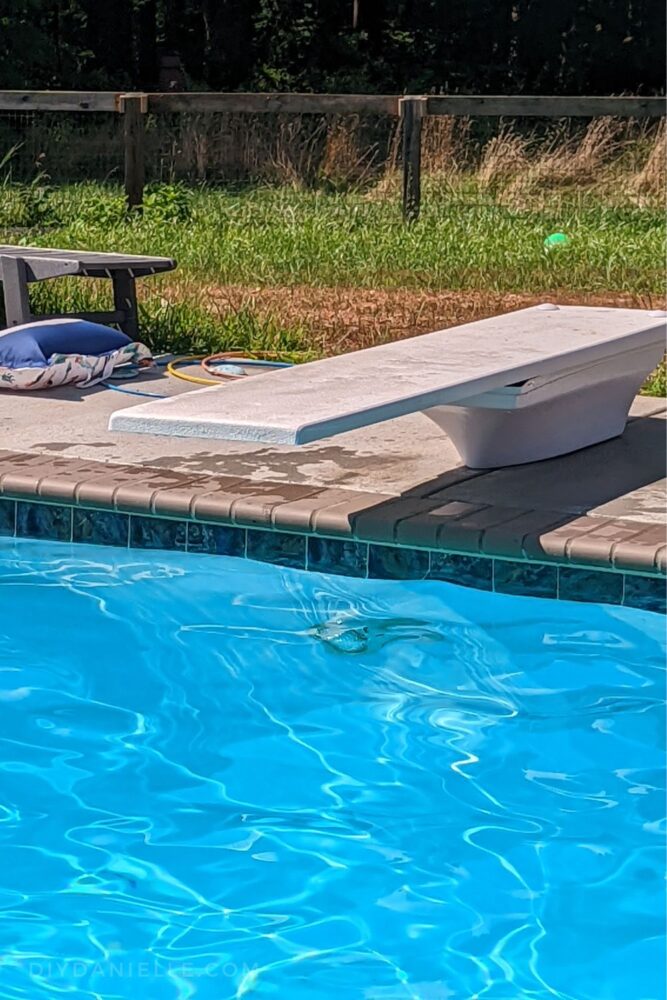
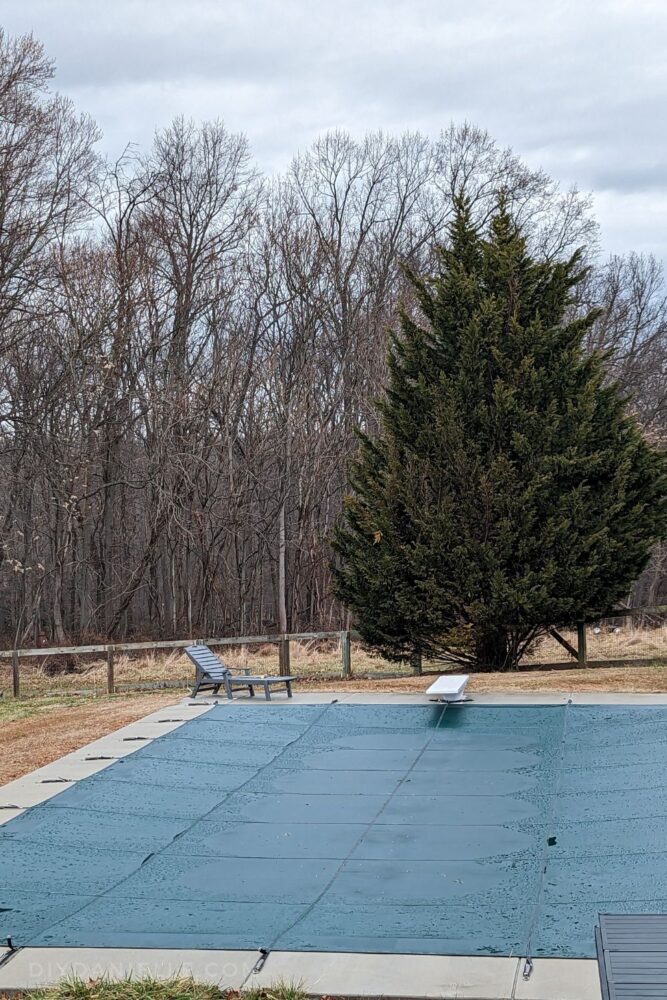
We have an electric heat pump, a green mesh safety cover for winter, (1) halogen light (white), a diving board, and an electric pool cleaner.
The contract gave us the total price, we had to give them a deposit, and then the payments were split up. We paid 40% at excavation, 40% at concrete application of the shell, 15% at the coping and tile stage, and 5% at the application of the interior finish.
While I’m not going to share what we paid (sorry), please understand that prices vary GREATLY by location. This is a supply and demand issue. In areas like Florida, there are a lot of pool builders and a lot more competition to drive prices down. Some areas probably have easier access to concrete and other supplies. I was reading that a pool would run between $20,000-100,000. We found prices SURGED at the end of the pandemic and our quotes were coming in $25-50k over what a friend was quoted for the same pool last year. And the highest quote I got was around $120k which was WELL over our budget. And it didn’t have any bells and whistles like a hot tub or much extra. We got one quote that was considerably lower than the others and didn’t use that company as they had HORRIBLE reviews- they went out of business the same year.
I’m hoping that sharing this will help others understand the process better and have a visual on the timeline of the project. Please let me know if you have any questions and I’ll see if I can answer them!
Parts of the Pool
Here’s a quick guide to the vocabulary because I DID NOT get it and wish someone had shown me this!
Here is a guide to the pool equipment that we have. I had to have my husband double check me on my original version and he told me THE ONLY THING I got right was the location of the electrical panel. LOL. The pool was his thing but this is correct (unless he’s wrong… teehee):

Heat Pump (Electric) | Filter | Salt Generator | Filter Pump | Electrical Panel | Filter Timer | Light Switch
In Ground Pool Construction Process.
Step 1: Decide What Pool You Want
We went with a concrete swimming pool, but we weren’t sure if we wanted a rectangular pool or one of those pretty shaped pools. A rectangular pool gives you more straight swim space and it’s likely easier/cheaper to get a cover- particularly if you want one of those expensive automatic covers.
While you can make some of these decisions later, it’s VERY helpful to know exactly how big of a pool you want. The size isn’t going to impact price nearly as much as you would think- we could have saved $2-3k by going a bit smaller; $2-3k is a VERY small portion of the price you’ll be paying. Get the size you want and that fits well for your space. Remember you may need to (and should) fence the space to keep out wildlife, pets, and children. The bigger the pool, the more fencing you’ll need. So there ARE additional costs to a bigger pool, but the pool size isn’t going to impact the pool quote itself by much.
A friend one had to perform CPR on a child who drowned in her pool- that’s not an experience you want to live.
If you know what size you want and what materials, it will help when you start comparing prices from quotes by multiple companies. Our pool is 20×40′ (800 sw ft) and at the deepest point, it’s 8′ deep. This allowed for us to have a diving board.
Step 2: Getting a Quote for a Pool
It’s important to get a quote from at least three different contractors when looking to install a pool. Pool prices vary by location (supply and demand, the number of available contractors, etc).
Before you setup a quote, screen the companies you’re interviewing by looking at their reviews- if they have HORRIBLE reviews, don’t interview them. It’s a waste of time. One company that I got a quote from had an extremely low quote, but a TERRIBLE reputation. They ended up going bankrupt mid 2022 and left lots of homeowners with half finished pools.
Get recommendations from local friends and family members to see who to interview. I found a small local pool company that offered a competitive price because I did a lot of investigating and didn’t ONLY get quotes from the first 5 companies that showed up on Google Search (often they’re paying for ads to get in those spots. In my opinion, high ad budgets mean that they’re building those ad costs into your price).
Once you have gotten a few quotes, checked out the company’s reviews, and made a decision, you’ll be signing a contract and they will move forward with pursuing any necessary permits with your county. They’ll come out to measure the area and a county person may come out to inspect the location for the pool too.
Step 3: Excavation and Initial Plumbing Process
Digging is a HUGE part of the process. You’re going to have a lot of leftover dirt, or you can pay for the dirt to be removed. Make sure this is outlined in your contract with the pool company. We opted to not have the dirt hauled away because we needed it for another project. You can also let people come and take dirt, but it’s a tough process unless you have the equipment to load their trucks. It’s a LOT of dirt.
To start, they outline the location for the pool, use rebar and 2x4s to frame it, and a skid steer to dig and remove dirt. They laid stone at the bottom.
At this point they installed a concrete slab for where the pool equipment will go. They began to trench for the plumbing to the pool pump. They also did small detailed things like cut out the lounging “step” on the deep end (back right side).
Once they finish all of the plumbing, I believe there’s generally a county inspection before they fill it all in.
Step 4: Rebar, Concrete, Tile, Coping, Concrete
I lumped this process together because there is a lot of concrete work involved throughout it. The concrete requires a long curing process after it goes in so plan on some patience. There are also some inspections involved in this stage.
As you can see in the video, they began with rebar. Rebar supports the concrete’s frame so it doesn’t just crumble. More rebar = more supportive. It was magnificent what they did.
Once the rebar is in, they spray in concrete. This is also SUPER fascinating to watch. I thought they would be pouring it in so I was so pleased to watch the careful process. You can see that they left a space for the pool light, plumbing, and they concreted the little ledge at the deep end.
They didn’t pour the stairs immediately, but came back to do that later.
The concrete needs to cure for two weeks before the coping and tile could be installed, and at that time, they also adjusted any plumbing. You probably noticed in the excavation video that the plumbing was quite long. You always want the plumbing tall before the concrete pour… you cut it to the height you need AFTER the concrete goes in. It’s easier to cut away PVC than add more!
Step 5: Final Stages
The pool shell concrete needed to cure for a total of thirty days before the pool interior (the plaster) could be installed.
The final stages involved electrical work and plaster. Plaster covers the concrete. The plaster is sprayed on.
You’ll have some final inspections, including inspection of the electrical work at this point.
Our county doesn’t allow for the pool to pass inspection until the fence is complete and up to code so we did some rushing to bring our fence up to code. The fence can’t be climbable, the gates must automatically close using self closing springs, you need child safety gate latches, and a pool alarm on any door exiting to the pool area. For what it’s worth, I hate that pool alarm to the core of my BEING. We’re looking to fence around the pool eventually so we don’t need it (although my kids all swim well so I’m mostly stressed with guests).
We installed all of the springs, latches, and the alarms ourselves. It probably saved us a few dollars during the process.
They installed the diving board after the pool was filled.
I have a lot of video tours from the pool build on my Instagram channel if you want to see some of the later steps further broken down.
Pool Closing
For our first pool closing, we had the company come out. They installed the clips in the concrete for the pool cover to attach to. But overall, my husband did a lot of the prep work in advance. You need to add certain chemicals, remove the filters, and do some other types of work.
This is what the pool look like closed for the winter! We can’t wait to open it up again in the Spring!
Your Pool is Finished. Now What?
This is the BEST part- seeing how much joy your family and you get from this pool! You’re done! Sort of.
For the first week,, you’ll be scrubbing the plaster a couple times per day. Then you scrub it once per day after. It usually took around 30 minutes to do our pool for each scrubbing. Scrubbing helps with the curing process and prevents dust-like particles from accumulating on the plaster. If they aren’t brushed off, they harden and it leads to the surface being grittier, like sandpaper. I believe we did this for around 30 days, but we can’t remember exactly.
A friend suggested that frequent scrubbing (and even extending how long you scrub to beyond the 30 days) may decrease your long term chemical costs- I can’t say if it will or won’t, but we were pretty diligent about scrubbing. Listen to the rules from your pool builder (and they likely sell pool chemicals so be even more diligent than they tell you). Scrubbing is a giant PITA, but honestly it’s probably one of those crap jobs that will pay off and make your job easier long term so do it.
If you choose a salt water pool, you CANNOT use the salt water immediately with the plaster finish. You need to wait the thirty days before starting to use that. Our pool company gave us detailed instructions at opening and it was super helpful to be walked through that.
You can check out these 19 DIY Pool Projects for items to make for your pool area. Work on your pool landscaping (unless you paid the contractor for that as well) and enjoy your pool!
I recommend teaching your kids and pets to swim AS SOON AS POSSIBLE.
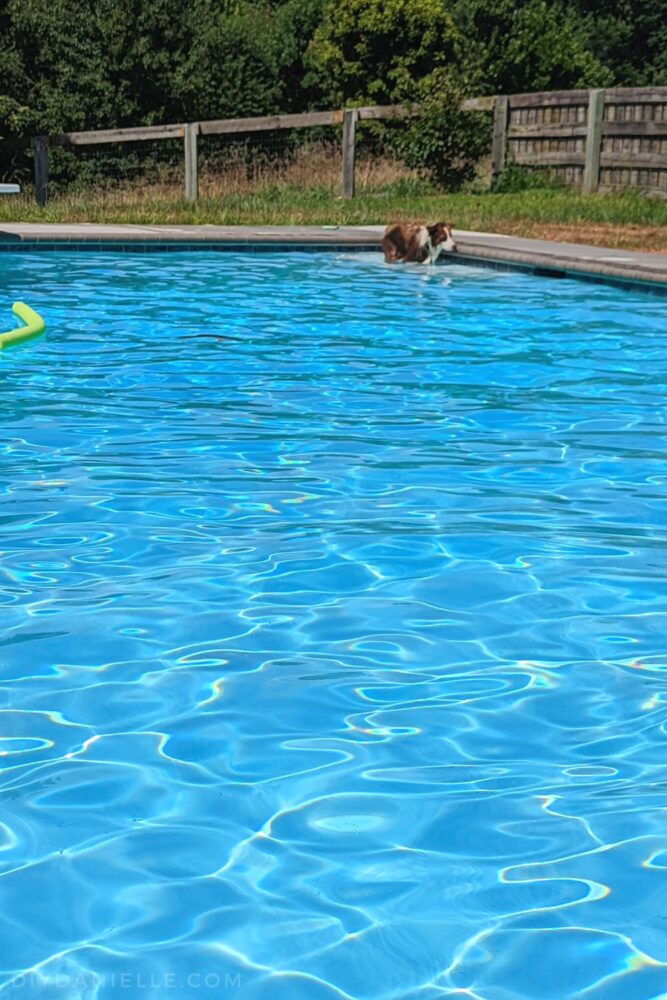
We taught our dog Pepper to swim, and our other dog Rocky maintains a healthy distance from the ‘lava pit’ so we haven’t pursued this with him yet. We didn’t use dog life jackets with Pepper, but we’d lure her in with a ball, let her fall in, then support her with a hand under the belly so she wouldn’t sink. She would swim and we’d go with her until she realized where the exits were.
We let her try and fail to try to get up on the sides of the pool, continuing to support her (no drowning allowed), until she went or we directed her to the steps. Then we repeated that until she learned the steps were the exit. Then we eventually taught her to go to the lounge area in the back as a 2nd exit. We used less and less belly support as she gained strength for swimming.
By the end of the summer, she would jump into the pool on her own to cool off and seemed to really enjoy the process. We didn’t force it and we made sure she never felt unsafe or like there weren’t exits- but we didn’t want to give her a false sense of security with a life jacket either. I was worried she wouldn’t sense the potential danger of the pool/drowning so I made sure she understood that if I removed my hand, she could sink or her head would go under. I didn’t want her to panic or be scared- I just wanted her aware of her safety. I hope that makes sense.
Pepper learned to swim AND dive off the diving board that summer. It was AMAZING and you can see some of the videos on my TikTok channel.
I take the same approach with my kids and swimming. And of course, we supervise and teach.
Please share and pin this post! You can also post your project and tag the DIYDanielle team on Instagram @doityourselfdanielle!
Great idea! Inground pool construction progress photos are a great way to document each phase—from excavation and framing to plumbing, concrete work, and final finishes. They not only showcase the transformation but also help ensure quality and transparency throughout the build.