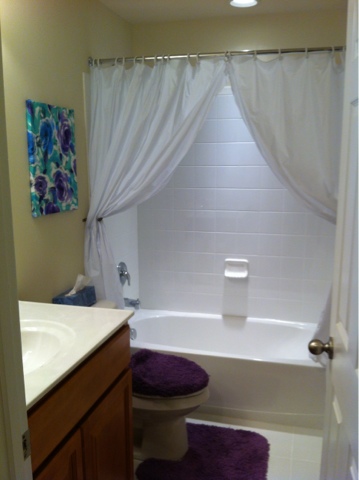
How to install a two panels shower curtain for only a few dollars! This is a great way to spruce up your bathroom without spending a fortune.
If you don’t regularly follow my blog, we just moved to a house and we now have 3 full bathrooms and one half bath. I’ve been trying to fill this house with all my belongings from the 2 bedroom/2 bathroom condo I lived in before and it’s expensive. I’m trying to save some money, but still make everything look beautiful because I love my new house and I want to show it off!
Needless to say, I saw this on Pinterest and needed to do something to replicate it. I was going to try it before in our condo, but there ended up being some problems with pulling it off. For one, I want to actually use my shower and I don’t want water everywhere or soaking wet curtains. I believe they used actual curtains for this bathroom.
So the other day I was at the dollar store (one of them?) and found these white shower curtains and white shower curtain rings. I’m puzzling over which project I wanted to do with shower curtain rings when I thought of this bathroom upgrade and decided to try to do something similar to the above photo, but super cheap. I needed to put up a shower curtain anyways and worst case scenario, I’d have an extra shower curtain and an extra set of curtain rings… and it turns out I have a lot of projects pinned that use there. Also, I like to use cheap shower curtains under art projects. Just fold them up after playing with Play Doh or painting so you don’t get anything on your floor.
I bought 2 white shower curtains and 2 sets of white shower curtain rings, totaling $4. My husband had bought some curtain drawbacks (or whatever they are) for $10 for a pair and we never used them. My project total ended up being $14.
 |
| Step 1: Hang two different matching shower curtains up, using two sets of shower curtain rings. Take the two middle rings and hook them through each other as well. |
 |
| Step 2: Put up your tie backs/curtain drawbacks. Daddy B did this for me after telling me repeatedly that this wouldn’t work. |
If you’re doing other decorating or renovating in your bathroom, make sure to check out my tutorial on how to hang a heavy mirror.
I may decide to add fabric flowers to the curtain drawbacks to hide the metal on the wall a bit better, but for right now I really like how it looks. Especially given that it was a $14 project! As you can see I pulled in my fabric “paintings” from a previous blog post, No-Sew Wall Art.

