
Learn about sewing machine tension, how it impacts your sewing, and how to fix problems with tension.
This post may contain affiliate links which may earn me commissions should you click through them and take certain actions. As an affiliate for Amazon, Cricut, xTool, Home Depot, and other sites, I earn from qualifying purchases. Please DIY carefully. View my full legal disclosures here.
The majority of my content is generated by me, as are 99% of the photos and videos, but I utilize technology for titles, descriptions, video editing out all of my ums, and occasionally for text overlay on images.
Please read the whole post so you don’t miss any important information!
Those lucky sewists among us can buy a sewing machine, take it out of the box, and sew to their hearts’ content without having to adjust any of the knobs and buttons on their machine.
But if you’re like most people, you’ll have to adjust the tension on your sewing machine at some point, especially as you branch out into different kinds of fabric.
Changing the settings on your machine can be intimidating, but I’m here to tell you that adjusting your sewing machine tension is not nearly as hard as it seems!
What is sewing machine tension and why does it matter?
Sewing machine tension is how tight the threads are pulled as you sew. The tighter your thread (or the higher your tension), the tighter your stitches.
With proper tension, your sewing machine needle moves up and down, the bobbin thread is pulled up, and you get nice, neat, even stitches. Too much tension and too little tension are both problems.
If your tension is too high, your thread is stressed to the point where it may be weaker, and your seam may not be strong enough to hold your garment together. Your seam or hem may also look wavy.
If the tension is too low, you may be able to see the stitches in your seam when you’re wearing your garment, and they may be more prone to breaking.
Either way, tension problems not only lead to weaker seams, but also less attractive seams and hems.
How can I tell if my tension is wrong?
If you’re not paying attention, you may not realize your tension is wrong until after you’re finished sewing and you put on your garment, only to realize your threads are breaking or that you can see more thread than usual along the seams.
It’s beneficial to you to learn how to identify tension problems as you start a project.
Ideally, you should test your stitches on a piece of scrap fabric that’s the same as the fabric you’re using for your project.
Testing Your Stitches
Sew a straight line a few inches long, cut your thread, and look at your scrap.
Is your fabric wavy, almost like a very loose gather? If so, your tension is too high.
Next, look at the stiches under a good light. Can you see the loops of the bobbin thread showing through on the top side of your fabric? If so, your top tension is too high.
Can you see loops of the top thread on the underside of your fabric? If so, your top tension is too low and/or your bobbin tension is too high. It can sometimes be hard to tell if you’re seeing the bobbin thread on top or vice versa, so you can start with using different color thread in your bobbin, and ideally both threads should be different from your fabric color so it’s easy to see.
Note: If you have a mess of thread on the bottom or top of your fabric, kind of like a bird’s nest, your machine is probably threaded incorrectly.
A mess on the underside means your top thread is the problem, and a mess on the top means your bobbin thread is the problem.
Rethread your machine and try again before adjusting the tension.
Comparison of Tensions
Below are a few photos comparing three different tensions on the same piece of woven cotton fabric.
Here is the top of the fabric. The left stitch had a setting of 0, the middle was a setting of 4 tension, and the right side is a 9.
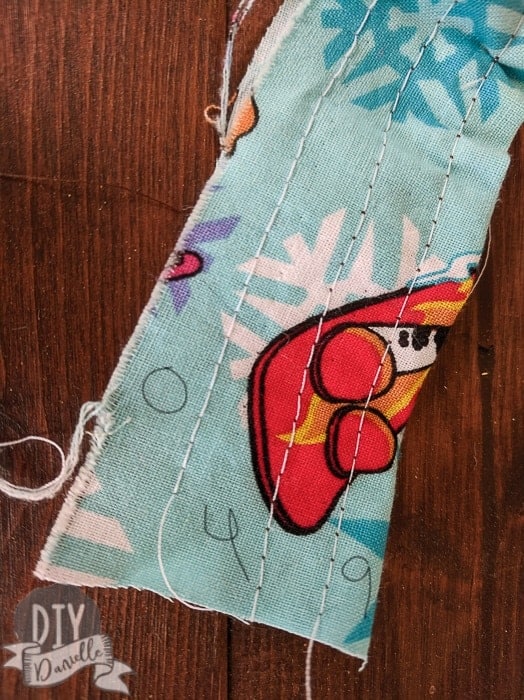
Here is a photo of the back of the fabric. The top is the 9 setting (as you can see because that’s where the fabric is gathering). The 4 is in the middle and the 0 is at the bottom.
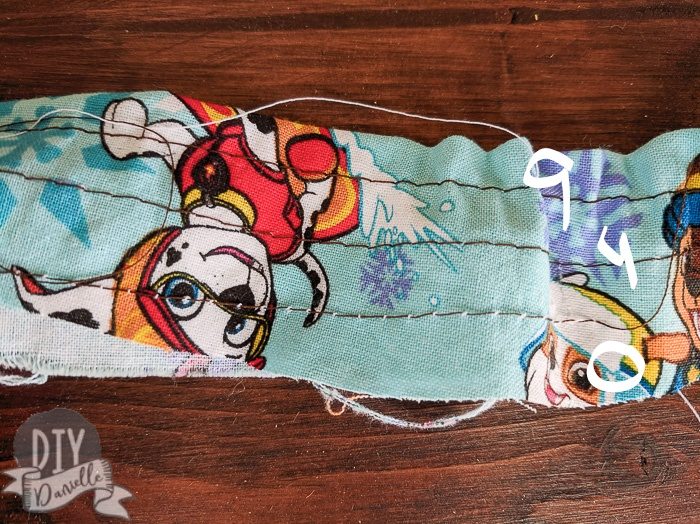
As you can see on the bottom, there’s NOTHING holding those stitches in place… this allows me to pull the brown thread out with absolutely zero effort. Just one gentle tug can remove the whole piece of bobbin thread.
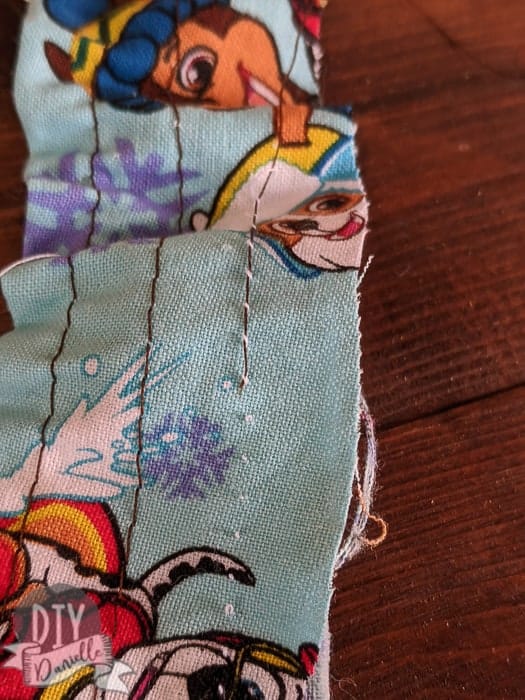
As you might guess, when you flip the fabric back over to see the white thread, the white thread easily comes up with a second gentle tug. There’s no bobbin thread balancing it to hold it in place.
It’s a very easy stitch to remove. That’s not ideal in most cases.
The 4 setting one looks a bit loose but the thread is solidly on there and should be fine. A setting of 5 was better.
How do I fix tension problems once I’ve found them?
Let’s start by reviewing how your sewing machine creates tension on the thread.
When you thread your top thread, you pull the thread between two mostly-flat metal pieces call tension discs. These discs press up against each other, and the thread runs between them.
As you increase the tension, the discs press harder against each other and the tension on your thread increases.
As you decrease the tension, the discs separately more and the thread passes more easily through them.
Think about pressing the palms of your hands together and holding a piece of string between them. If you barely press your hands together, the string is easy to pull.
If you press your palms together harder, the string is more difficult to pull, and the thread becomes taut as it leaves your palms.
Your bobbin also has tension. The bobbin case (whether it is separate and meant to be removed each time you load a bobbin, or embedded in your machine) squeezes the bobbin and stops it from spinning too fast.
If the bobbin spins too fast, the thread never gets pulled taut. You can test this by putting a full bobbin in the palm of your hand.
If you close your fist loosely around the bobbin and pull the thread, it comes out easily. If you close your fist harder and pull the thread, the thread comes out slower, is easier to control, and is pulled taut between your hands.
Notice if you close your fist very tightly around the bobbin so that it doesn’t move at all, your thread will break when you pull it. This demonstrates the problem with tension being too high.
Adjust the Top Thread Tension First
You want to start by adjusting the top thread tension.
Most of the tension problems you have can probably be solved by adjusting the top tension; adjusting the bobbin tension is much harder.
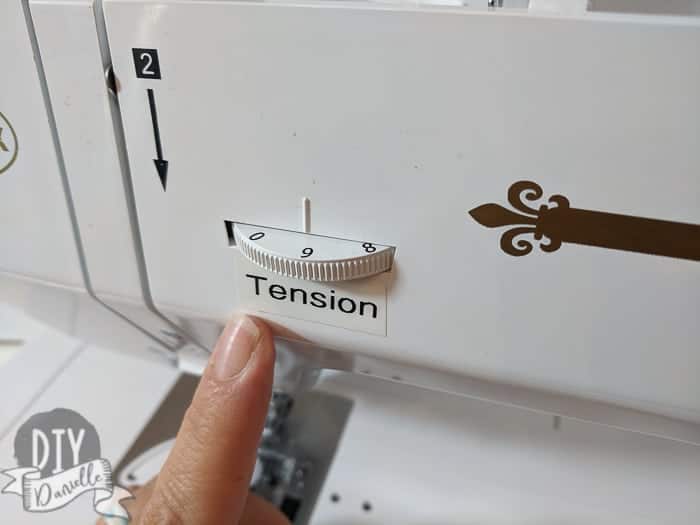
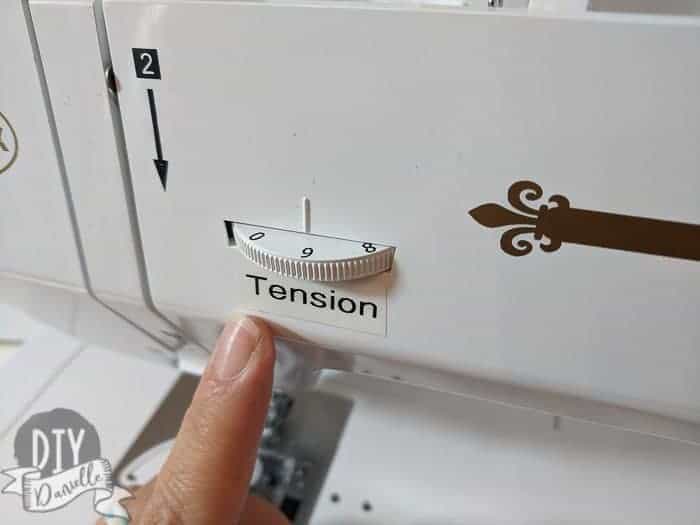
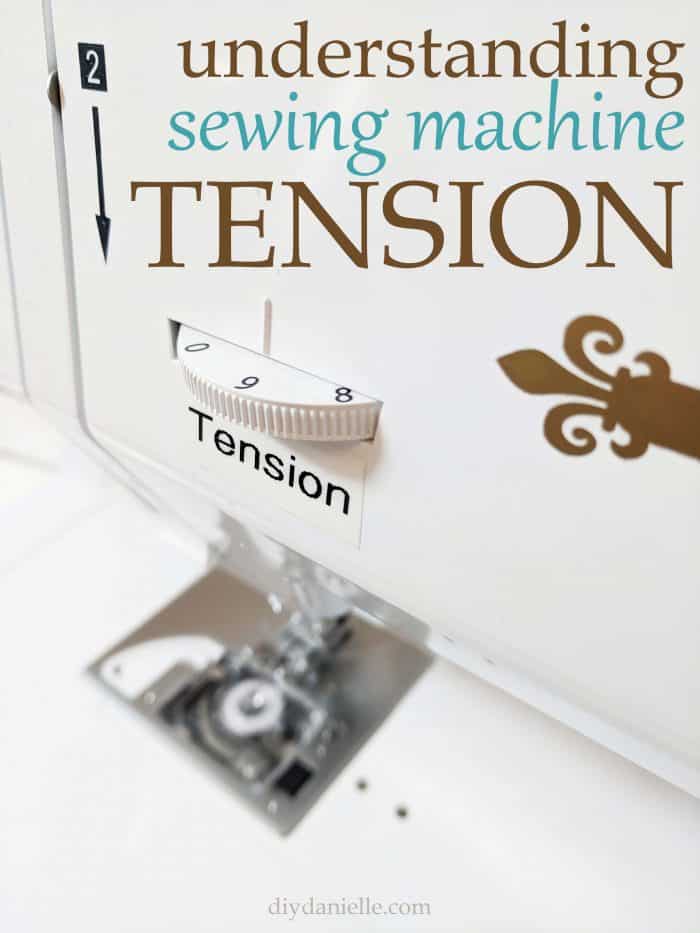
Your sewing machine has a knob or a dial for adjusting the tension of the top thread.
You can look in your manual if you’re not sure where it is, but it usually has numbers on it, and older machines may have a small spring between the knob and the body of the machine. Higher numbers on the dial or knob mean higher tension.
Adjust your tension either up or down a notch or two, and try some more stitches on your scrap fabric. Keep adjusting the tension up or down as needed until your fabric is flat, you can’t see the bobbin threads on the top of your stitches, and you can’t see the top thread on the bottom of your stitches.
I adjusted my top tension, but I’m still having issues. How do I adjust the bobbin tension?
If you see the top thread on the bottom of your fabric it means that either your top tension is too low or your bobbin tension is too high.
Usually, you can (and should) fix this problem by adjusting the top tension higher. The bobbin tension is usually harder and more finicky to adjust as there’s no numbered dial.
Some sewing machine manufacturers make it especially difficult to adjust the tension on your bobbin case by requiring you to take the needle plate of your machine off completely to adjust the tension.
Changing the tension on your bobbin should be a move of last resort.
If you’re sure your machine is threaded correctly, that your bobbin is wound and threaded correctly, and you’ve adjusted your top tension, but you’re still having problems with your tension, start by consulting your sewing machine manual or the manufacturer’s website for instructions on how to adjust the bobbin tension.
Bobbin cases have a tiny screw to adjust the tension. Sometimes there is more than one screw on the bobbin case, and that’s why it’s important to consult your manual to make sure you’re turning the correct screw.
As I said above, you may need to remove your needle plate to remove the bobbin case, and you can learn how to do that through your manual, too.
Once your bobbin case is out and you’ve identified the correct screw, make a note of how the screw is positioned to start.
You can put a small mark on your bobbin case with a marker or chalk, or take a photo with your phone.
Then, use a small screwdriver to turn the screw (your machine may have come with a tiny screwdriver or other tool that is meant for this purpose). Turn the screw clockwise to increase the tension, and counter clockwise to decrease the tension.
Try turning it just 30 or 45 degrees (from about 12 o’clock to 1 or 2 o’clock) to start.
Put your bobbin and bobbin case back together and back in the machine and try some test stitches. Make sure you adjust your bobbin case tension just a little at a time.
I’ve adjusted my top tension, and my bobbin tension, and I’m still having issues. What now?
If you’ve exhausted all of the tips here, you may have a different sort of problem.
Start by resetting your tension settings to where they were when you started and rethread your machine.
Make sure your thread is between the tension discs.
Re-wind your bobbin and put it back in, making sure it’s loaded correctly.
Make sure you’re using the correct needle for your fabric.
You can also try adjusting your stitch length up or down.
If none of these fixes solves your problem, try different types of fabric and see if you have the same problem. If you do, it may be worth having your sewing machine serviced.
Here’s a quick video explanation of sewing machine tension…
Please share and pin this post! You can also post your project and tag the DIYDanielle team on Instagram @doityourselfdanielle!
This post was written for DIYDanielle by Becky McGill-Wilkinson. Web Story: What is Sewing Machine Tension?