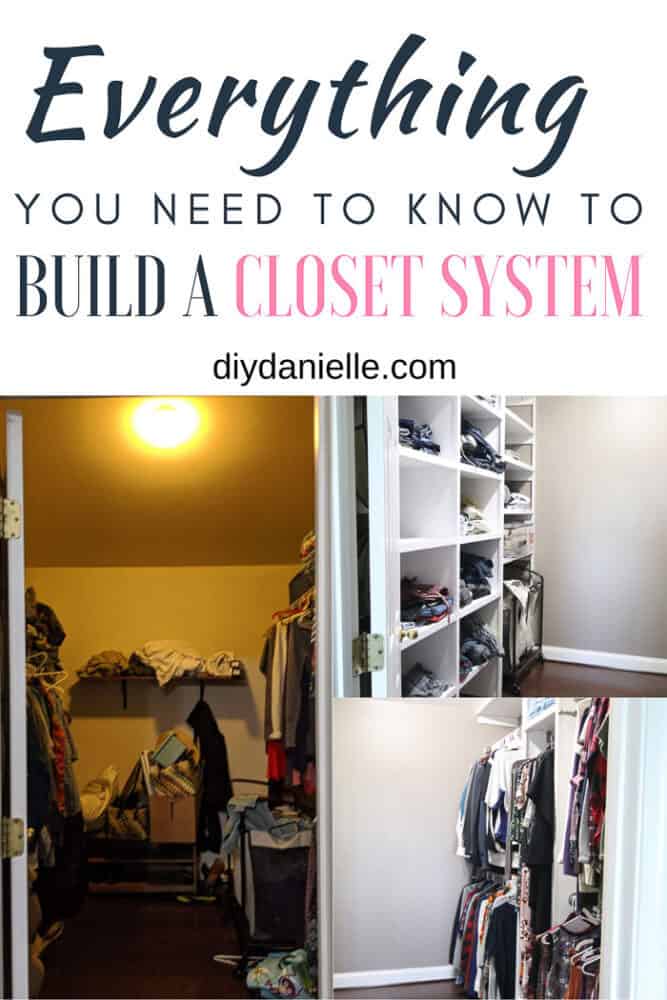
How to use plywood and trim to create DIY closet built-ins. These plywood shelves with 1x2s for trim saved us over $4000 on a closet system!
This post may contain affiliate links which may earn me commissions should you click through them and take certain actions. As an affiliate for Amazon, Cricut, xTool, Home Depot, and other sites, I earn from qualifying purchases. Please DIY carefully. View my full legal disclosures here.
The majority of my content is generated by me, as are 99% of the photos and videos, but I utilize technology for titles, descriptions, video editing out all of my ums, and occasionally for text overlay on images.
Please read the whole post so you don’t miss any important information!
Oh. My. Goodness. I am BURNT OUT on building things. When I wrapped up our DIY laundry room shelving, I was adamant that I was taking a break. I figured I’d tackle some small projects until the burn out wore off.
But I KNEW the master closet needed help. It looked like this…
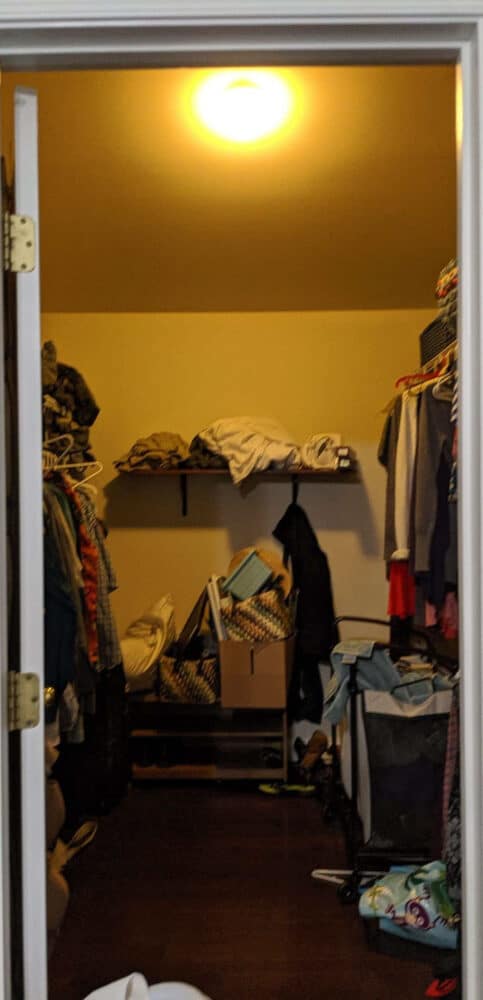
I wasn’t happy just organizing it because we are folders… we don’t like to hang clothing up. There was no good spots to place folded clothing because the entire closet was wire shelves.
Rather than DIY it, I wanted to hire a company to put it in, but the quote was way over budget. So I decided to DIY it again (sigh). I know I’ve written about our previous closet system, but I wanted to get into the design details and cost breakdown this time. You can also see some of the differences and improvements from our last build.
Here’s a SUPER in-depth guide to what I did, some things I’d do differently, measurements for the closet, design info, and pricing breakdowns.
Table of Contents
- Cost Comparison for Building Your Own Closet System vs. Hiring a Company
- Pros and Cons to DIY’ing Your Closet
- Trim Options for Plywood Shelving
- Options for Accessories in a DIY Closet Renovation
- Measurements for Designing Closet Shelving
- Closet Shelving Height
- Closet Shelving Width
- Closet Shelving Depth
- Shoe Organizer Spacing for a Closet Shelf
- Closet Rod Placement
- Tips for Designing your Closet System
- Minimizing Plywood Cost
- Creating an Open Feel to the Closet
- Design Around Outlets and Vents
- Pocket Holes vs. Side Supports
- Adding a Middle Shelf Between Rods
- Save this for later!
Cost Comparison for Building Your Own Closet System vs. Hiring a Company
We originally got a quote from one large closet company because I DID NOT want to do this project. I knew it would be a lot of work to DIY. Unfortunately, even with the more affordable choices, our quote came in at around $5k. This was more than my husband was willing to spend on a closet.
Want to save money on a non DIY closet system? You need to skip the upgrades.
The downgrades you’ll need include:
- White closet system (seems like other finishes cost extra)
- No customization for heights: standard sizes are best
- Skip drawers and pull out accessories
- Prep the room yourself (patch and paint walls)
- No special lighting
I decided to save receipts to give you a break down on how much it costs to make your own closet system from scratch.
Here’s the run down on what it cost me to DIY the closet:
- (6 sheets) 3/4″ Plywood 4×8′ at $50/sheet $300
- (200′ roughly) 1×2 #2 Premium East White pine at .37/ft $74
- Rods:
- Short Rod: $10.99
- (4) Heavy Duty Rods @ $54 $216
- Rev A Shelf Additions
- Belt/Scarf hanger $18
- Valet Rod: $20
- Tie Hanger: $21
- Box of 1/4″ Kreg coarse screws $11*
*Linking to HD which would have been cheaper for these, doh.
Total cost: $660
I used some cabinet screws and scrap plywood to make supports along the wall for the shelves attaching to the wall. Due to the lack of studs, I used a wall anchor kit (mine came with a drill bit and screws as well) for most of the side supports.
A lot of the supplies and tools are items I already owned, although I did need to pick up more paint and primer.
Other supplies, not included in the cost estimate:
- DAP DryDex Spackling
- Sandpaper
- Kilz 2 All Purpose Interior and Exterior Primer
- Behr Premium Plus Paint & Primer in One, Interior Semi Gloss, White (no colored added)
- Behr Premium Plus Paint & Primer in One, Interior Satin Coastal
Tools used:
- Circular Saw
- Kreg Rip Cut
- Miter Saw
- Nail gun with finishing nails
- Kreg pocket hole jig
- Stud finder
- Level
- JobPlus
- Drill
We also replaced the light in the closet; the total cost for that was $104. The price breakdown for this was:
- 6-Light Foldable Track Lighting, Oil Rubbed Bronze Finish
- 10 Inch Molded Plastic Ceiling White Finish Medallion for Light Fixtures and Ceiling Fans
- LE GU10 LED Light Bulbs, 50W Halogen Equivalent, Non Dimmable, 5000K Daylight White Natural Light
The light fixture came with bulbs, but we used the same fixture in the laundry room and the bulbs make a small room VERY hot so we swapped them out for LEDs.
I ordered the medallion to cover the area where the old fixture was so I didn’t need to patch the ceiling. It just saved me a little extra time.
Pros and Cons to Renovating Your Closet
When I posted, “Ew I’m starting to renovate our closet” on Facebook, a friend of mine immediately piped up and said, “WAIT is it that bad?!”
Yes and no. It’s NOT difficult, but it’s a large project that requires a lot of work.
Pros
- Full design capabilities. There isn’t much standing in your way.
- Save money.
- Lots of color and wood choices
- Lots of trim choices
- Customize the height of the shelves and closet system to meet your needs.
Cons
- Lots of sweat equity and time. What is your time worth? Do you LOVE building and painting?
- Sanding, mess, cleanup
Trim Options for Plywood Shelves in Closets
There are a number of different trims you can purchase, but I really liked the 1x2s in my laundry renovation so I opted for these. The upside is that they’re thicker than the 3/4″ plywood, giving you a lip to your shelves. The lip can keep things from rolling off the shelf or give you a place to hide cabinet lighting.
The downside is that there’s a lip to your shelves. It decreases the size of any bins you want to use. It might feel more closed.
Veneer is an iron on piece of thin wood that you add to the front of plywood. It can be stained or painted. Personally I hate using it because it’s time consuming to iron on. Also I hate ironing.
It does have some benefits though. It’s very thin and looks natural. It covers the raw edge of your plywood. It doesn’t take up any extra space in your room. I would use veneer for a smaller closet.
At my old house, we put in a DIY closet organization system with veneer on the plywood sides.
Veneer or a thinner trim would also allow you to add drawers more easily to your closets. We have enough drawers in our bedroom so we didn’t need to account for that.
Here’s an up close photo of the 1x2s we used for trim. Excuse all of my husband’s pants/shorts… things got messy pretty quick!
You could certainly make drawers work with the trim, of course, if you prefer that.
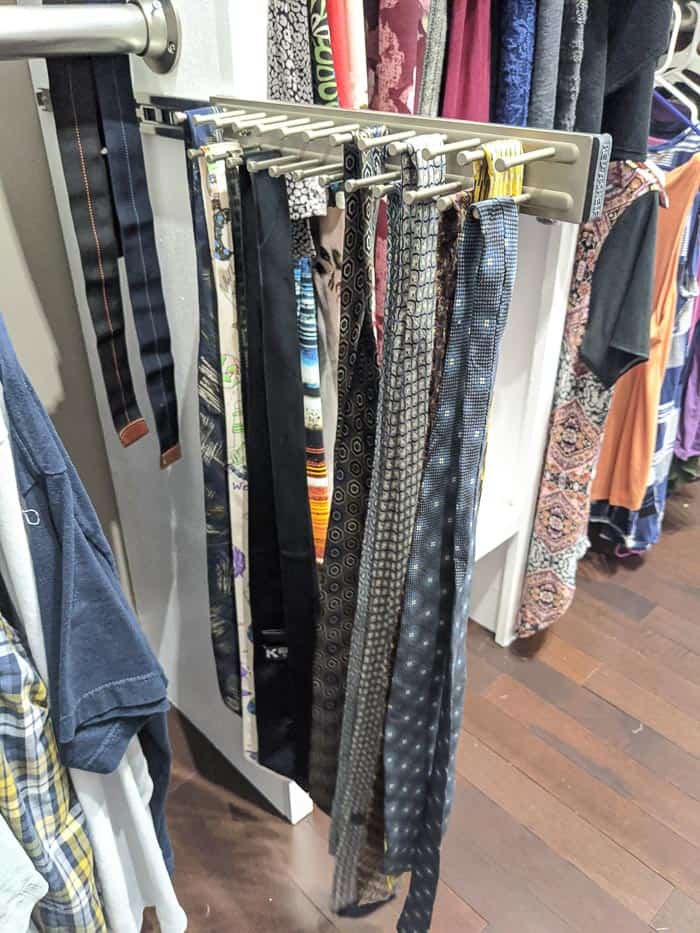
Options for Accessories in a DIY Closet Renovation
There were a few accessories that I found on Amazon that were $20 or less. I’m still debating if they were worth it.
You can buy these accessories to hang on rods too if you prefer. My main issue with them was finding a good spot to hang them. They would work well in the “long” hanging section, but my trim prevented them from sliding out if I placed them there.
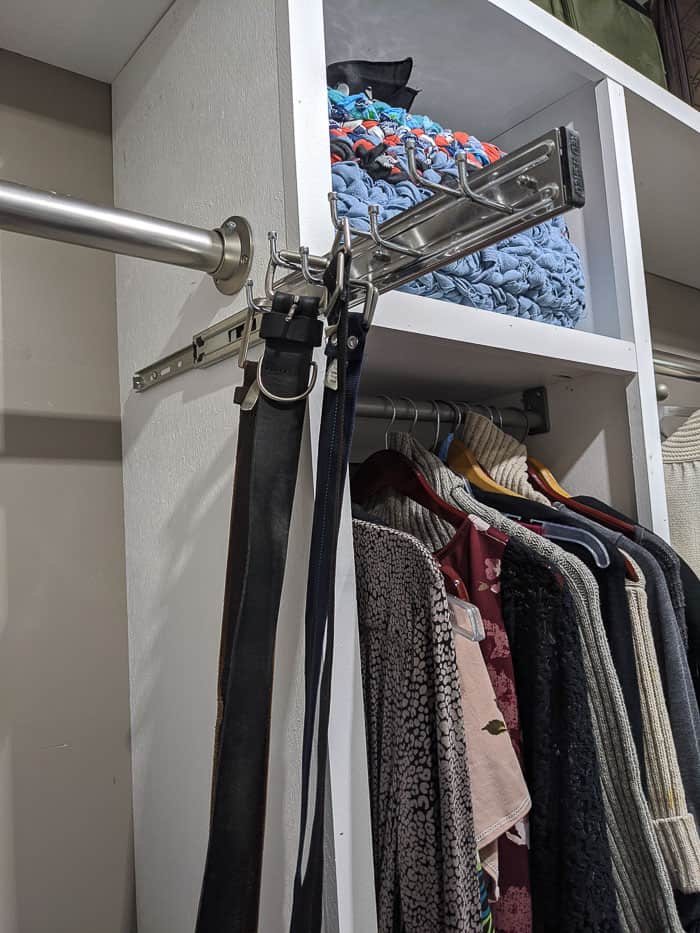
The belt hanger needed more space to hang the belts, but the bottom rod interferes. I’m not stressed, but it’s something to plan out in advanced if that will drive you nuts.
Measurements for Designing Closet Shelving
Shelf Height
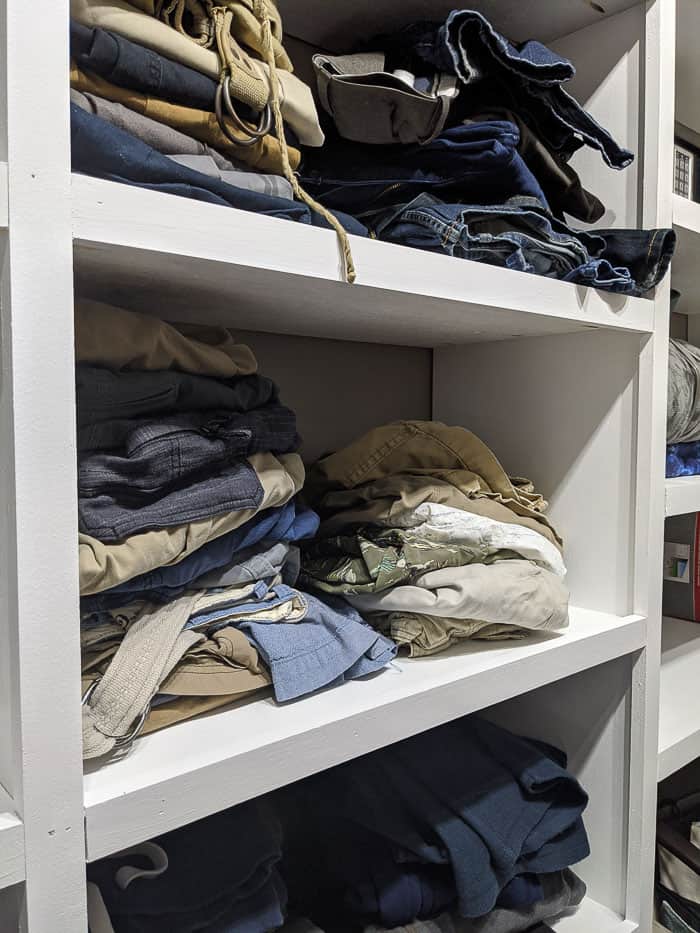
For the clothing shelves, we decided to keep 15.5″-16″ between shelves. This leaves plenty of room for stacking items on each shelf.
The trim takes up some of that real estate so if we were using bins, we’d need our bins to be smaller than the width between the trim.
If you prefer to have smaller stacks of clothing, you’ll want more shelves.
Personally, I like the larger openings between shelves because it feels more open to me. Lots of little shelves seem like they’d be a bit claustrophobic and tight to work in. Shelves tend to block light from the ceiling light.
If you go with more shelves, I’d definitely add under cabinet lighting to brighten things up and I’d choose veneer to finish the fronts instead of 1×2’s.
Shelf Width
The width of the shelf is entirely a personal preference. We each have a shelf unit for clothing that is 30″ wide which allows us to place two folded items side by side, and stack others on top.
The shoe shelves are 22″ wide which seems sufficient for 2 pairs of shoes side by side. You can decide for yourself by putting a pair of your BIGGEST shoes side by side and seeing how much real estate they take up. Of course, you may want a longer shoe shelf than I have!
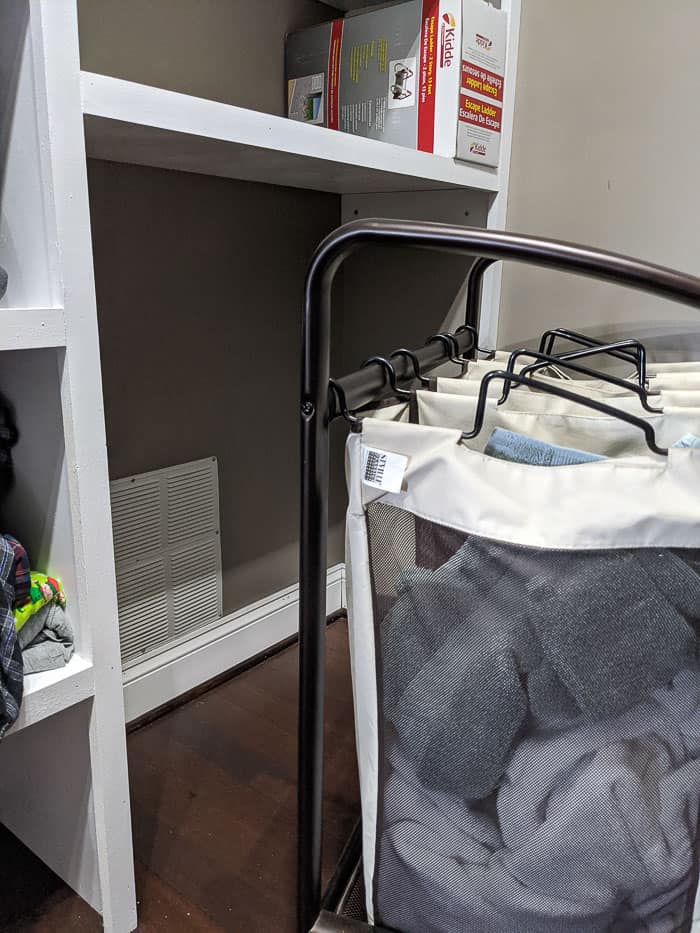
The widest shelf is 36″ wide. I decided on this width so our rolling laundry organizer could fit under it. This width allowed us enough space to avoid blocking the vent.
Shelf Depth
As mentioned before, I decided on a 15″ shelf depth simply to conserve on plywood and save money.
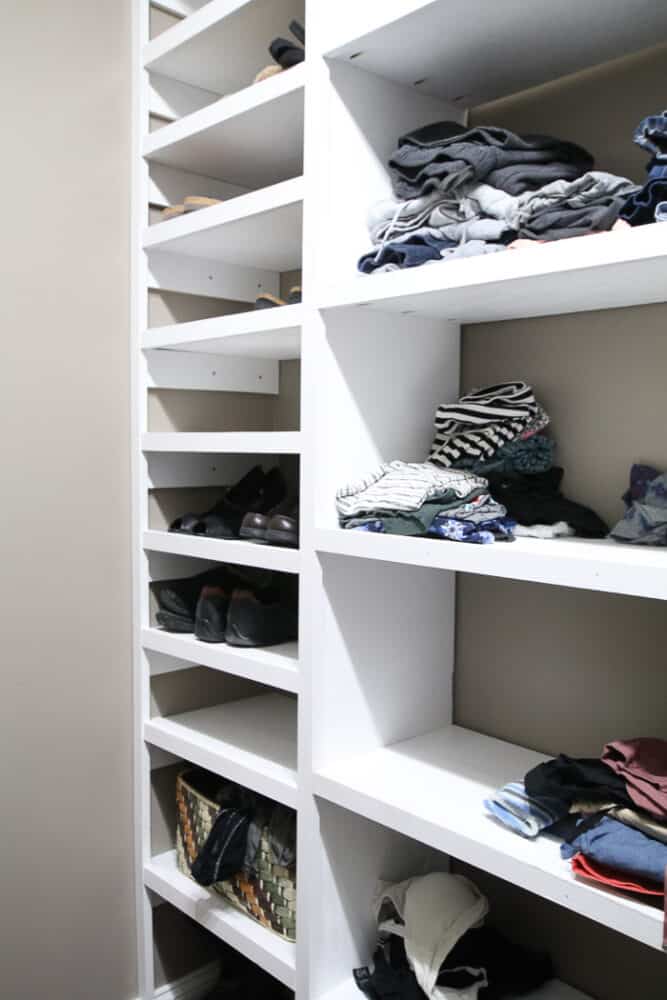
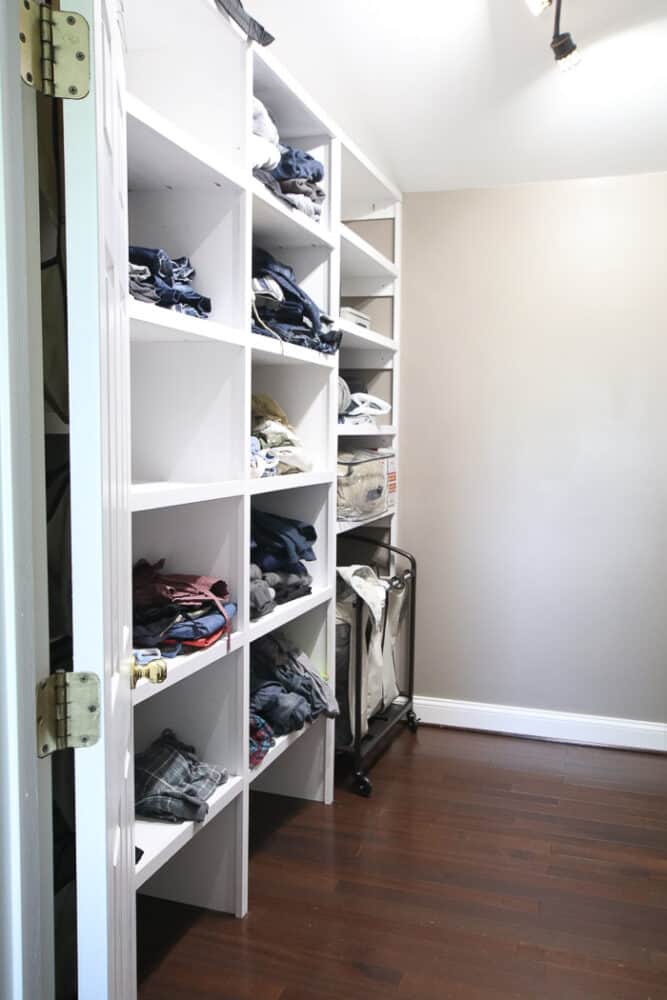
How Much Space Between Shoe Shelves in a Closet Organizer?
I varied the space between shelves on my shoe organizer. My bottom shelves were taller while my top shelves were closer together. This allows me to store a variety of different shoes and boots in my closet.
With a 17″ gap, I am able to fit a couple pairs of high boots. I used a 13″ gap for the shelf above it for shorter boots (shelf with the basket). My other shelves decrease in size to 9″ apart, then 7″ towards the top.
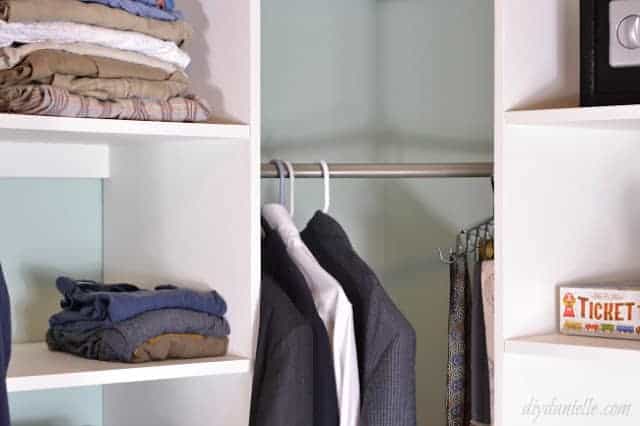
Closet Rod Placement
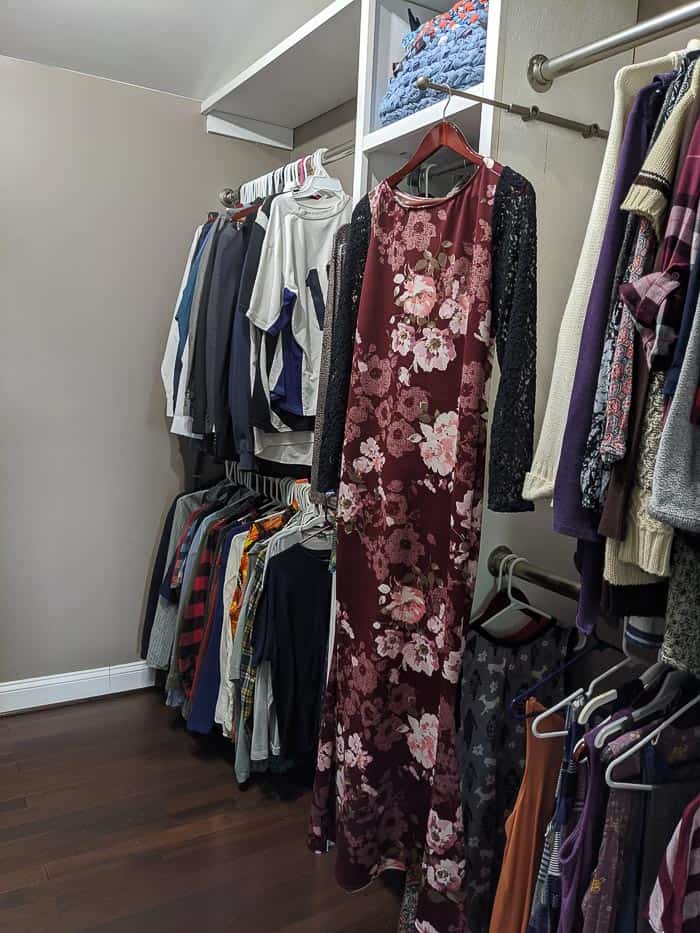
Single closet rods should be placed 67-70″ from the floor. For double rods, the first rod is placed 40″ from the floor and the second rod is 80-82″ from the floor.
The center of the rod should be around 11″ from the center of the rod to your wall.
With the rod depth at 11″, my clothes/hangers stick out from the wall about 20″.
My original research said that single rods should be 60″ from the floor, but I’m 5’6″ and at 67″ from my bottom shelf, my floor length dresses still brush the bottom.
In the photo below, I haven’t added the center rod yet.

Tips for Designing Your Closet System
Here are a few of my thoughts as I am wrapping up this project. There are some things I’d design or build differently next time.
Minimizing the Plywood Cost
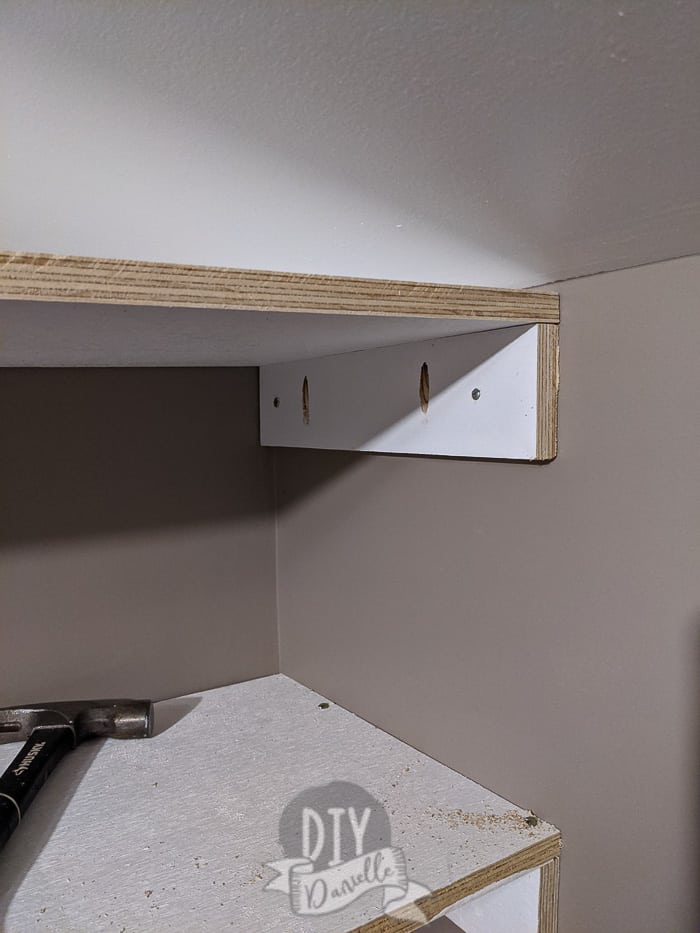
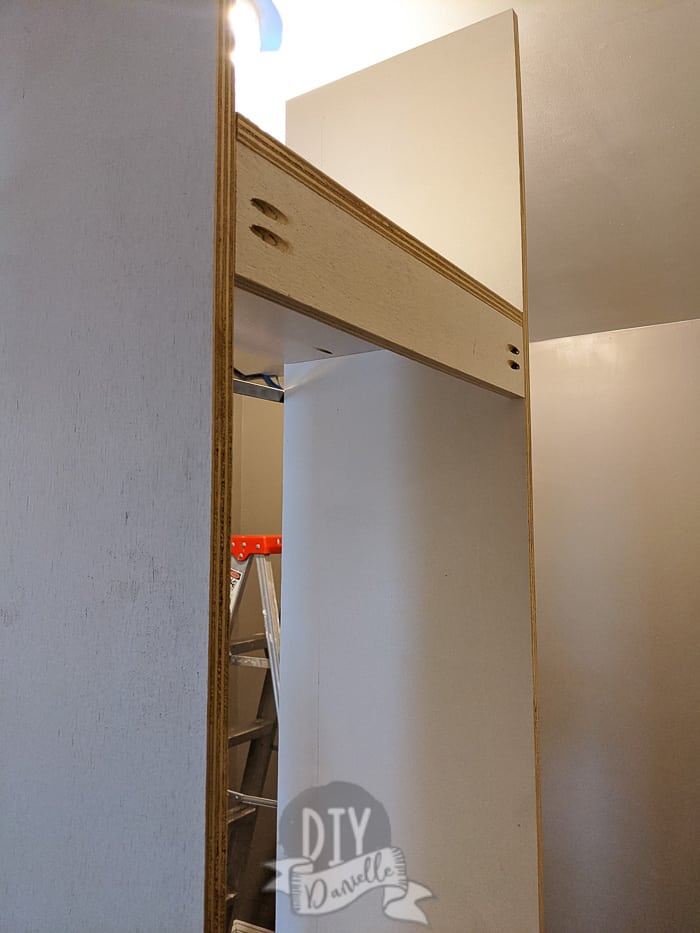
I saved money on plywood by using supports for the shelves along each side wall. This also saved on how much space the vertical supports took off from my finished shelf size.
To explain further- if I’d added a vertical 3/4″ plywood piece on each end of my left side of the closet, I’d have used another sheet of plywood; I also would have shaved 1.5″ off my total usable shelf space.
This isn’t much in the way of space, but I think it looks better and it saved me about $50 so I’m happy. It also made use of the small scraps of plywood left after I ripped my 15″ cuts from my 4×8 sheet of plywood.
Here’s a photo of one of the supports (most don’t have pocket holes, this was a top shelf).
I planned my shelf depth based on the size of my plywood. My height needed to be slightly under 8′ so I was looking at dividing up the 4′ width into 3 sections. 48″ divided by 3 is 16″… I could have made the shelves 16″ wide, but I wanted a scrap leftover to use for supports.
I decided on 15″ deep shelves which meant I could cut (3) vertical supports from each sheet of plywood with a 3″ piece leftover.
The other reason I went with 15″ shelves is that I wanted to maximize the open feel to the walk in closet.
Maximizing the open feel to the walk in closet.
My walk-in closet is the perfect size for us, but it always felt really claustrophobic. There’s no window and the lighting sucked. The wire shelves took up SO much room. I really wanted to feel like I was walking into this big open space, as much as possible, without actually wasting more square footage on a closet.
What I discovered is that clothes on hangers take up more room (in depth) than shelves do.
The right side of our walk-in is deeper than the left side. While the shelves on both sides are all 15″ deep, the clothes stick out further. I designed the right side to be all hanging clothing, then used the left side for shelves.
Most people look to create a “his” and “hers” side to the closet. We still have that separation, to some degree, but I opened up space by not doing hanging clothes on both sides.
Design shelves around outlets and vents
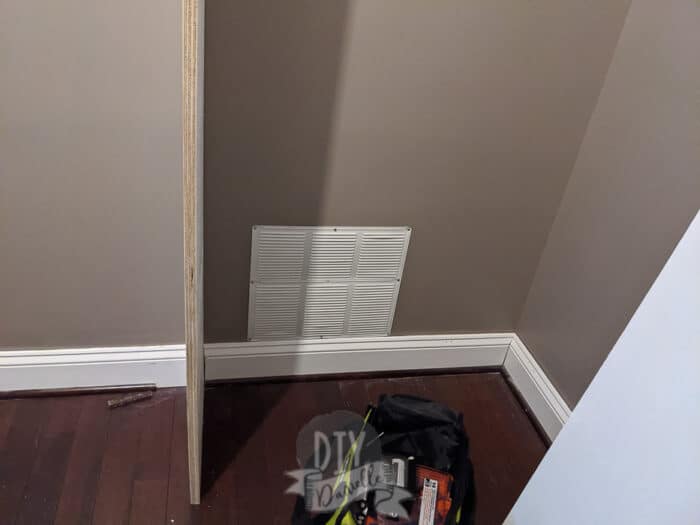
When you’re drawing up your design, you need to take into account any outlets or vents that could be in the way.
The vent on the back left side of the wall needed to be accessible; the “vent” is an access point to the turn off valve for our bathtub so it was actually a great place for the pull out laundry bins that I use. This is why I placed the 36″ wide shelf there. I’m able to easily roll the laundry sorter out if I need to get to that valve.
Here’s a photo of the vent I was working around…
Pocket Holes vs. Side Supports
While pocket holes seem intimidating, they made assembling the middle shelves pretty simple. I was able to add the pocket holes to all of the interior shelves out in my garage, move them inside the closet, and hang them in minutes. Very simple.
By the time I got to the LAST shelf though, the shoe shelf, I quickly discovered a problem.
Side supports are a HUGE pain in the butt, particularly considering that the shoe shelf was on an interior wall. There were NO studs on that side so I had to use TWO wall anchors per support. Wall anchors are fairly time consuming (pro tip: use two drills so you don’t need to switch bits).
Our shoe shelf has NINE shelves along the wall. I nearly curled up in a ball in tears.

The worst part was that I saved this shelf segment for last. Not only was I exhausted and burnt out, but the last shelf is the hardest.
The last shelf section is touchy because your walls aren’t really perfectly straight. So the top shelf might need to be a bit less/more wide than the bottom shelf. It’s not usually a big difference, but it means a lot of running back and forth between the closet and the garage to trim wood to the proper size (I hate cutting wood indoors).
NINE SHELVES.
How could I have made this easier? My right shelf only has four shelves and abuts the outside wall. There are more studs in that wall. If I’d started on the shoe shelf side and worked my way right, I could have saved myself a little bit of effort.
I could also have made the shoe shelf a middle shelf so I could have installed all 9 shelves as pocket shelves.
It works and I’m happy with it, but I recommend designing the shelves to make them AS EASY as possible to put up.
Adding the middle shelf between the rods
Unlike the left side, the right side only had one shelf in the middle. This shelf needed to be attached to the wall for security. I used an extra piece of plywood on the back and screwed the shelf into a stud.
I added a support on either wall so I could have an overhead shelf at 8′ as well (above the rods).
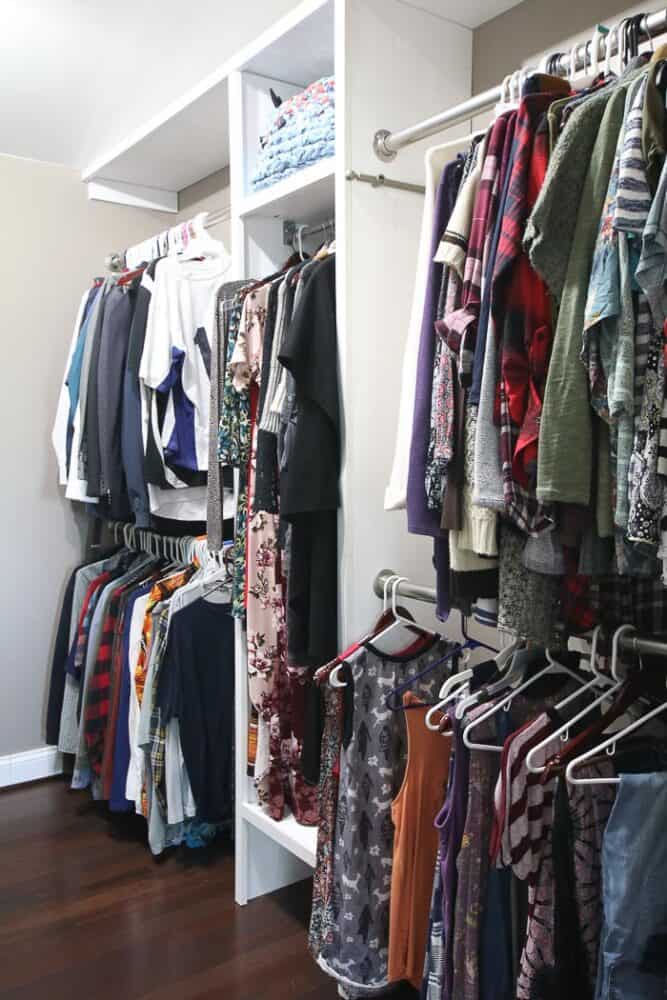
Here are two final photos of my closet! It’s nice to have more shelving and storage space than we need! Obviously I decluttered (and unpacked) some items, but I’m still left with lots of room in there.
Save it for later!
Please share and pin this post! You can also post your project and tag the DIYDanielle team on Instagram @doityourselfdanielle!