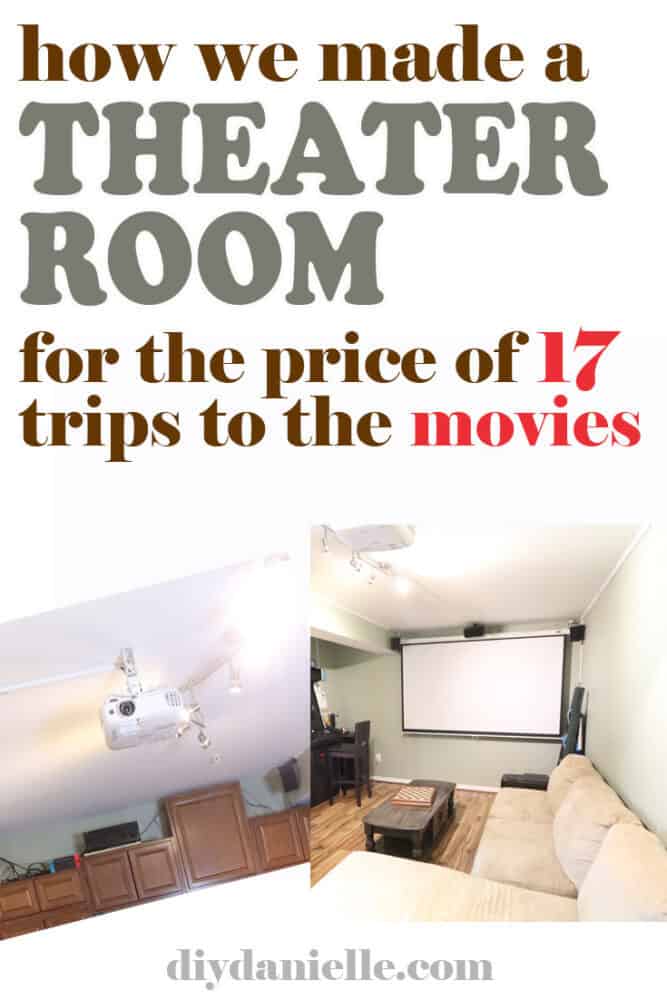
The basement theater room that we setup after finishing off a storage room in our basement. Setup for the screen and projector, as well as wiring for sound.
This post may contain affiliate links which may earn me commissions should you click through them and take certain actions. As an affiliate for Amazon, Cricut, xTool, Home Depot, and other sites, I earn from qualifying purchases. Please DIY carefully. View my full legal disclosures here.
The majority of my content is generated by me, as are 99% of the photos and videos, but I utilize technology for titles, descriptions, video editing out all of my ums, and occasionally for text overlay on images.
Please read the whole post so you don’t miss any important information!
We’ve set up a theater room twice- once in our old house (pictured) and once in our new home. As our new home already had some wiring run, this was a fairly simple project so I’ll stick with explaining how we set it up in our other house.
Supplies for a Home Theater System with a Projector
First, we wanted to purchase quality products as the setup was relatively ‘cheap’ compared to going to the movie theater with five of us. Also we spend a lot of time at home because going anywhere with three kids is horrible.
Now that we’re stuck at home indefinitely with the closure of theaters and other fun places, I’m thrilled with the investment.
There’s two routes to go here. The expensive route and the affordable route. Honestly, the affordable stuff is probably fine for folks like me who go to the TV section at the store and think they all look like the same approximate quality.
My husband is a tech geek so he likes the ‘good stuff.’ He’s leaning over my shoulder giving me some of this info and scoffing when I say stuff like “a sound bar is fine.” Bear with us!
I picked up the mini projector recently because my husband hates taking down the Epson projector for outdoor movies. As we can’t go anywhere, I wanted to be able to do yoga in my backyard and outdoor movies.
I’m thinking about trying to have friends over to stay in vehicles for a ‘drive in’ movie at some point. I’m just trying to figure out if we can do it right and maintain social distancing.
Products for a Quality / Expensive Theater Setup
Prepare yourself, this is going to be a long list. The first two items are your ‘must haves’ but the rest of the setup allowed us to wire everything into our home and hide cables.
- Epson Home Cinema 2040 1080p 3D 3LCD Home Theater Projector (Currently $672 on sale, but I got it for $400 on a lightning deal on Black Friday a couple years ago)
- Elite Screens Manual B 100-INCH Manual Pull Down Projector Screen ($69 currently)
- VideoSecu Swivel Tilt Universal Projector Ceiling Mount Bracket Fits Flat and Vaulted Ceiling with 26.7″ Extension Pole ($17.99)
- To pull the wire through the wall, theoretically (we failed): 33′ Electric Fiberglass Wire Pull Rods Fish Tape
- Wiremold Cable Management Kit, CordMate II (up the wall and across to the projector)
- Wiremold Cable Management Kit (used for the edge of the ceiling/wall)
- Cable Matters 2-Pack 16 AWG Heavy Duty AC Power Extension Cord (Power Extension Cable) in 15 Feet (NEMA 5-15P to NEMA 5-15R): So the projector could reach an outlet
- AmazonBasics RCA Audio Subwoofer Cable – 25 Feet
If we were doing it again and money wasn’t a consideration, my husband said he would get a higher quality projector with 4k resolution. The Epson Home Cinema 4010 4K PRO-UHD (1) 3-Chip Projector with HDR is currently marked at $1800.
This more affordable 4k projector, the Optoma UHD51A 4K UHD Smart Home Theater Projector, was marked at $539 today as I’m writing this. I imagine this sale will disappear pretty quickly… that was from a third party vendor and camelcamelcamel says this is usually in the $1k+ range.
I initially bought the projector when it was on sale as a gift, thinking I was getting a real steal. Once my husband bought all of the goodies to go along with it, it was definitely much more pricey. But I think we probably spent under $1k for the setup; it was a selling point when we sold the house (the wiring stayed, we kept our equipment).
Movie tickets run $10-15/person so it’s $60 without treats for our family to see a movie. So this was roughly 17 trips for our family to the movie theater worth of money. We purchased everything in 2017 so we’ve gotten three years over use out of it so far. We’ve wasted money on worse things.
The Affordable Option
You can use a white sheet or backdrop as a cheap alternative to the pull down screen. I use my white photography backdrop ($20) as our outdoor movies screen. They’re much easier to use and you can get creative for hanging the backdrop (binder clips, nails, curtain rods, etc). The only consideration is that the sheets aren’t thick so you may want two layers.
- Mini Projector, TOPVISION Projector with Synchronize Smart Phone Screen, Upgrade to 3600Lux, 1080P Supported, 176″ Display, 50,000 Hours Led, Compatible with Fire Stick,HDMI,VGA,USB,TV,Box,Laptop,DVD (Now $105, purchased for our brother-in-law on a Black Friday lighting deal for $67)
- White sheet (you can project onto the side of the house too) or a white backdrop ($20)
I haven’t used this projector yet so I’m interested in seeing what the sound is like and video quality. I’ll try to update this post when I have a better idea!
Setting up the Projector and Screen
You need to mount your screen or sheet first. You could also project onto a wall, you just want to make sure it’s absolutely blank. White is the color of choice for projecting onto as it won’t throw off the colors from the film.
Once you have that item placed, you can move the projector around to find the perfect location. You want to make sure that the projector isn’t blocked by furniture, and that a person won’t be parked in front of it.
There are multiple ways to hang the projector. You can mount above like we did. You can put it on a shelf. For some screen types, you can project from behind the screen.
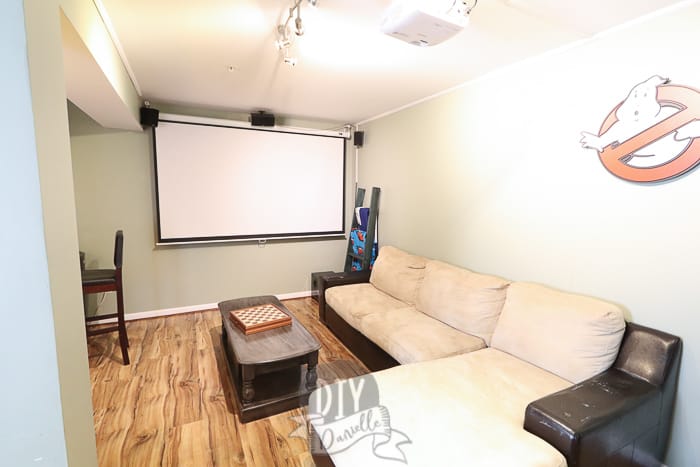
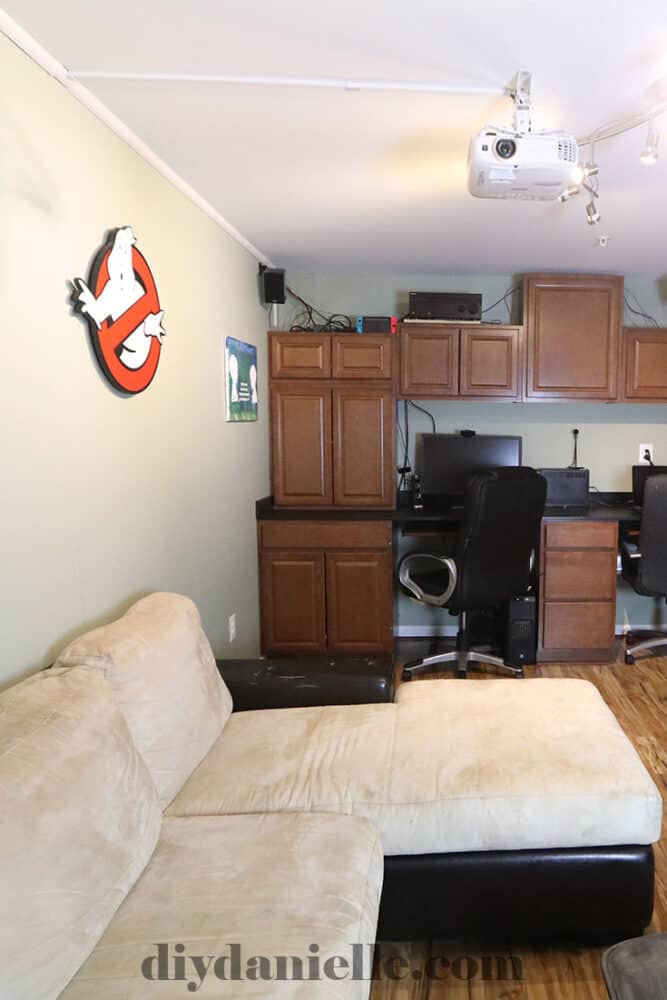
In our theater room, we ceiling mounted the projector. For the most part, nobody is going to be blocking the line of sight of the projector. It’s convenient to do this if you don’t plan to move your projector around a lot.
The downfall is you can’t reach the buttons on the projector without standing on a ladder, and you have to run wires to wherever your ceiling mount is.
Ceiling fans or light fixtures might also be a hazard or get in the way.
In this case, we attempted to run wiring through the walls for the sound. This was SO DIFFICULT. We found that it was easier to use the
Wiremold Cable Management Kit to run the wiring along the ceiling. The kit pieces just conceal the cords and make them less obvious.
To mount the projector to the ceiling, we used the VideoSecu Swivel Tilt Universal Projector Ceiling Mount Bracket Fits Flat and Vaulted Ceiling with 26.7″ Extension Pole ($17.99). We also bought Elite Screens 6″ Universal Projector Screen L-Brackets to attach the mount to the ceiling.
You can see the projector mounted below and our home office in the background. The wiring is covered up a bit by the cable management kit. We had to work around the light fixture in the room.
Setting up the Sound System
First, your projector may have sound built in , but it is likely not going to be loud enough for most uses (based on our experience). Separate speakers will give you a better quality sound and you’ll feel more like you’re at a movie theater. It will also be louder.
For outdoor movie nights, we brought a boombox out to run the audio for our Epson projector. Otherwise the projector sound was too quiet.
For our theater room, we used the following supplies:
- Monoprice 109436 Gold Plated Speaker Banana Plugs – 5 Pairs – Closed Screw Type, For Speaker Wire, Home Theater, Wall Plates And More
- AmazonBasics 100ft 16-Gauge Audio Stereo Speaker Wire Cable, 100 Feet
- VideoSecu 5 Black Universal Satellite and Audio Speaker Mount Bracket for Wall or Ceiling MS40B5 WM6
- Energy 5.1 Take Classic Home Theater System (Set of Six, Black)
- Sony STRDH550 5.2 Channel 4K AV Receiver
This was where we tried to run wire through the wall for the speakers, but had difficulty feeding it through. Drywall repair is a real beast, particularly if you struggle to find the wire you’re feeding through.
You have three other options:
- Run the wiring along the floor boards
- Buy wireless speakers
- Use a Wiremold Cable Management Kit like we did to conceal the speaker wires.
There are different speaker arrangements. For 5.1 surround, you have two front, two rear, a center speaker, and a subwoofer (this is the “.1″… it’s the bass).
For a higher end system, you’d have a 7.1 surround system with two side speakers; the additional cost of the speakers isn’t very high, but when you’re buying higher quality speakers, it is more pricey.
You need to have an audio video (AV) receiver that supports high end audio codex, like Dolby Atmos. To achieve the HIGHEST audio quality standards, all of your devices need to support Dolby Atmos to have that quality level… so your streaming service/AV receiver both need to be Dolby Atmos compatible.
But realistically you just need a speaker, a projector, the wiring to connect it all, a screen of sorts, and something to project (like a streaming service, video game system, or Blu-Ray player). You can use a sound bar or headphones as well.
Treat your projector like it’s a television; remember that you may need to add on speakers of some sort to be able to hear it well.
The Basement Room
You want a room large enough so that you can pull your projector back to hit the screen size you want to use. The way this room was setup, we could only place the screen along that far wall. This made laying out the furniture a bit difficult.
The room also needs to be dark. Basements are perfect for home theaters, particularly if you have a small room with no windows. You can get high quality blinds and such, but a naturally dark room is really the best.
Here’s some projects we did for that basement: DIY Home Office (which is on the other side of the room), we hired someone to finish the room with drywall and such, and we DIY’ed the laminate floors. You can also see our DIY arcade machine in the photos!
Pro’s and Cons of Projectors
Pros
- Screen size
- Feeling of being at the movies
- You can take it outside for outdoor movies
- For the size screen you’re getting, you’re probably getting a better deal on a projector.
Cons
- The bulbs can wear out and need replacement. This can be expensive. Don’t leave the projector running all the time.
- Mounting is hard and you may have to run and conceal wiring.
- Projectors can be somewhat fragile (ours is mounted in the playroom and kids are often throwing things around, this has been a worry for us).
- It’s harder to plan out the room’s layout for indoor use. You need the projector to be far enough away for the size screen you’re using.
- Works better in the dark. You can see the projection with a bit of light and we’ve definitely started outdoor movies before the sky was 100% dark, but you’re squinting quite a bit to see it all. The image quality is MUCH better when there’s no extra light in the room.
I need to take pictures of our new house’s basement theater room to add to this post. It’s a pretty neat space.
Please share and pin this post! You can also post your project and tag the DIYDanielle team on Instagram @doityourselfdanielle!