

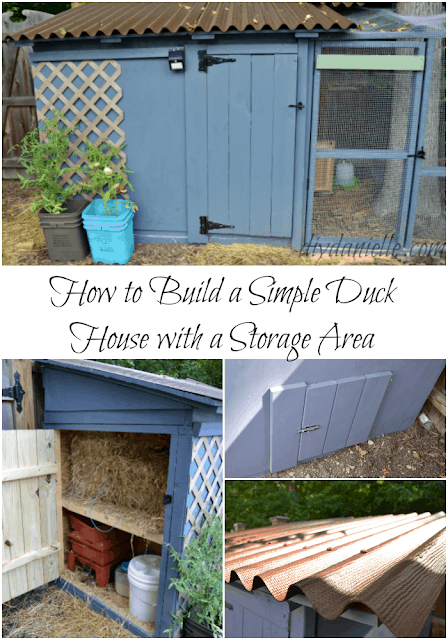
Discover how to build a secure, efficient duck house with our DIY guide. This duck coop includes storage space for supplies!
We built a duck house on our property that was PERFECT for a few ducks. They had protection from the cold weather and rain, a predator-proof run, and the coop even included a storage space for bedding and feed. I still look back on that build fondly because it came out SO well.
We’re looking to build a new duck coop on our new property so I decided to update this post and the woodworking plan. Here’s what you need to know!
This post may contain affiliate links which may earn me commissions should you click through them and take certain actions. As an affiliate for Amazon, Cricut, xTool, Home Depot, and other sites, I earn from qualifying purchases. Please DIY carefully. View my full legal disclosures here.
The majority of my content is generated by me, as are 99% of the photos and videos, but I utilize technology for titles, descriptions, video editing out all of my ums, and occasionally for text overlay on images.
Please read the whole post so you don’t miss any important information!
Blog post originally written on August 3, 2016. Updated on July 30, 2024.
We live on a 10,000 sq ft property which put us just over the requirements to have poultry in our area. I was interested because I’ve heard they’re good pest control- they eat ticks, stink bugs, Japanese beetles, mosquito larva, and more. And you get EGGS.
Of course, I like to research. And it took me about 2 years to convince my husband. My friend, Lisa, runs Fresh Eggs Daily so I consulted with her on chicken ownership and bought her book, Fresh Eggs Daily. She checked out some photos of my yard and encouraged me to get ducks instead.
I wanted the coop to blend in nicely to our yard and I needed to make sure the ducks were safe from predators. We have a tall privacy fence, but there are gaps underneath for small predators to get in and I often see hawks in our area.
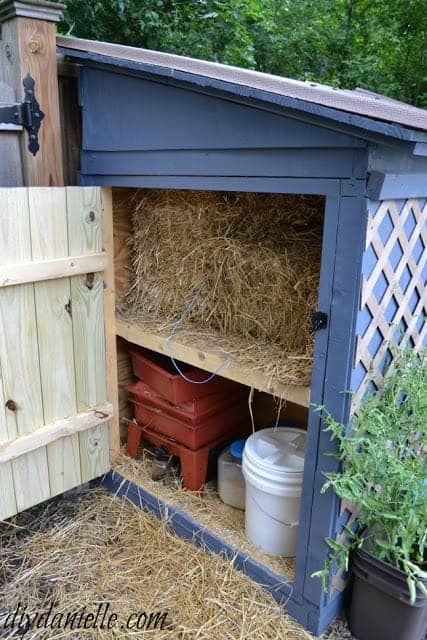
The floor space inside the coop is 43″x45″… but there’s an additional space to the left for storing straw (bedding) and feed. I wanted the straw stored up high (in case of flooding or water getting on floor). I’m hoping that the straw will also provide extra insulation for the coop during the winter.
The floor space inside the coop is equivalent to 13 sq ft. This would be enough for 3-4 ducks by itself if you allowed 4 sq ft per duck, but with the extension of the predator proof run, that will add into our total square footage. I plan to leave the door to the coop open to the run all night with the food and water outside to reduce the mess.
Important Features of the Duck House
- Wood Choice: Any wood that touches the ground should be pressure treated, but you also don’t necessarily want animals exposed to too many chemicals. So you may want to consider what you want to use to build the structure.
- Ventilation: All coops need ventilation. Our original duck house had ventilation in the back, but I’d suggest adding some to the front as well. You can always build a wood cover to go over it in cold weather, but too little ventilation can be a huge problem.
- Sloped Roof: The roof should be sloped to let rain and snow slide off it. Ideally, you want the slope facing the back so the water doesn’t drain to the path in front of the coop. Or you can install gutters to help move water away from that area. We didn’t think about that at the time, but I really like the look of our roof so I didn’t change anything in the plan. Adding a gutter is feasible enough, even if you have to hack it a bit when putting one on such a small structure.
- Lighting: The ducks don’t need light inside any more than we need light in our bedrooms at night, but you may want a solar and motion activated light. This helps if you need to check out your animals in the middle of the night and it may scare away predators.
- Decorative Elements: I nailed a piece of leftover lattice from our privacy planters to the front and placed some tomato plants in front for additional decor. I wanted something pretty to break up the plain wall. The lattice looked lovely, but the tomato plant didn’t have a chance of survival with the ducks having access to it. If you go this route, try to protect your plants from the ducks!
- Storage Space: One of the biggest issues with almost all coops that I’ve seen is that they lack storage space. I do NOT want to run all over into multiple sheds to feed my animals. Being able to store feed and bedding in the coop is extremely convenient. Our storage area was big enough for a bale of straw for bedding, feed, and our worm composting bin. I was hoping that the straw and building would keep the worm bin warm enough through the winter- but not let it get too hot.
Duck House Supplies
- Framing: 2x3s, homedepot.sjv.io/LXb4WO
- Base: Pressure treated wood
- Walls: Plywood
- Roofing: Corrugated plastic panels*
- Hardware Cloth
- Heavy Duty Staple Gun
- Hinges
- Ryobi Drill https://homedepot.sjv.io/a1EdkQ
- Sander- Ryobi Cordless CAT Sander https://homedepot.sjv.io/x9xJ4d
- Miter Saw https://homedepot.sjv.io/BXrdaL
- Speed Square https://homedepot.sjv.io/QOmbqY Level- 9″ Torpedo Level https://homedepot.sjv.io/e0VJZ
- Measuring tape with all of the markings https://amzn.to/3GTWNhc
*I can’t seem to find these in stock anywhere but I STRONGLY prefer them over metal. Metal is a real pain in the butt to work with and extremely dangerous. I usually get pretty cut up, even attempting to be careful and I HATE cutting it.
We built a base of pressure treated wood, then used regular 2×3’s to create our frame. We used plywood for the walls. Built a slanted roof. Added corrugated panels for keeping water and snow out of the house. We added doors on hinges- one small door that leads into the run. One big door for me to get in to clean. And one big door for the storage area.
There is a large space for ventilation along the back of this house- ventilation is a MUST. We used a heavy duty staple gun to place hardware cloth over the ventilation so we wouldn’t need to worry about predators getting in. Because our ventilation is in the back, the wind and rain shouldn’t get inside too badly.
It gets pricey to buy the RIGHT wood for the project and the woodworking supplies, and it takes a certain amount of skill. And it took us a LONG time (I’m sure a pro could’ve put this together much faster). While I like how our run is subtle and fit behind the shed, I think a rectangular simple run would have gone together WAY easier. It’s all about how much time and effort you want to spend.
As usual, having a blog motivates me to do way more work than I would want to otherwise… and also just because sometimes I want what I want and not what is available.
But I think this project is feasible if you already have a lot of the woodworking equipment and a bit of experience with building things.
The Free Detailed Duck House “Plan”
Interested in MORE details about how we built this coop? I put together an eBook titled “How to Build a Duck Coop: A Free eBook from DIYDanielle.com” with lots more photos and instructions. My subscribers will find it in the exclusive members-only Google Drive folder for DIYDanielle.
Subscribe to get that link. There are so many photos of the process that this page would take forever to load if I included all of the information. It is not a complete plan like you’d find on a building site, but it should give you the basic run down on our process for building the coop.
Video Tour
Love it? Pin it!
Thanks for taking the time to read this post! I really appreciate the time you’ve taken. Please share, like, and pin my post if you enjoyed it. Follow me on social media and subscribe to my email list to keep up to date on all of my latest projects!
Need an easy shelter and don’t want to DIY? Here’s what you can buy.
Omlet makes a ton of chicken shelters and runs that are movable and have lots of accessories available. You can add wheels and handles to move the run as needed which is nice. The cages look like they’re well predator-proofed, and you can get an attached run up to 13′. They even sell an automatic coop door that opens and closes when the sun rises and sets. The Eglu Go is their easily movable shelter and run. They have perches to add on, swings, treat holders, and even chicken clothing. Totally worth checking out if you like to geek out over your poultry.
Here’s a video of the Omlet Automatic Chicken Coop Door and Light.

Build an Easy to Clean Duck Coop with Attached Storage
Materials
- Pressure treated wood
- 2×3’s to create our frame.
- Plywood for the walls.
- Corrugated panels for keeping water and snow out of the house.
- 2 Doors on hinges
- Hardware Cloth
- Lattice
Tools
- Heavy Duty Staple Gun
Instructions
- Cut the pressure treated wood for the floor of the main coop to 43″x45″.
- Use 2'x3"'s to create the frame.
- Cut the plywood to size for the walls.
- Build a slanted roof with corrugated panels.
- Add two doors on hinges.
- One small door that leads to the run and one big door to get in to clean.
- Add ventilation along the back of the house with the hardware cloth and staple gun.
- Attach a piece of lattice to the front to break up all the wood.
I love that you're getting ducks! We don't have near enough property for something like this. Thanks for sharing with our Merry Monday party.
That is adorable!! I need to build one for chickens and this would probably work perfectly. 🙂 Thank you for sharing with us at the #HomeMattersParty
It would help if there were like pictures and step by step plans!
Hi! I have a separate file available with the step by step pictures. It was too long for the blog post (the massive quantity of photos would have slowed my site down a lot).