
How to repair pants that have ripped in the knee. Using the right fabric allows you to patch pants so they aren’t as likely to rip again. You can add padding. You can also add length to the pants to extend their life.
This post may contain affiliate links which may earn me commissions should you click through them and take certain actions. As an affiliate for Amazon, Cricut, xTool, Home Depot, and other sites, I earn from qualifying purchases. Please DIY carefully. View my full legal disclosures here.
The majority of my content is generated by me, as are 99% of the photos and videos, but I utilize technology for titles, descriptions, video editing out all of my ums, and occasionally for text overlay on images.
Please read the whole post so you don’t miss any important information!
I have a couple of issues with kids’ clothing. First, my oldest is tall and skinny so he always outgrows his pants in length before he outgrows them in waist. Second, the knees NEVER last with him. He’s so busy all the time. I’m sure my second will have the same issue, but for the moment his clothes are okay.
I don’t like to throw clothes away unnecessarily and I prefer to fix items when possible. But when I tried to put patches on there, it was difficult to sew them on well (with a machine because forget hand sewing) and they didn’t last long otherwise. He’s just too hard on them.
So I came up with my own plan to fix the knees. I decided to reinforce the knee area by removing the worn fabric. I also added a bit of length to extend their life.
I’ve done this a couple of ways:
Method 1: Replacing the knee area with a thicker fabric. I try to pick something that will be comfortable, but still thick enough to last.
Method 2: Two layer with fleece on the inside and a cotton on the outside. This is nice if you want to add padding and thickness to the knee area. It’s also nice because you can add fun fabrics. I haven’t found a lot of good fabrics for Method 1 that have fun designs.
Thoughts Durability of Various Knee Patching Methods
I’ve tried making my own patches and had very little luck. My son wears out the jean fabric of his pants so it’s nothing for him to wear through a patch… or for the patch to fall off. Iron on patches alone do not do the job. Sewing them on is better, but I found that it was difficult to sew around a patch in the middle of the leg of the pants. Impossible. I could have hand sewn, naturally, but that seems even more time consuming than replacing the knee area so I’m not going to bother. My hand sewing is atrocious and slow.
I’m interested to see how these methods compare in the long term for durability.
The one thing to consider is fabric choice when you fix the pants. A thin fabric that can easily rip will not be as ideal as a durable fabric. But more durability can mean the fabric is less comfortable or less flexible too. Flexibility might allow for stretching instead of ripping in some cases.
For my son, he is always kneeling on wood, gravel, rock, pavement, etc. so I anticipate the issue is wear and not stretch. My patches were designed on the assumption that I needed sturdier fabric choices, although method 2 was my first try and I worry that the cotton will wear fast (so far so good).
Supplies
Supplies listed below may include affiliate links to the products.
- Method 1: Thicker, but still comfortable fabric.
- Method 2: Cotton fabric (something that coordinates and that your kid will love!) or Flannel, Fleece fabric
- All your normal sewing supplies
If you sew a lot, make sure to check out our new app, Sew Organized, available FREE on the Android Play Store and the Apple App Store.

Download it on the Android Play Store | Apple App Store
Method 1: One Layer Knee Replacement for Ripped Knees on Pants
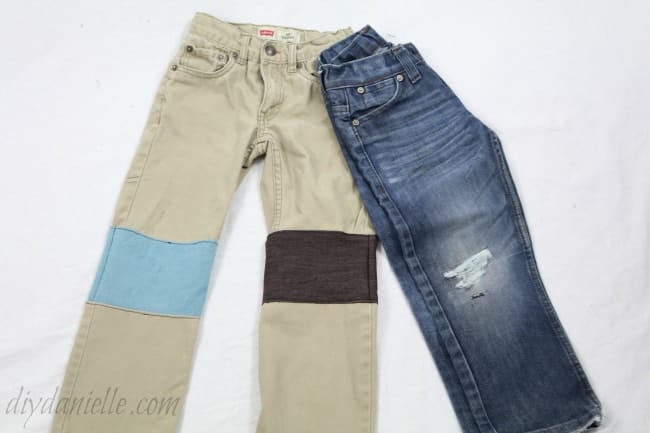
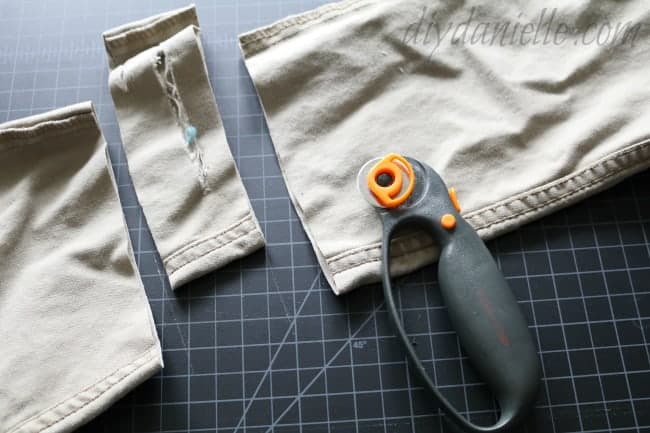
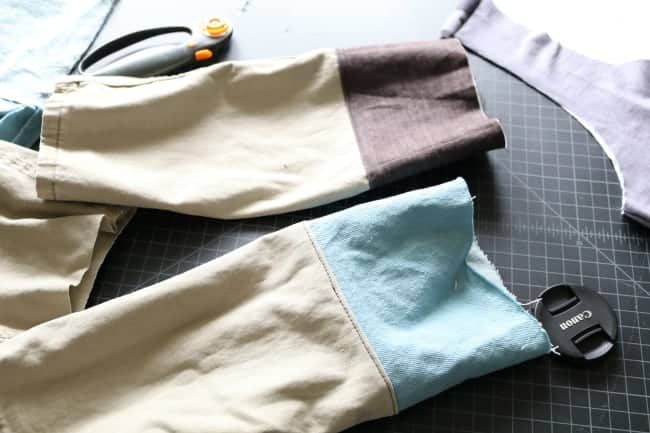
First I used a straight edge with a rotary cutter to remove the ripped piece of fabric. I removed a similar sized piece on the other leg in the same spot.
I cut a piece of fabric for each knee to replace the ripped piece. You need to add enough of a seam allowance on all sides. In the picture below, I’ve folded over the piece of brown fabric (fold is along the bottom). Then I added a slight seam allowance to the other short side.
The two long sides can be made much bigger if you want to add extra length to the pants. I just make sure that I cut it so it will be taller than the original cut, even after the seam allowance.

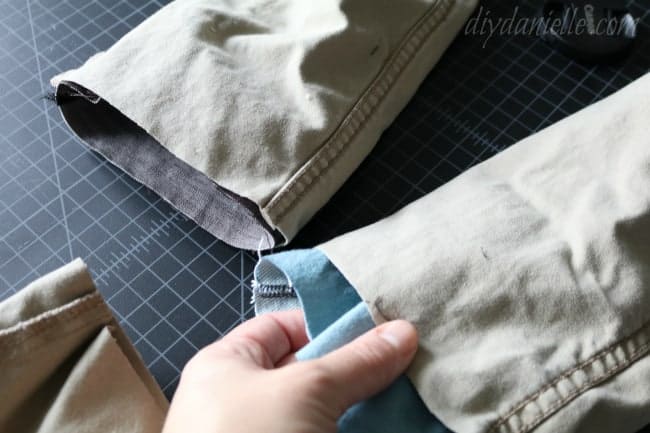
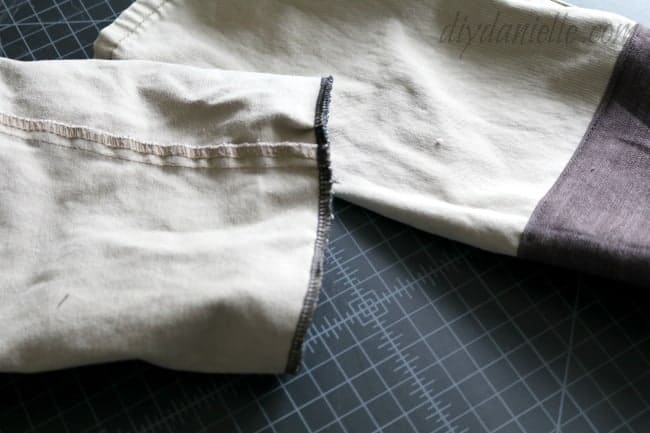
Cut a similar sized piece for the other pant leg.I serged the pieces along the short edges, right sides together. You could also straight stitch then finish with a zig zag if you don’t own a serger. Then I made SURE they matched the same width as the original piece I cut off… you want this to be exact.

At this point you want your pants wrong sides out. You’ll want your replacement panels right sides out. You tuck them into the leg, right sides together. Make sure to line up the side seams.Then you can serge (or sew/zig zag) them together.
Once that is done, turn right sides out and top stitch.
Now you’ll need to attach the bottom with panel to the top of the pants. Your bottom with panel are right sides out. The top of the pants are wrong sides out. Tuck the bottoms into the top, line the side seams up, serge.
Turn right sides out and top stitch again. Your pants are finished and repaired. This is fairly quick to do.

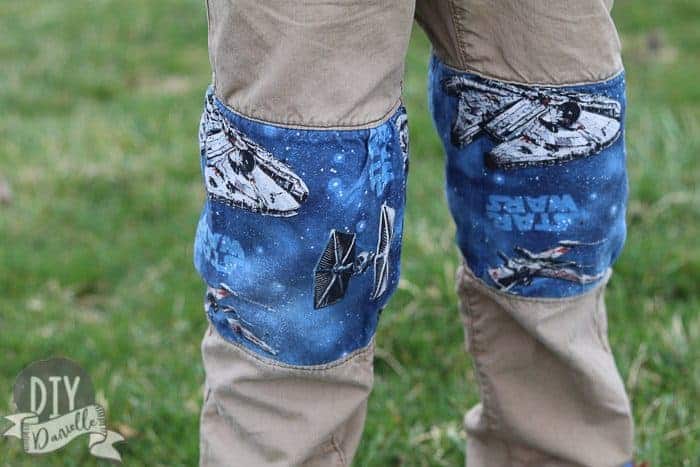
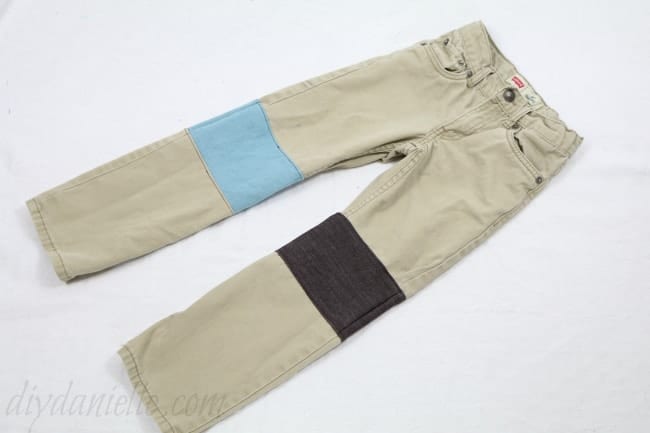
Here are the finished pants. Love how they came out. I used two different fabrics for patching because I didn’t have enough to do both the same color. I love how they came out.
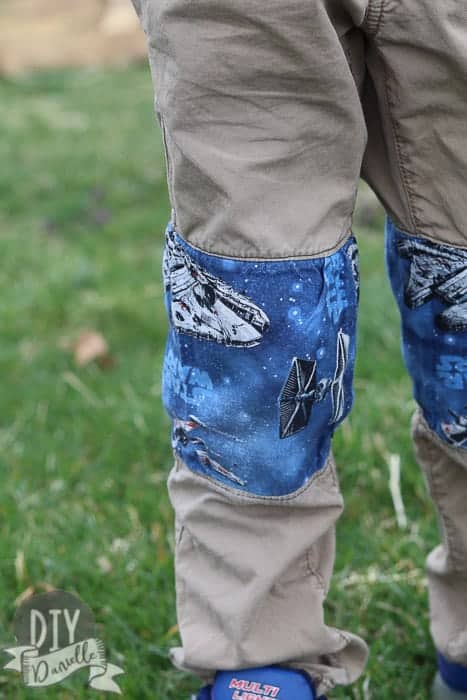
Method 2: Two layer, padded knee patch for ripped knees.
This was pretty much the same process except the two layers meant doing it a bit different. Instead of cutting one piece of fabric for the panel, I used two for each pant leg. One fleece piece for the inside and one cotton piece for the outside.
For each cotton piece and each fleece piece, I folded right sides together and sewed the short side to create a circle.Then I tucked them into each other, as I’d like them to appear when right sides out on the pants. It’s been a while since I did this version, but I believe I attempted to sew them together here… that’s not really necessary, although you’ll want to pin them together so the fabric won’t shift.
At this point, you can just sew them on, as you did in method 1. These are definitely the cuter option for fabric choices… and they’d stood up pretty well so far. But method 1 was faster.
Here’s a quick video showing the process:
I hope you enjoyed. If you loved this project, you might also like my post about upcycling and repurposing worn clothing, as well as my angel gowns project to make burial gowns for babies from upcycled wedding dresses.
Pin this!
Thanks for taking the time to read this post! I really appreciate the time you’ve taken. Please share, like, and pin my post if you enjoyed it. Follow me on social media and subscribe to my email list to keep up to date on all of my latest projects!

How to Repair Holes in the Knees of Pants
Repair those old worn out knees of pants with new patches in a fun material. It's quick and easy and extends the life of the pants.
Materials
- Cotton, fleece or flannel fabric
Tools
- Rotary Cutter
- Sewing supplies
- Serger
Instructions
- Use a straight edge with a rotary cutter to remove the old worn out fabric from each knee.
- Cut two new pieces of fabric to replace the old pieces.
- Place your pants wrong side out with the replacement panels right side out.
- Tuck them into the leg, right sides together with the side seams.
- Serge (or sew/zig zag) them together.
- Turn right sides out and top stitch.
- Attach the bottom with panel to the top of the pants.
- With the bottom panels right sides out and the top of the pants wrong sides out, tuck the bottoms into the top.
- Line the side seams up and serge.
- Turn right sides out and top stitch again.

THANKS!