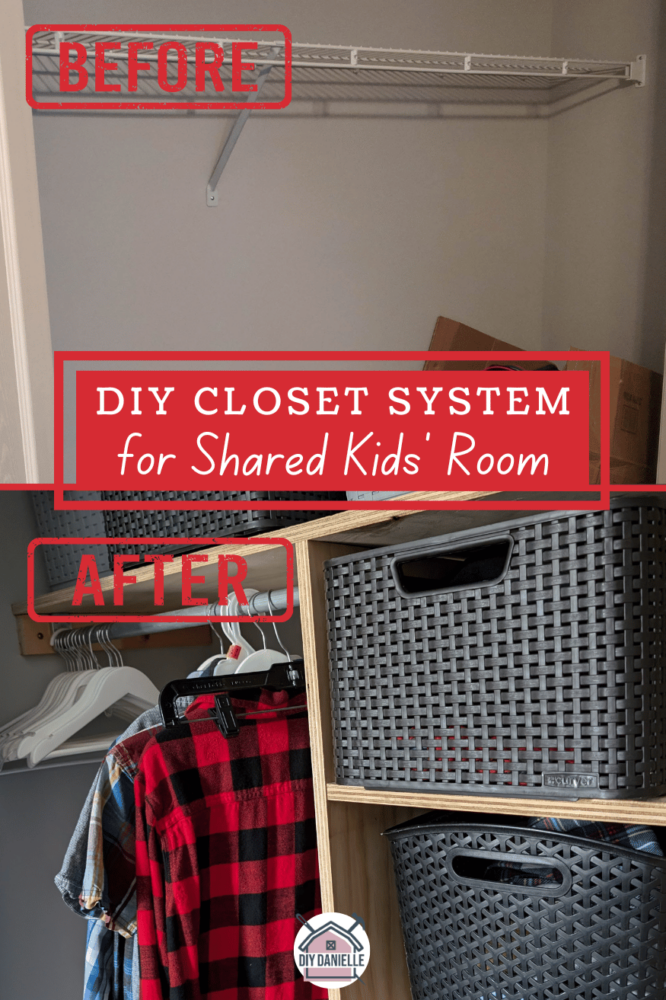
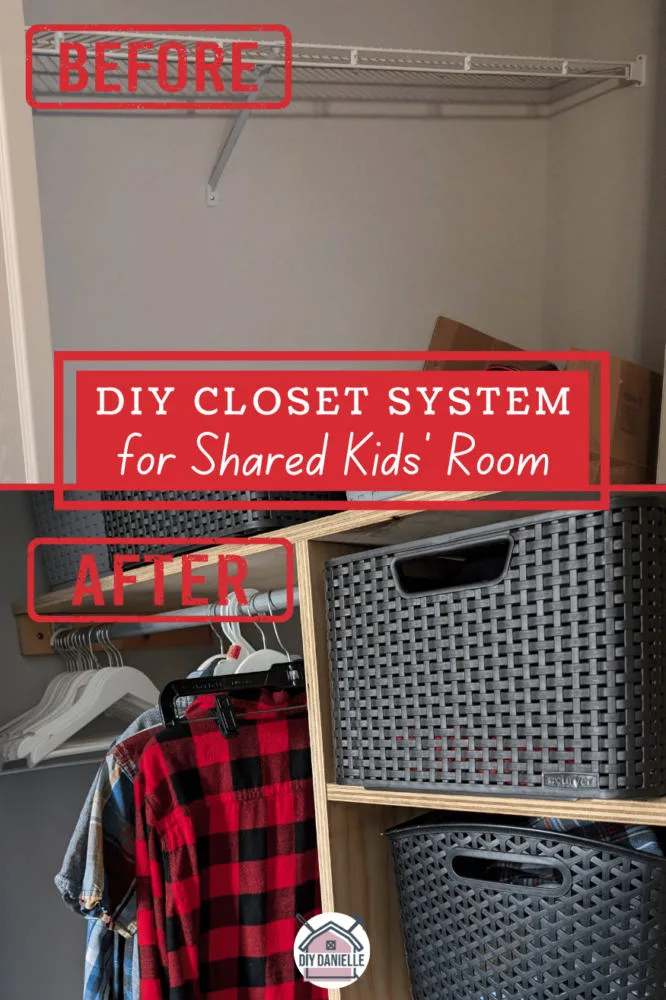
Discover how to create a DIY closet system for a shared kids’ room with our step-by-step guide. Maximize space, enhance organization, and make tidying up a breeze with these easy and budget-friendly solutions.
One of the pain points for our current home is the lack of storage space and this has been something I’ve slowly tackled as we’ve lived here. Two of our kids share a bedroom while we’re hosting an au pair. This has worked out really well but their closet needed a better system. I created this shared closet system so we could organize and maintain their laundry more easily. Here’s how I built it.
I’m also going to discuss organizing the room as well to make it easier for myself and the kids to manage.
This post may contain affiliate links which may earn me commissions should you click through them and take certain actions. As an affiliate for Amazon, Cricut, xTool, Home Depot, and other sites, I earn from qualifying purchases. Please DIY carefully. View my full legal disclosures here.
Please read the whole post so you don’t miss any important information!
Building vs. Buying a System
The first thing to understand is that, yes, you can buy a closet system at the store. I bought my other son, with a similar sized closet, this closet system for $400. It has drawers and is quite nice.
My husband and I always argue about if it’s easier to buy or build. Building takes time, but most systems require building as well. It’s just all pre-drilled and theoretically lined up perfectly. But you do occasionally run into issues, Or need to buy additional items.
Depending on the cost of wood, building might be cheaper. But not necessarily. Wood. Prices are quite high right now. Building might be cheaper. But not necessarily. Wood prices are quite high right now.
That particular $400 closet system didn’t include the wood that would go on top to create an upper shelf. They apparently don’t sell it separately, but they have a different kit that includes it which was a frustrating pain point on that build. If I had seen the option I would have purchased it.
The other consideration is that you do get a custom item when you build it yourself. You can use different quality woods, different paint colors, and more to make your system exactly what you need. I like that piece of it.
Of course, I still haven’t painted this and may never get to it. But it has been functioning very well for us for the past few years. Yes, I’m late on posting this.
It’s also fairly simple to build and it’s a good beginner’s project.
Organizing a Shared Kids’ Room
As a parent, I LOVE having my kids share a room, particularly when they’re young… when I was a kid, my dad used to say, “it builds character” for stuff like this. It helps them learn to cooperate with others and get along in a shared living space, it helps them think about how they keep their space clean with another person involved, and it’s an area where they’re so infrequently AWAKE during the times they’re in it that it’s a nice space to share.
But I also hate it as the person who wants an organized space that’s easy to clean. It can easily feel cluttered, it’s hard to keep the kids on task for cleaning their space when it’s shared, and OMG WHO LEFT THEIR UNDERWEAR ON THE FLOOR!?!
This was what we started with!
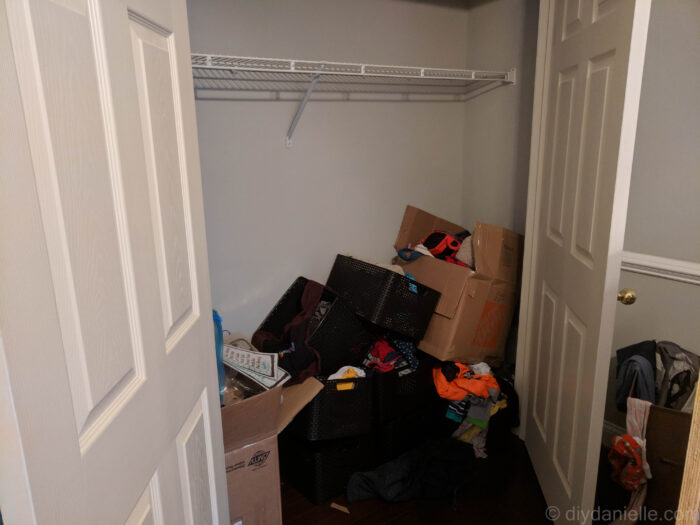

It was really important to me to organize this space well to ensure that laundry didn’t get mixed up and that they had their own section of the closet.
Here are my tips for organizing the closet:
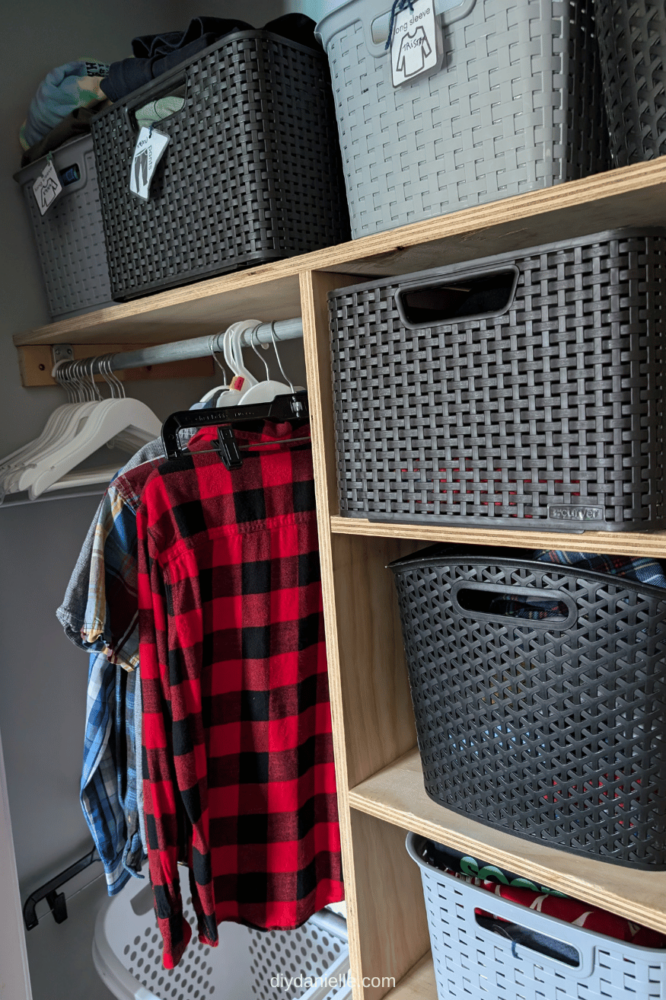
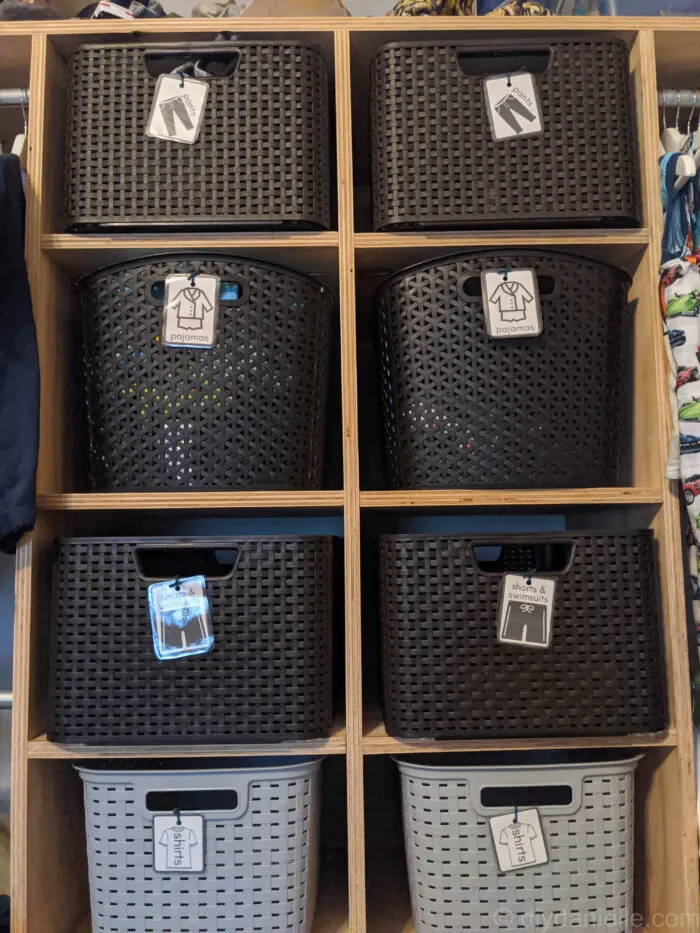
- Divide the closet into “his and hers” sections- aka two zones (or 3-4 if you have more than 2 kids sharing a room), one per child.
- Decide on your bin size prior to starting your shelf build. I think smaller bins and more shelves might be nice. This would allow for smaller items like socks, underwear, and bathing suits to be stored in their own bins. But it will also require more wood and more shelving. This will impact cost.
- A laundry basket for each child that has their name on it: I choose to launder one person’s laundry at a time which means less sorting (and less children wearing each other’s clothing… it baffles me how my 10 year old can put on the 6 year old’s clothing and not notice they’re half way up his calves. Then he’ll argue with me if I point it out. Ugh.).
- Each child brings their bin down once a week. I wash it, dry it, and then they bring it back upstairs and sort it.
- If they want, they can fold it or hang their clothes up, but they have bins that are labeled that they can throw their clean laundry into.
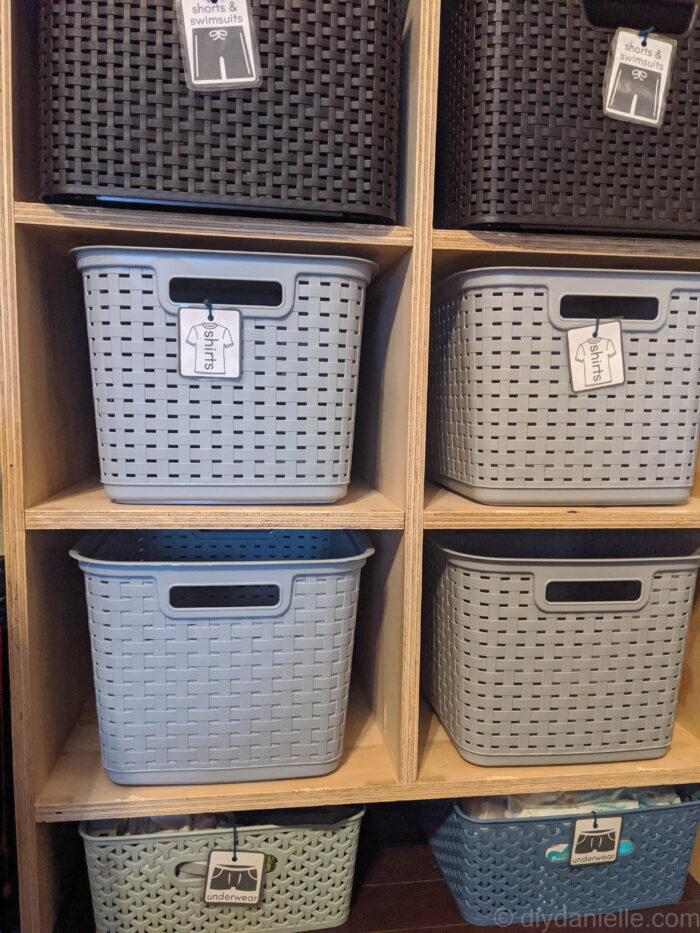
- Shorts go into the shorts bin, underwear goes into the underwear bin, etc.
- I swap out the long sleeve shirt bins and the short sleeve shirt bins seasonally. I do the same way as shorts and pants. The clothes that are off season are on the top shelf- accessible, but not easy to grab. This prevents my kiddos from wearing shorts all winter and pants all summer. Which they WILL do if I don’t shuffle the bins around. Truly mind blowing.
- Each child has their own color socks. This is huge. We have 3 kids which makes it tricky, but at least having the two who share a room have different colors keeps them from getting mixed up. You could also chose socks in themes (ie. Minecraft socks for one kid, Mario socks for the other, etc.). We do black, white, and designs for the littlest. This prevents needing to spend lengthy amounts of time sorting socks which I LOATHE. I also try to buy alllllll the same kinds of socks per person so we can swap them out… if one sock gets a hole, no big deal… there’s a bunch more that match. We just toss the sock with the hole (I use them for staining wood).
- I printed labels for each bin- they needed to be easy to see, have the word on them in EASY TO READ font, and have a picture of the item that was clear.

Bin Size
My bins range in size so the shelf height had to be adjusted accordingly. MY favorite sized bins are 9 in tall by 17 in deep and 12 and 3/4 wide.
I have two that are 11 in tall which I HATE because they have a weird curve in the middle that impacts how tall the shelf must be, but doesn’t really give much extra storage space.
A couple of the bins are 5 1/4 in tall.
I was reusing old bins which was helpful, but I wish I had purchased a bunch of the same all at once to use for this. Planning the shelf height accordingly would be really useful.
Designing the Closet System
Before you get started, you should measure and draw out what you want. My closet may not be the same as yours!
- Create a layout plan and sketch the closet design
- Deciding on the placement of shelves, rods, and storage bins. I discuss this later on in the post.
- Choosing the right materials: I recommend using high quality plywood that doesn’t have a lot of toxic chemicals in it. This is in a kid’s room. You want to ensure that the air quality doesn’t go down. The same is true for choosing paint.
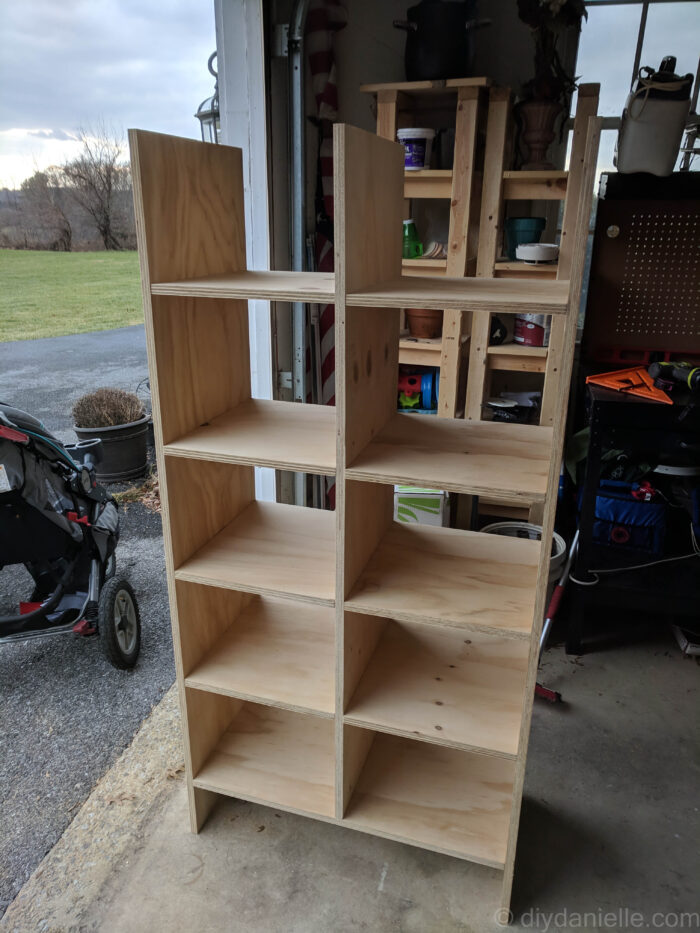
DIY Closet System for Shared Kids’ Room
I always use 3/4-in plywood for projects like this because shelves can support more weight and be less prone to bowing over time. The price difference isn’t big enough that I’m willing to cut costs by using 1/2-in.
I can repaint these or add drawers later on if I want to customize them further, particularly as my woodworking skills grow, but I can’t undo broken wood.
Supplies
- Screws: 1 1/4″ Kreg pocket hole screws… I really like this screw kit (except I wish it had more 2.5″ screws): https://amzn.to/3VgDsKW
- Kreg Pocket Hole System (big one) https://homedepot.sjv.io/2rPRxg
- Ryobi Drill https://homedepot.sjv.io/a1EdkQ
- Level- 9″ Torpedo Level https://homedepot.sjv.io/e0VJZ
- Wood Choice 1: 3/4″ Purebond Plywood, Birch https://homedepot.sjv.io/10eem (sl;ightly less costly than red oak or maple)
- Wood Choice 2: 3/4″ Purebond Plywood, Red Oak https://homedepot.sjv.io/Ea4Djn
- Wood Choice 3: 3/4″ Purebond Plywood, Maple https://homedepot.sjv.io/3P41xA
- Wood Glue https://homedepot.sjv.io/5b4JQo
- Measuring tape with all of the markings https://amzn.to/3GTWNhc
- (4) 18-Inch to 30-Inch Adjustable Closet Rod 1-Inch Diameter, Zinc Plated: https://amzn.to/3A3tyHO
- Optional: Paint or Stain
Tutorial
Step 1: Cut your plywood.
My measurements are as follows. Please double check my math before cutting. I sometimes confuse numbers and I would hate to have you cut wood to find out it was all wrong:
- A Vertical Sides: (2) 62″ x 16″
- B Divider: (1) 55.25″ x 16″
- C Middle Shelves: (8) 14×16″
- D Top Shelf: (1) 78″ x 16″
- E Bottom Shelf: (1) 28.75×16″
The 78 in wide piece was the internal width of my closet. You’ll need to adjust this for your own closet size.
Note: I have info at the bottom of this post about saving money on this build… you may want to look at that before using my measurements. I built this before 4×8 sheets of plywood skyrocketed (back when they were $50/panel). Please also measure your closet. My system may not fit in your closet. You may also want to adjust the shelves to fit the bins that you want to use.
Step 2: Use your Kreg Jig to add two pocket holes to each side of the following shelf pieces: C, E. These allow you to attach the shelves to your vertical wood. You also want to add pocket holes to the top and bottom of the divider (B).
Step 3: Measure where you want the shelf height. You may want to adjust according to the height of your bins. I like the idea of small bins and shorter shelves for smaller items. I would mark out on the vertical pieces where the shelves should go.
MAKE SURE TO ADJUST FOR THE 3/4 THICKNESS of the shelf!
Step 4: Once you’re ready to install the shelves, start with the bottom shelf. Use your Kreg pocket screws to attach the shelf to the left vertical piece. Then attach to the right side, making sure to use your level to check and ensure the shelf is level. The pocket holes should be on the bottom, out of sight. This allows you to skip filling the holes in after (which is a cosmetic thing that I avoid as I like to be able to easily take things apart).
Step 5: Next you want to install your shorter vertical shelf (B) in between the two other vertical pieces (A).
You will screw this into the bottom shelf (E). At the end, we will screw it into the top shelf as well, but for now, that’s it.
Step 6: Now you can screw each smaller shelf (C) into the A and B sides at your desired heights.
Again, make sure these shelves are level and that C is plumb (straight up and down).
If you want, assuming your shelf system is taller than mine, you can switch to putting the pocket holes on the top for your upper shelves (seeing as the top of those will be hidden to most people). You want to start that at about your line of sight… I’d use the average female adult’s height for this (because most men don’t notice this stuff, haha). So in that case, anything that’s over 63″ has the pocket holes on the top. My shelves aren’t high enough to do this with.

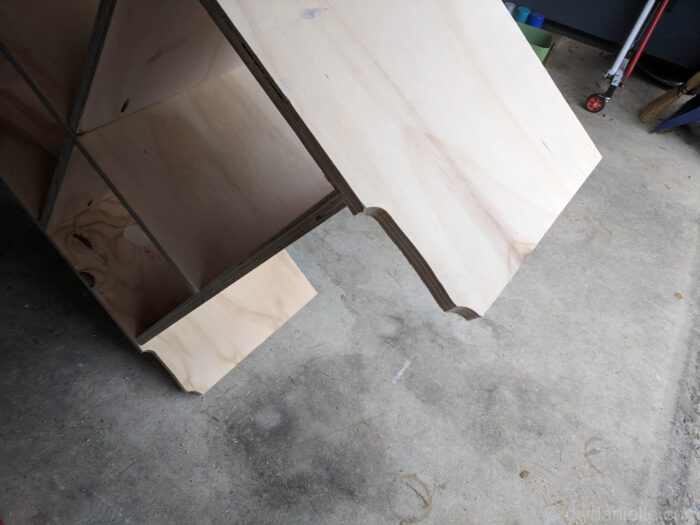
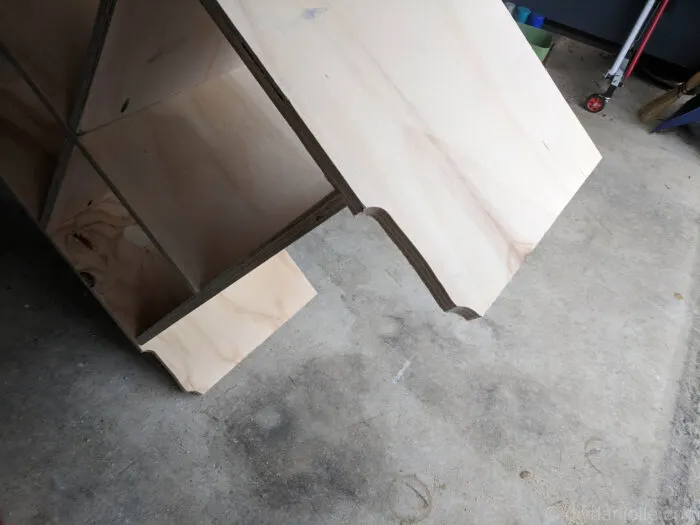
Step 6A, Optional: Use your jig saw to cut out the baseboard design so this will sit flush with your baseboard. Alternatively, use a Job Plus to remove the baseboard where the closet system will go.
Step 7: Place your closet system in your closet in the middle. Lay your top shelf on top and make sure it’s level. Cut a couple of scrap pieces of wood to use for supports on either side of your long top shelf (D).
Screw the scrap pieces of wood on the left side and the right side to support the ends of the shelf. Again, make sure the shelf is level.
You’ll also want to ensure that your scrap is attached to a stud or that you use drywall anchors. I like to sketch my stud location on the wall when possible so it’s easier to mount everything.

Screw the top shelf down into the supports and screw divider B into the top shelf using the pocket holes.
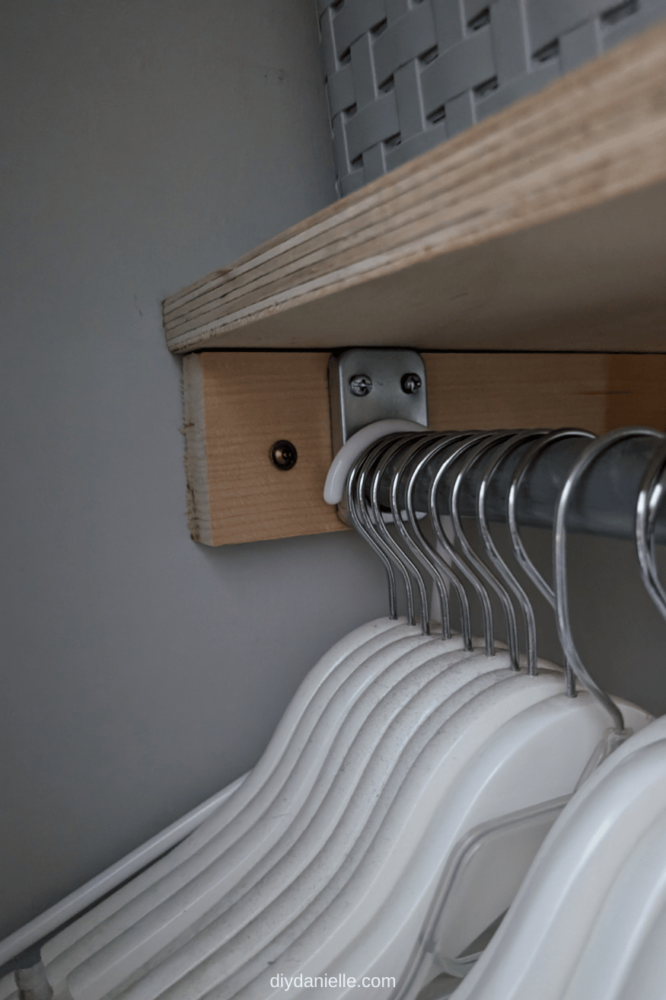
Step 8: The last step is to attach your closet rods. The bottom closet rod is hung at about 30 and 1/4 in from the floor. The top rod is hung at 60 and 3/8 in from the floor. Our hampers are about 24 in tall so this allows them to slide underneath the bottom rod.
I screwed scraps into the wall as supports for these too.
Step 9, Optional: Finishing Touches.
If desired, you can use veneer edging or smaller pieces of wood to cover up your plywood edges.
You can also prime and paint the shelves, or use stain/polyurethane. I left them unfinished because my kids are young and at that stage where stuff gets covered with markers and/or tape. It’s in a closet so whatever.
Tips for Saving Money:
- Birch plywood seems to be cheaper. Buy a few dollars.
- You can choose to make your closet system 12 in deep so you can get more cuts out of your 4×8 panel.
- I also shop around for used wood to see if anyone is getting rid of stuff that they have been storing in their garage. Occasionally I get good deals on plywood.
- Keep in mind that not all plywood is the same. There are cheaper panels but some of them use chemicals that you shouldn’t use indoors. Some require more sanding or prep work. If you’re able to look at them before buying them, that’s helpful. I’ve had really good luck with the quality of the Purebond wood.
Additional Resources
- DIY Basement Storage Shelves
- How to Read a Tape Measure
- Guide to Drawer Slides
- Types of Sandpaper
- Types of Sanders
Please share and pin this post! If you make this project, share it in our Stuff Mama Makes Facebook Group. We have regular giveaways for gift cards to craft stores. You can also tag me on Instagram @doityourselfdanielle; I love seeing everything you make!