

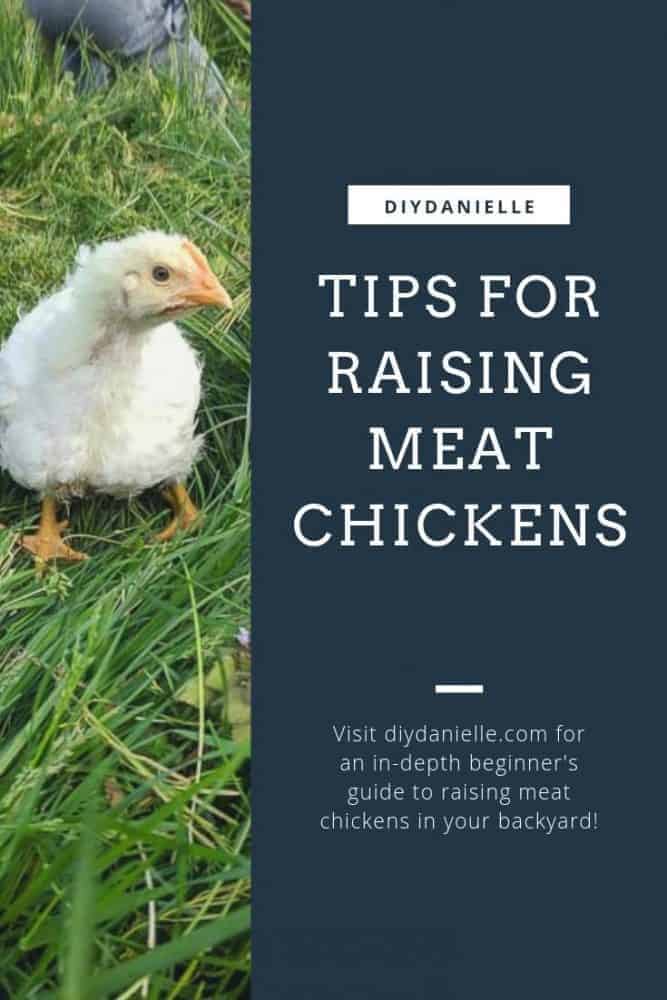
A beginner’s guide to raising meat chickens in your backyard with a cost analysis and week by week experience.
This post may contain affiliate links which may earn me commissions should you click through them and take certain actions. As an affiliate for Amazon, Cricut, xTool, Home Depot, and other sites, I earn from qualifying purchases. Please DIY carefully. View my full legal disclosures here.
The majority of my content is generated by me, as are 99% of the photos and videos, but I utilize technology for titles, descriptions, video editing out all of my ums, and occasionally for text overlay on images.
Please read the whole post so you don’t miss any important information!
When I say this is a beginner’s guide, I mean that I am a beginner and I am going to explain what I’ve learned and analyze the experience in general. I did a lot of research on meat chickens and I hope the information that I share is useful.
I also want to discuss how I felt about the process too… the reality is that I’m an animal lover and I wasn’t sure how I would feel about turning our “pets” into food. There was also the additional concern of how my kids would cope with the process.
Bear with me… this is essentially a short novel.
Breed Selection
There are a few chickens that are people use for meat. Cornish X and Freedom Rangers are the two that I’ve heard the most about.
I chose Cornish X because they are:
- Ready for processing within 6-8 weeks
- Not likely to survive if they weren’t processed (more on this later)
- Easily available
- Seen as a fairly easy meat bird to start with
In the future, I may try to raise some Freedom Rangers, but they apparently take 14 weeks or so to grow out. I’ve heard they do better on pasture though so that off sets some of their feed costs. I think that the Cornish X, however, will still be more of a cost savings due to their shorter lifespan and faster grow rates.
My main thought here was that I was planning to bring home Muscovy ducklings this Spring and I wanted the chicken meat in the freezer before I did so. I didn’t want to have to keep the ducklings in the house or shed. A quicker turnaround meant that I could bring the ducks home sooner.
I was also worried about us getting attached. This is a really good test run for my family on how we’ll feel about processing animals. I thought it was better to ease our way into it by keeping the turnaround quick, handing off the processing to a skilled person, and then re-evaluating some of those choices the next time we raise chicken for meat.
The other benefit is that these chickens aren’t intended to be kept and bred… so it sort of forces you to make the “hard choice.” Again, thinking about how to make this easiest on myself and my family.
Complaints about this breed include: their hearts and/or legs can give out when they get too big, they are very sedentary and therefore dirty, and many people feel it’s sad to see them like this.
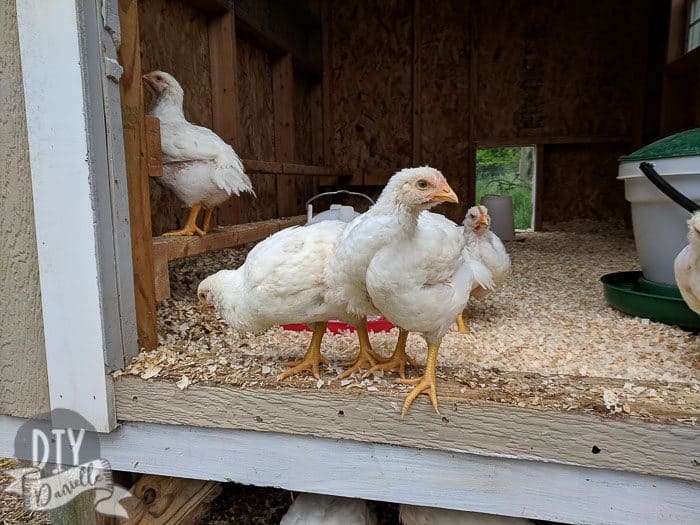
Honestly I really liked the breed. I think that I didn’t see some of the issues that some people complain about because of the timing of our processing and how we cared for them. We had zero deaths after we adjusted their feeding schedule (more on this later) and they were outside every day for their last four weeks or so. They were definitely starting to have a harder time flying or moving around, but they were laying in clean grass for most of the day- not a dirty coop. We processed at 7.5 weeks instead of holding out for a higher weight bird because we didn’t want them to die or have their body parts give out. Essentially we processed when we saw their quality of life go down.
Some of you may be wondering if these birds are the same as the Cornish Hen that you can buy from the grocery store. They are, in fact, the same breed. The difference is that Cornish Hen are Cornish X birds that are processed around 4 weeks. They just process them when they’re smaller instead of waiting for them to get big.
Most people process Cornish X between 6-8 weeks, although some withhold feed more and wait until 14 weeks.
Costs to Raising Meat Chickens
This is a breakdown of what it cost me to raise these meat chickens. You’ll spend more or less depending on your cleaning habits, what type of chickens you get, how long you grow them out, etc. I did NOT account for the cost of the coop, run and other supplies because I already owned them.
This is my cost for raising 17 chicks to 7.5 weeks old.
- Chicks (20 total): $44.50
- Feed: I went through (4) 50lb bags of feed for 17 chicks over 7.5 weeks. My neighborhood store sold Start & Grow feed for $21.50/bag. I bought 2 bags of this, but I ended up preferring the DMR 20% Poultry Starter at Tractor Supply which was $17.27/bag. $77.54
- Bedding, Shavings: 4 bags at $5.50 each, I believe $22
- Processing Fee: $3/chicken $51
Total: $195.04 or $11.47/chicken
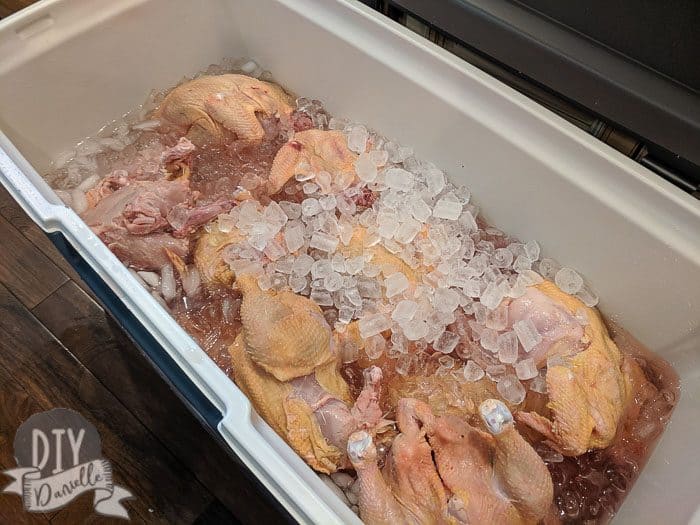
We had a total of 69 lbs 8 oz (1121.1 oz) of meat after processing. Our chickens were, on average, 4lb 1oz. This was equivalent to $2.80/lb or $11.48 per chicken dinner. Keep in mind, however, that the neck was still attached so the weight might be off compared to store/farm bought that likely wouldn’t have its neck on. But mine were weighed without packaging also.
Just for a comparison, I eyeballed the price of a whole organic chicken at Costco. They sell for $1.99 lb or a 10.11 lb chicken will sell for $20.12. Now my chickens probably wouldn’t meet the requirements for ‘organic’ but I was more concerned with the ethics of raising them than an organic label.
At a local farm, you can buy their Heirloom roaster chicken for $4.50/lb at 5-7lbs per bird. Or $22.50-31.50 per chicken dinner.
I’m not comparing the price to “regular” store chicken… it’s not apples to apples in terms of taste. I’m not even sure the Costco organic chicken is a good comparison. If you’ve ever had TRULY fresh, farm raised chicken, the chicken just does not compare.
You can certainly save money or spend more if you choose different types of feed and bedding. I would consider swapping out the bedding for wood chips in the future (free through ChipDrop or your local arborist if you’re in a good drop zone) to save money. I’ve heard it is a great bedding option for chickens, but haven’t used it personally.
I didn’t use pure organic feed. I think I used unmedicated exclusively, but I’m not sure. I ended up swapping feeds a couple of times which probably wasn’t ideal. In the future, I will choose the cheaper of the two feeds, purely because it’s 20% protein and a better price.
Some people do save money by mixing their own feed as well.
There were a few items that I didn’t add into my calculations- I needed to buy a huge cooler for resting the meat on. I also had to buy a couple of bags of ice to keep them on. Next time, I will bag up ice from our ice maker in advance. I’ll also be spending money on packaging them to freeze.
Expecting & Preventing Death
One of the things that I expected was that some chicks would die. Between the stress of travel (we ordered ours delivered via USPS), predators, and disease, there are a lot of things that can kill a chick. I tried to do my best to lower the death rate.
Heat Lamps
I hate heat lamps. They’re a common cause of fire and they can absolutely destroy your coop and chickens. But when you’re raising chicks without their mama, they aren’t optional (that I know of).
When the days started heating up, I turned off the lamps during the day. I slowly eased off the use of heat lamps as quickly as possible. These particular chickens didn’t seem to need it as much as other breeds do.
You can always plan to raise these during warmer parts of the year so you can avoid as much heat lamp use… but you’ll still need to keep them around 95 degrees Fahrenheit initially so I imagine you’d still need a heat lamp at night in most areas.
Keep your heat lamp dusted. Make sure it’s not touching anything. Use it according to the manual.
I would be tempted to have two heat lamps setup and swap which one is on… this would give each a period to cool down. Just my two cents… no experience on this.
You might consider installing some type of fire alarm in your coop, but I imagine that if there’s a fire, the coop will go up before you get a chance to respond to the fire. If you have a larger shed or barn, you might have more time. There’s a lot of flammables in a coop or barn so prevention is important.
Predator Proof the Coop
If you want to have a good survival rate, your main priority will be predator proofing the coop (and ideally, the run). My coop had some stuff nailed shut because my coop is a little worn out. I wanted to ensure that I prevented any unnecessary deaths.
We also have a motion sensor light on the coop.
Our run isn’t predator proof, but we kept the grass long so they’d have something to hide in. There’s also a big peach tree that should block hawks from swooping down easily. The fencing was checked so no animal could easily get in without climbing over it. The chicks were also able to get under the coop to hide.
I read that hawks will frequently wait for chickens to eat or drink water to attack. Because of this, I placed the waterer and feed in spots where they had cover.
The other thing to consider is coop placement. I believe that a coop closer to your house and any related noise is going to be safer than one that’s near/in the woods.
Lastly, I added a couple of fake owls around the coop area. No clue if it works… sometimes when I see hawks around, I hoot like an owl and giggle at myself because I’m probably fooling no one.
Use Your Judgement
One of the most important things is to listen to your gut. I was reading that chickens needed to be kept under a heat lamp for their first 8 weeks. This is true for laying chickens, I believe… but Cornish X apparently run a bit hot.
I had been trying to find information on heat recommendations specific to this breed, but one day I decided that I needed to just take a chance. I walked into their coop to find them laid out flat on the floor panting. Some had moved away from the heat lamp, but others hadn’t really gone as far as they needed. From ALL appearances, they were hot and they were going to die. I immediately turned the heat lamp off, opened all of the windows in the coop, and they immediately perked up a bit.
They still weren’t 100% though so I ended up letting them outside in the grass that day and by the time they were outside, they were pecking happily and looked like completely different chickens.
If I’d done what I’d read to do, I think I would have had a higher fatality rate. Now keep in mind that we are in Maryland and have warm Spring weather. It wasn’t cold out, but there was a Spring breeze. I think my overall message is to keep an eye on your birds and respond to what their body language is telling you. Once you respond, reassess and make sure you did the right thing. When in doubt, check with your veterinarian.
Cleanliness
These birds will sit in their own filth. They don’t move a lot, particularly at the end of the 6-8 weeks, so IN MY OPINION you want to keep things as clean as possible. This prevents disease and death, and keeps them cleaner.
My chickens still looked gross and dirty, but I did what I could. I’m a little unclear on what a typical frequency is for cleaning a coop with meat chickens in it, but you really to adjust depending on how big your coop is, if they have outdoor time, and how many chickens you have in one coop. When they’re smaller, they don’t make a mess as quickly.
If I raise these again, I will keep them in a chicken tractor for the last few weeks of their life and move it daily. I just don’t like the idea of animals sitting in filth and there was quite a bit of cleaning involved the last week or two.
Feeding Schedule
When we first started, I read to feed 24/7 until the chicks were four weeks old. At that point, most people reduce the time feed is offered to 12 hours only of the day.
A week after getting my chicks, however, I was seeing one chick die PER DAY. I panicked and asked in a homesteading group what I should do. Someone said that they apply the 12 hour feeding rule starting at FOUR DAYS OLD.
I immediately started withdrawing feed overnight (from 7pm-7am or thereabouts). I didn’t have any more deaths. So four days will now be my standard.
Summary: 24/7 feed for 4 days. After that, reduce feeding to 12 hours a day, preferably during the daytime. They should ALWAYS have water.
I kept the feeders full and removed them overnight. I let them eat as much as they want during those twelve hours.
During the last two weeks, I did change up my schedule a bit as an experiment. I wanted to see them foraging more so I fed them outside of the coop in the morning, but not a full feeder. Then they would forage all day. At 6 pm, I would put a full feeder inside their coop. This would help get them INTO the coop so I could close it for the night (we go to bed fairly early and they weren’t great about going into their coop at dusk). They probably had access to feed more than the 12 hours as a result, but they got a more varied diet and exercise.
Just to give you an idea how much they ate— it took the 17 chicks 5.5 weeks to go through two 50 lb bags of feed. In the next two weeks they went through the other two bags. We were scraping the barrel at 7.5 weeks for more feed to finish them off. I think it’s safe to say that they could go through a bag a week at the end.
A quick thought on the 4 day rule. My GUESS is that the chicks, due to breeding, prioritize food over water and that they were dying due to dehydration. My thought it that removing the feed gives them time to prioritize drinking water and getting some rest. I’m not a vet and it’s just a guess, but they’re voracious eaters and attack their feed pretty steadily. I was seeing evidence of pasty butt which can come from not drinking enough water.
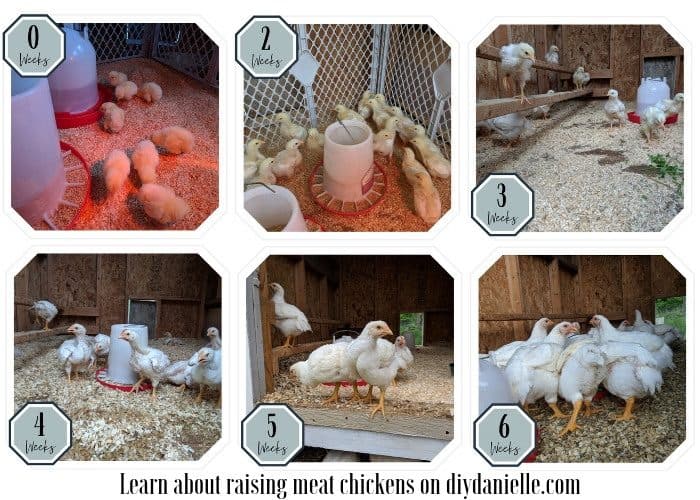
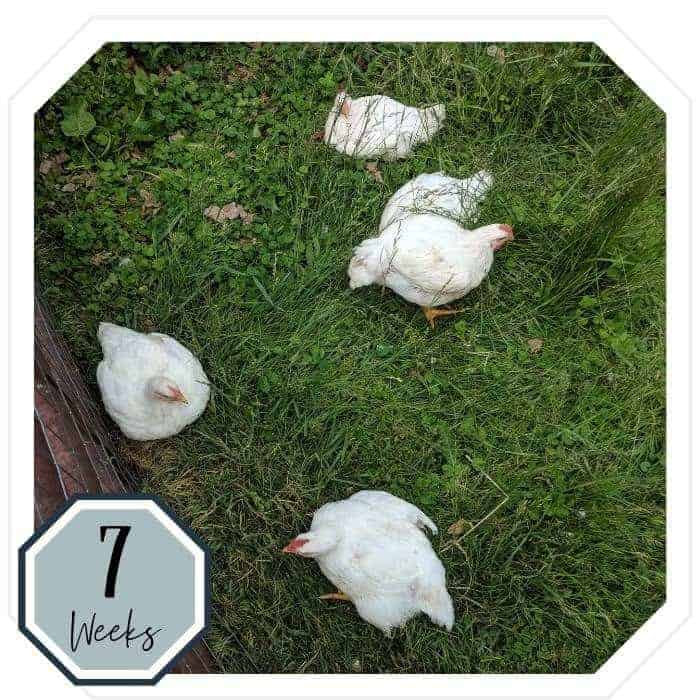
Week by Week
When you get your chicks, they immediately need WARM water and feed. Do not give cold water. They’ll need to be placed under a heat lamp and be able to move away from the heat lamp if they get hot. You can make decisions about your heat lamp position by watching their behavior- if they move closer to it and huddle together to the point they’re hurting each other, it may need to be placed lower. If they’re moving away from it, that’s a good sign you can raise it.
Here’s a week by week comparison of our chicks.
Processing Yourself vs. Hiring Out
This was something we spent some time considering. At $3/bird, it’s not out of our budget to have someone else do it, but obviously saving money is ideal. We considered processing ourselves and we know someone who can teach us, but we opted not to do this for the first round.
My main concern was that I wanted to gauge how we felt about the process before investing in equipment. We don’t have ANYTHING except sharp knives so we’d need to buy a lot of stuff. We would NEED a large pot. I would strongly prefer to have a plucker. Apparently a scalder is also recommended.
My thought was to get them processed this time, see how fast we go through meat, and see if we want to do it again. If we do, we will invest in the equipment.
Transporting the Chickens to the Processor
Keep in mind that you not only have to pay for the processing fee, but you also need to plan for transporting the chickens to the processor. This is a separate issue to consider.
Transportation is ugly. I was warned to lay down tarps and make sure the chickens were secured in a crate so they couldn’t fly around. One woman joked that hers flew out of the box while she was driving an hour to the processor.
The person we used for processing was 20 minutes away which wasn’t too far. This was a decent distance and with our setup, we didn’t have much mess.
17 chickens fit snuggly into my dog’s metal crate. Here’s what I did to make the ride easier.
To begin, I put the back seats in the minivan down. I took a large heavy duty tarp and tied it to the hand holds up above the windows for the middle seats. This created a bit of a barrier between the middle row and back. I pushed the tarp in and tried to get it flat.
The crate got placed inside, on top of the tarp. I pulled up either side of the tarp and tied on top of the crate. This meant it somewhat covered the crate.
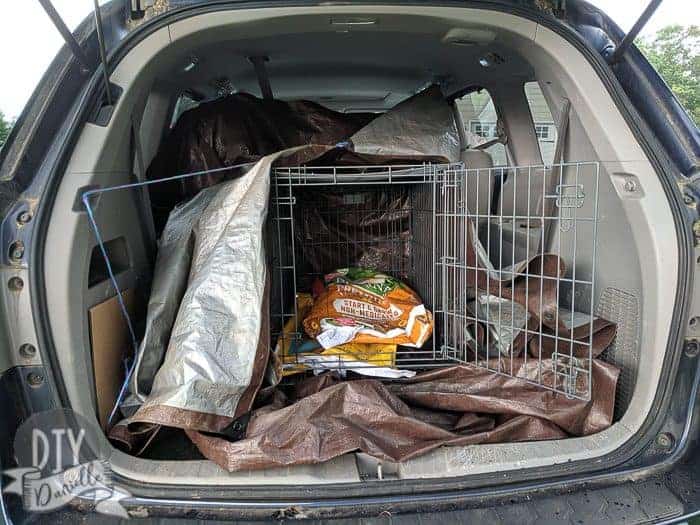
Inside the crate, I layered two empty feed bags, then covered the feed bags with an old towel.
Then we moved the chickens into the crate. I DID NOT MOVE THE CRATE WITH THE CHICKENS IN IT ALREADY. This would have surely freaked them out and it was too heavy for me.
The chickens had a somewhat dark area for the drive. They were snuggly fit inside the crate so they weren’t moving/sliding around. And they were calm for the entire ride.
When I got home without the chickens, I pulled the empty crate out of the van. I untied the tarp. I removed the tarp. There was very little mess inside the vehicle except a few stray feathers. The towel was dirty. I’ll hand wash it outdoors, then wash on hot.
I will sanitize the crate later with their water and feed buckets because the ducks will use them later. I also sanitized the chicken coop. Pro tip: A flat bladed metal shovel is great for cleaning chicken poop off the floor.
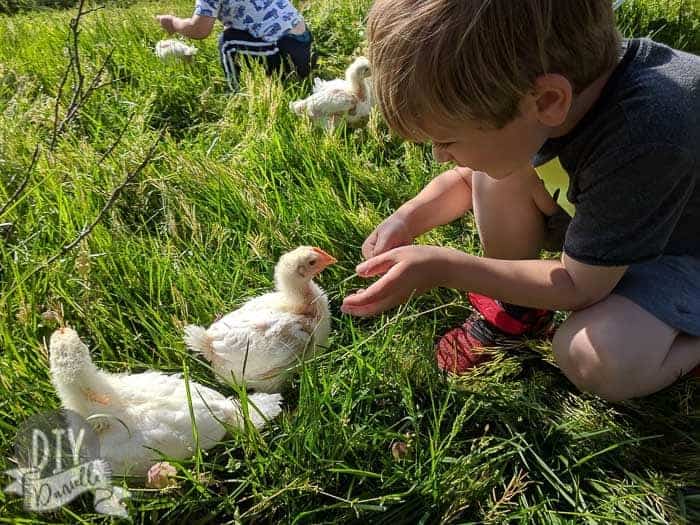
Talking to the Kids about the Meat Chickens
When we ordered our meat chickens, we talked at length about how these would be food and not pets. We talked about how the chicken we get from the grocery store are raised. I showed them pictures of chickens being raised for the grocery store. We talked about how chickens that are treated well taste better, just like home grown fruits and veggies taste better.
I was listening to a homesteading podcast where the speaker was discussing how they raise pigs for a living. They have kids who get to play with the piglets, but they make sure their kids understand that these will be food. What the speaker said really stuck with me; He said, “I tell my kids that these pigs have a lot of good days and one REALLY bad day.”
And this is how I explained it to my kids. We can choose what type of days our own chickens have. We can’t decide that about the grocery store chicken. So we played with our chickens, we took good care of them, and we hope they had a happy life.
We checked in regularly with the kids throughout the 7.5 weeks. We discussed how we were feeling and reiterated how we get to choose what type of life the chickens have.
In the end, my kids have coped pretty well. It didn’t hurt that our ducklings came the day before the chickens left. My 5 year old saved a couple of loose feathers from the chickens.
Final Thoughts
This was probably more information than necessary, but I hope it gets you started on raising your own meat chickens. I know it’s not for everyone, but it’s a great way to know exactly what you’re putting on your table at home- where it came from, how it was raised and treated, and what it was exposed to.
I have a couple of things I wanted to mention.
Next time, I will be more diligent about adding apple cider vinegar to their water. I think this is a great way to prevent pasty butt. I’m hoping that starting out with that will help prevent any issues.
The night we left our chickens to be processed, I was up thinking about how I felt about the whole thing. I was a little sad about the chickens leaving and wondered if we could have kept them happy another week or two. But what stuck with me, personally, was that I was really sad that their last experience was traveling to the processor and then spending a night at a strange place before being processed.
While I may prefer to have someone else do the deed, I can’t help but think I could improve the quality of life for the next batch of chickens by keeping them at home for processing.
I know this isn’t practical in all cases, particularly not for resale where you need to bring the animals to a USDA approved processor. But it’s something additional to consider when making choices for your homestead.
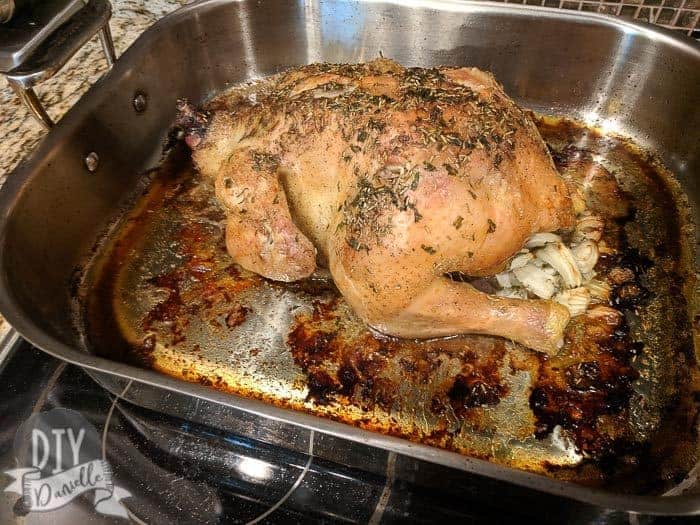
Overall, I’m okay. I didn’t cry. I didn’t freak out. And I managed to weigh and deal with the meat fine when we got it home. Chicken meat is gross to deal with raw, but it’s gross no mater where it comes from so it wasn’t a big deal.
Also the chicken was delicious. I will call this a success!
Love creative homestead ideas? Check out these posts too: DIY Duck House | Goat Barn Accessories | Framing the Goat Barn | Siding & Roofing for the Goat Barn | Easy Solar Lighting for a Shed or Barn | Beginner’s Guide to Milking Goats | No Mess Duck Waterer
Need an easy shelter and don’t want to DIY? Here’s what you can buy.
Omlet makes a ton of chicken shelters and runs that are movable and have lots of accessories available. You can add wheels and handles to move the run as needed which is nice. The cages look like they’re well predator-proofed, and you can get an attached run up to 13′. They even sell an automatic coop door that opens and closes when the sun rises and sets. The Eglu Go is their easily movable shelter and run. They have perches to add on, swings, treat holders, and even chicken clothing. Totally worth checking out if you like to geek out over your poultry.
Thanks for reading. Please share, comment on, and/or pin this post- it’s the best way to send some love to your favorite bloggers!
First they are not pets ……if there food. Second they will not die it’d they go more then weeks….I have a 2 year old meat chicken. If you feed them less and let them forage like chickens they still get big just slower. I have some that are15lbs. Never had any with broken legs and they were still just as tender. Most of your info comes from factory farms and that’s where places like tsc gets stuff. So please do what’s best for you and take with a grain of salt most don’t know what there talking about they are just hired pic street and know only what they are told.
You have Cornish X? There’s a big difference between the Cornish X breeds and the other meat breeds that aren’t quite so bulky, at least from EVERYTHING I’ve read. People aren’t generally successfully breeding Cornish X
Thanks so much for this article! I raised an experimental group of 6 Cornish X’s A few years ago and have been excited to have the space, time, and equipment for another, larger round. I now have 20 chicks ordered to be shipped on September 10th. It is still hitting 90+ here every day, so I have been contemplating if/how long I will need to have them under a heat lamp. (My experimental group was started in March, so there was no doubt they needed it!) Your blog was extremely helpful and covered several topics on my mind! Thanks so much!!
Enjoy! I found they run really hot so I sort of wish I’d gotten a late summer/early fall group!