
Struggling with unwanted iron-on vinyl? Learn the technique to remove iron-on vinyl. Safely peel away vinyl without damaging your items.
I have tried customizing shirts and other items with embroidery, iron on vinyl, and other products. My favorite has been iron on vinyl because it is feasible to save the shirt if you make a mistake.
One of the things I really disliked about embroidery was that a simple mistake could result in a shirt that was simply impossible to ever use again. It felt really wasteful.
It also required a lot of supervision of the embroidery machine which was difficult for me as I do not like sitting and waiting for a machine to work.
Regardless, being able to remove iron on vinyl correctly and still have the shirt be usable is very helpful and I’m going to show you how to do it.
Please note that I’m using the terms iron on vinyl and heat transfer vinyl (HTV) interchangeable in this post as the products are essentially the same, but produced by different companies.
This post may contain affiliate links which may earn me commissions should you click through them and take certain actions. As an affiliate for Amazon, Cricut, xTool, Home Depot, and other sites, I earn from qualifying purchases. Please DIY carefully. View my full legal disclosures here.
The majority of my content is generated by me, as are 99% of the photos and videos, but I utilize technology for titles, descriptions, video editing out all of my ums, and occasionally for text overlay on images.
Please read the whole post so you don’t miss any important information!
What is Iron On Vinyl?
Iron on vinyl (also known as heat transfer vinyl) is a type of product where you can cut out a reversed design on the vinyl, generally using the Cricut machine or the Silhouette machine, place it down on a shirt, and heat the design so it adheres to the shirt.
It’s not changing the actual fabric, however, it’s just applying a design on top of the fabric.
The way I see it is that it kind of melts the plastic onto the shirt. It can also work on other fabrics as well.
This is different from something like screen printing where you are actually dyeing the fibers of the shirt.
Importance of Proper Removal
While removing iron on vinyl from fabric is feasible, you want to remove it properly or else you can tear the shirt or pull the fabric in a way that results in a lower quality product.
The fabric your iron on is applied to will impact how easily the iron on vinyl can be removed without damaging the fabric.
A very fragile fabric is going to be difficult to remove the iron on vinyl from without damaging it. A more resilient fabric can withstand the process a bit better.
I find that stretchy knits may get pulled out of sorts in the process, but maybe this is just user error. I sometimes find it difficult to be patient while removing the iron on vinyl.
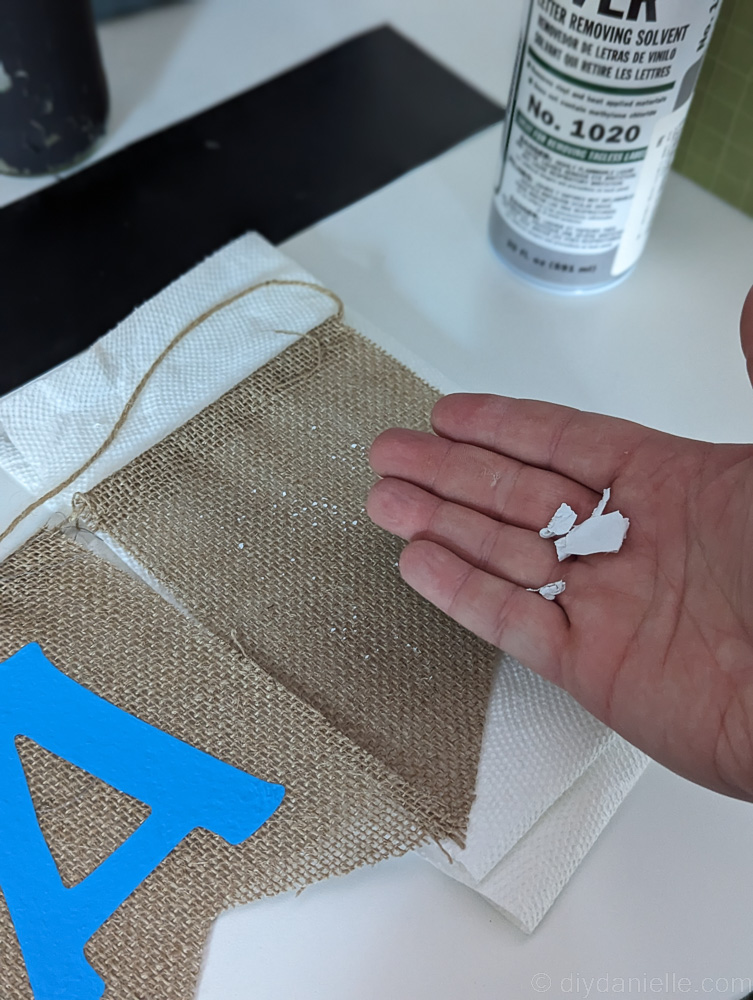
The fabric I’m showing this method on today is burlap and while it has a fragile weave, it was quite easy to remove the iron on from.
There are several methods that you can try, but my top choice is VLR.
How to Remove Iron-On Vinyl
Supplies
- VLR Letter Removing Solvent
- Iron / Heat Press
- Tweezers
- Parchment paper
- Goo Gone or adhesive remover
- Scrap fabric or paper towels
VLR Method to Remove HTV
The VLR method is by far the easiest and simplest, particularly if your vinyl is actually stuck to the fabric really well.
The only thing to note is that it has a very strong scent and you should wash it before using the fabric again.
In the case of the product I’m showing you, it’s a burlap banner so I didn’t wash it as it’s not touching anyone’s skin or up close to anyone who is going to smell it.
But I did remove some HTV on a custom jersey and I just hand washed that area and let it hang dry.
To remove your vinyl, flip your shirt inside out, or flip to the back of the fabric. Cover the back of your iron on vinyl with the VLR.
You can rub a paper towel or cloth over the iron on and it should begin to peel up. You can use tweezers to pull the letters off, but don’t scrape the fabric with them.
Just remember that this may not work on every fabric type and every application of iron on vinyl.


Other Options to Remove Heat Transfer Vinyl
Removing Iron On Vinyl with Heat
Heat can usually release adhesive so you may be able to remove your iron-on vinyl using your iron, heat press, or a hair dryer.
Parchment paper or scrap fabric can be used to protect the item you’re removing the iron on vinyl from.
Heat the iron on vinyl briefly and while it is still warm, use tweezers or a scraper to lift the edges of the vinyl. Ensure that you don’t ruin the fabric in the process.
You may need to work in small sections to peel it off little by little. This will require heating multiple times most likely.
Please share and pin this post! You can also post your project and tag the DIYDanielle team on Instagram @doityourselfdanielle!
