
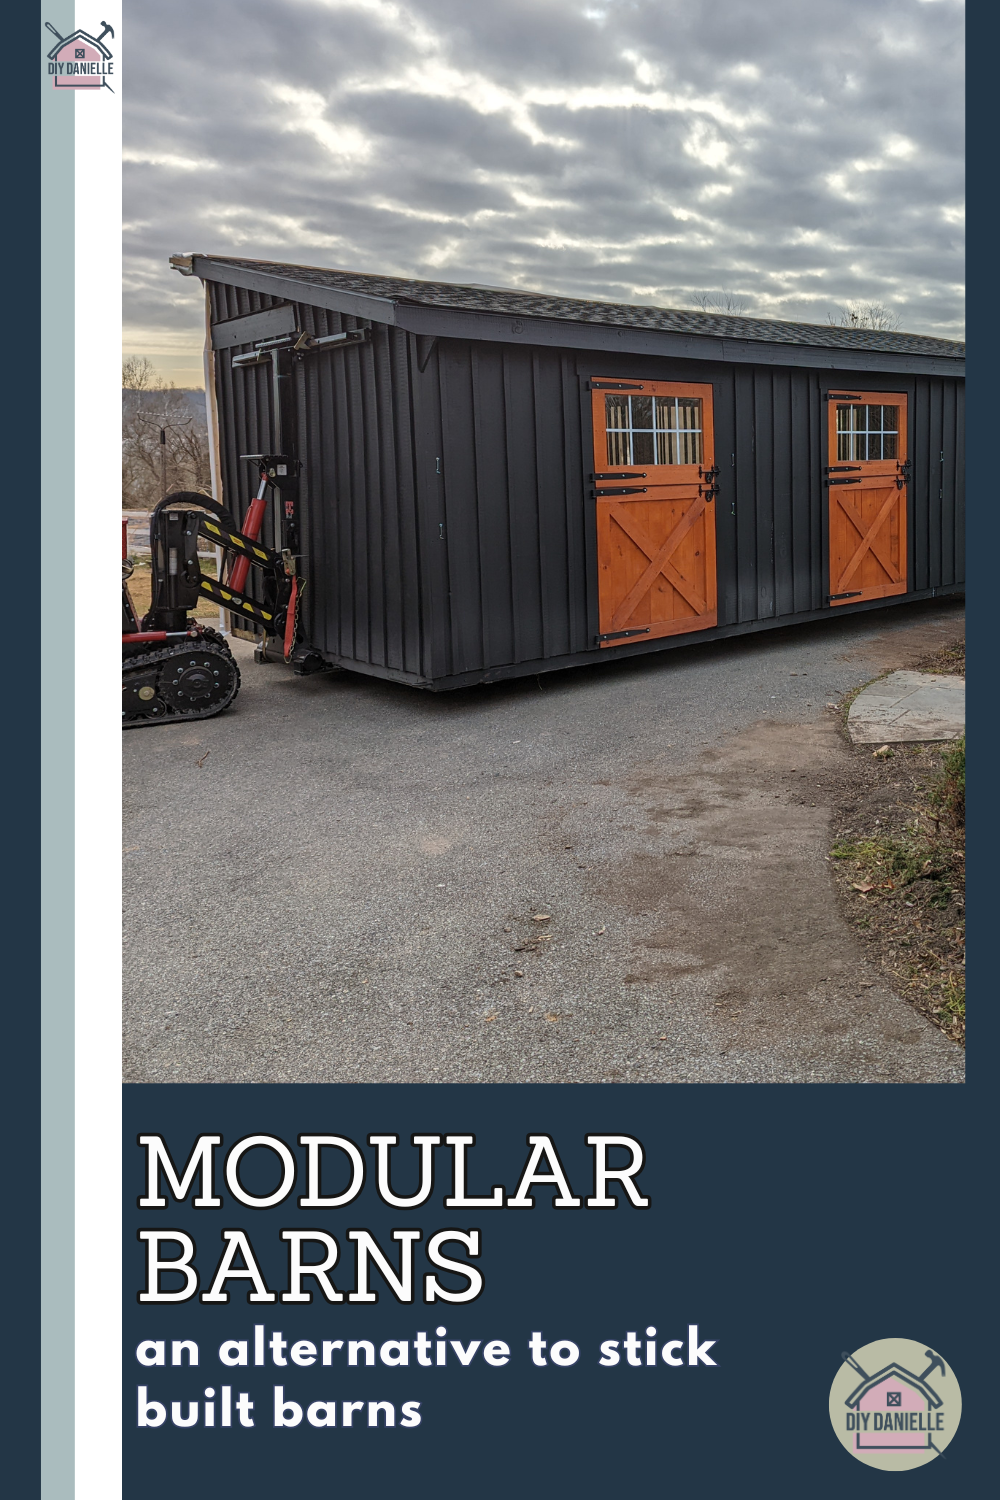
What is a modular barn? Our experience buying and having a modular barn installed on our property for our horse farm.
In November 2021, we had a modular barn installed on our property. I needed a small barn for five or fewer horses, and a tack room to hold gear. I was able to buy a “floor model” from a large company who makes barns and have the modular barn delivered. I wanted to share a bit of the process because it’s interesting and I figured it might help someone else looking to have a barn built for their farm!
This post may contain affiliate links which may earn me commissions should you click through them and take certain actions. As an affiliate for Amazon, Cricut, xTool, Home Depot, and other sites, I earn from qualifying purchases. Please DIY carefully. View my full legal disclosures here.
The majority of my content is generated by me, as are 99% of the photos and videos, but I utilize technology for titles, descriptions, video editing out all of my ums, and occasionally for text overlay on images.
Please read the whole post so you don’t miss any important information!
Benefits of a Modular Barn
There are a lot of benefits of a modular barn, but for me, the benefit was that this one was already built. I like being able to SEE what I’m getting versus trying to imagine what I’m buying if I went through the whole process of having a barn built to my specifications. The barn I purchased was on sale through the company we used and I had photos to look at. It was SO helpful. I didn’t need to make ANY decisions really- no deciding on door types, wood, color, etc. I just had it delivered. This made it fairly easy (but not as easy as you might think- I’ll get into that later).
Here are the other benefits:
- Fairly fixed pricing: I knew exactly how much the barn would cost me. No extra add-ons, no “whoops” wood prices went up and now your project is going to cost 2x what we quoted you, etc.
- No salesmen. I bought an item on their sales page therefore I never had to meet with a salesman.
- No extensive construction on property. All of the work is done in under 3 days.
- Cheaper than having a custom barn built on site.
- No construction guys leaving trash around for weeks/months during a construction process.
Process of Having a Modular Barn Installed
Step 1: Purchase the Barn
I started by purchasing the barn and signing contracts online. The company was able to hold the barn on site until I was ready for the delivery.
Step 2: Decide on Barn Location
Next, we decided on where we wanted the barn. We needed to follow local laws and make sure it was a certain distance from the property line and neighboring houses. Keep in mind that the distance from your home will impact the cost of running electricity and/or water to the barn… as well as septic if you want to put a bathroom in too.
We were required to move our chicken coop to make room for the barn so that was an unexpected additional project to unhook it from electric and drag it across the yard to my garden (where I created a chicken moat garden!).
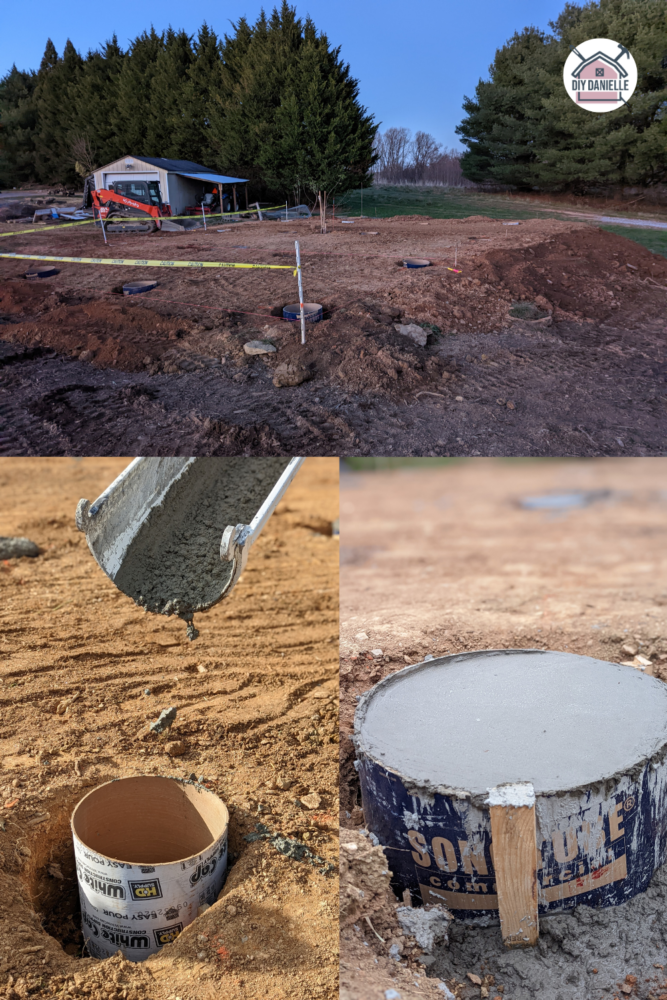
Step 3: Level the Area
The area where the barn will go needs to be level and you want it set so that water runs away from the barn. We hired a company to do the leveling work. We also had them put in conduit to the barn at the same time (we were working on another project at the time so it made sense). This would allow an electrician to install electric wire later on. I couldn’t afford it at the beginning of this project.
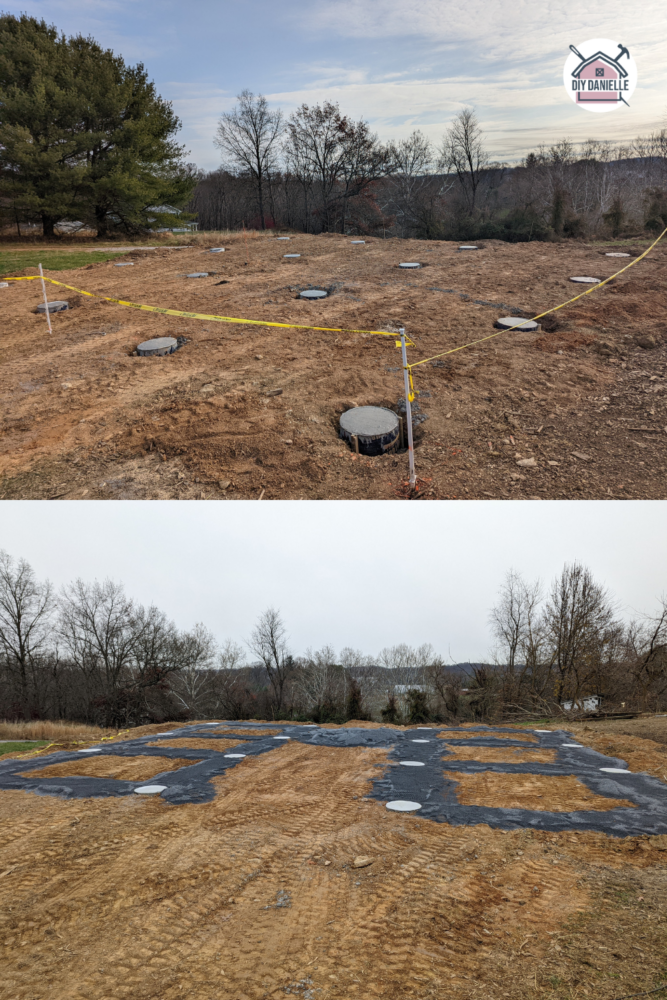
Step 4: Add Concrete or Concrete Footers
You need to add a concrete base per the specifications of the modular barn builder or add concrete footers with stone dust base everywhere else. I ended up choosing to do concrete footers and stone dust because many people prefer stone dust and dirt under their horses’ hooves instead of concrete.
Now that I’ve had the barn a while, I ended up putting in a concrete aisleway ANYWAYS so I regret not doing that initially. I also have found that mice WILL dig through the stone dust, even though I have stall mats on top of it. This can cause issues with the stone mats being lopsided.
While I’m not sure concrete is the best option for stalls, I also hate having to redo the mats. So I’d probably investigate my options more thoroughly if I were to do this again. Understand that mats cost about $50 each and I think each stall required 5 mats. A few of the mats need to be cut to fit which is a pretty huge pain.
Installing concrete won’t help- in fact, now that I have a concrete aisle, I feel like I need to buy more mats for the aisle because horse poo stains on the concrete are a GIANT pain to deal with. I don’t have the answers- if you have solutions, leave a comment.
Step 5: Bring the Modular Barn In!
Once the footers went in and the concrete had time to cure (I think this was only a few days), they brought the modular barn in.
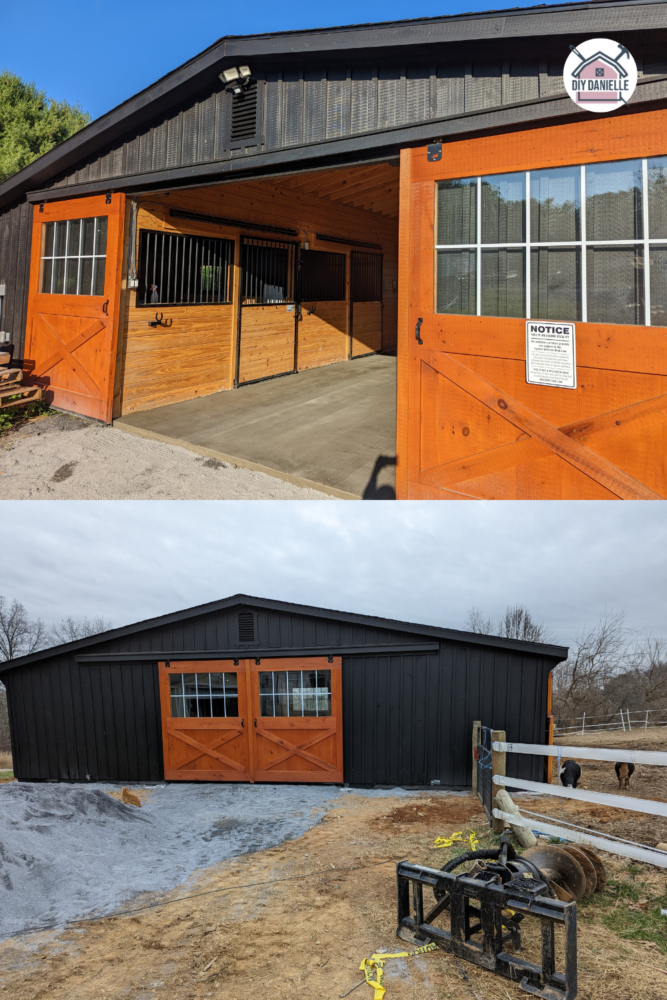
I purchased a low profile barn- this means there’s no loft area above. While I LOVE the look on my property, this has the downside of not giving you any area to store hay. Or rather, you can store hay in the stalls, but that’s less room for horses (or goats, sheep, etc.) and you’ll probably want to fill your barn. I did (sheepish grin).
I’m using a cheap 7×12 “carport” for hay right now that has me considering what my next big purchase will be. It works, but the canopy took a beating with the wind over the first year so I had to replace that already (a 5 year Outdoor Furniture Accident Protection Plan is $44.99 and I 100% recommend getting that. You WILL use it).
The modular barn is really TWO shed rows. Sort of. The company brought in the first “shed row” which was the three stalls on the right side of the barn. They placed it on the concrete footers.
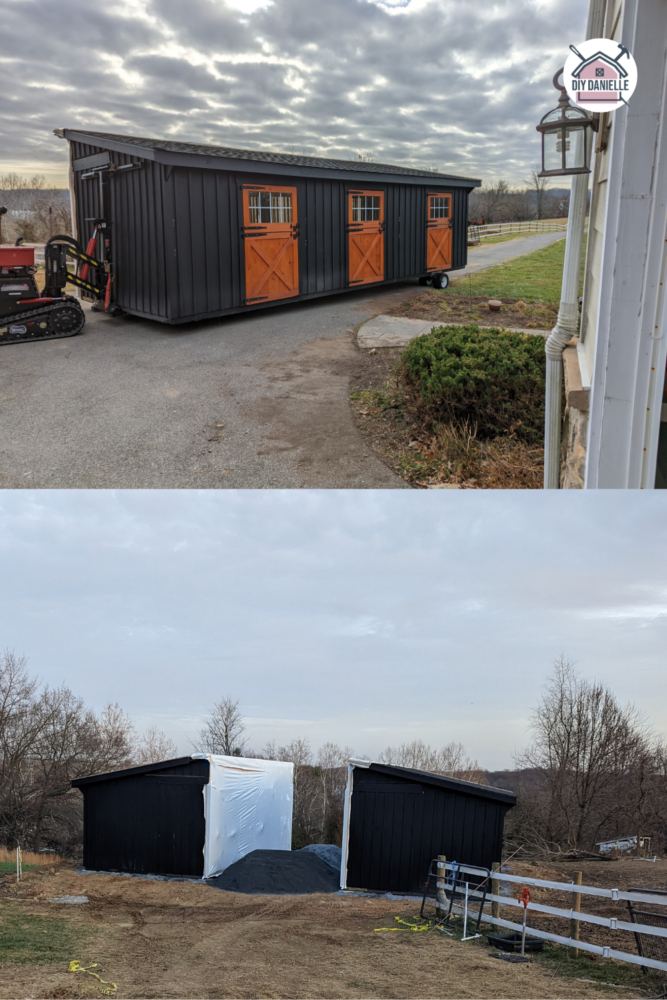
Then they came back a few hours later with the second “shed row” which was two stalls and the tack room. Inside the stalls for both sections were the parts for the roof.
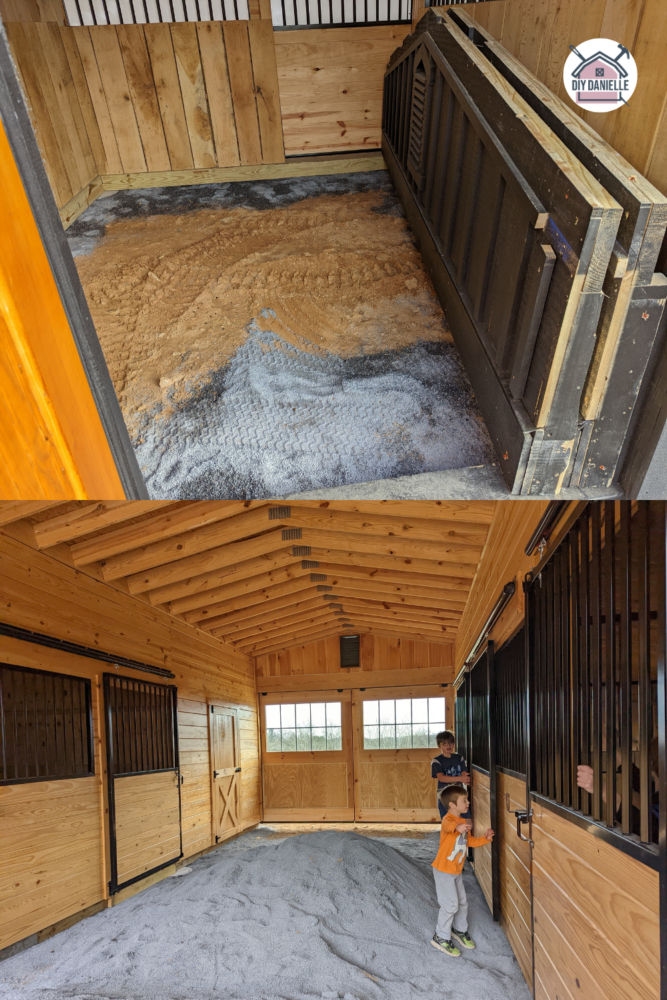
After a day or two, the company came back with a small team of employees (maybe 3-4 guys) and they installed the roof over the two shed rows to connect them. They left ZERO mess and I was really impressed with their work.
My one regret with this barn is that I wish it had an overhang on the side with the stalls. I’ve debated asking if I could add that on, but I assume it would be cost prohibitive. But gosh it’d be nice to have that!
Step 6: Have Gutters Installed
I had gutters installed. It was a good call and if you’re smart, you’ll install some water barrels to attach to the gutters, then use the rain water to water plants along your fence line or next to your barn. I think it cost me a little over $1k for gutters. They look great and we are able to redirect water to one zone.
Step 7: Electric Fencing
If you use electric fencing, now is a good time to install your ground rods… before you have a ton of vegetation in the way. We installed three ground rods on the non field side of the barn, then connected them. This winter, I finally cleaned up the wiring. I hammered in poultry staples along the bottom of the barn exterior to hold the insulated wire in place and it looks SO much neater. This will prevent issues when you’re weed whacking or trying to walk around the exterior of the barn.
Step 8: Landscaping
Landscaping was a pretty big deal because our barn sits atop a little hill. I didn’t want to have any issues with erosion so I dropped some money- and mostly a lot of time- on adding grass seed. I used temporary electric fencing to keep all of my critters off the hill (which was all dirt at this point) until the grass grew in.
I have sheep and goats whose manure can go directly into a garden and their poo is a pretty fantastic fertilizer. The barn was installed in December so I used ALL of their manure (and wasted hay) from the winter to spread on the dirt hill. Once Spring hit, I added grass seed that was recommended by my local feed store for preventing erosion.
One side of the barn has stalls that open into the pasture, but the other side does not. I planted elderberry and comfrey on that side under the windows. Both were planted from cuttings inside my garden (I dug up extra comfrey) and they were quite established within a year. I anticipate they’ll be quite beautiful in this upcoming Spring/Summer. I still use goat and sheep manure and soiled hay for that area.
The hill is a bit tricky to mow, but feasible. I may eventually try to lessen the slope and grade it out a bit in the future, but for now it works.
Step 9: Insulate and Update the Tack Room
While this isn’t necessary, I planned to use my barn tack room as an office, as well as to hold medicine and such for the animals. It needed to be insulated and heated/air conditioned. Here’s a blog post about my Barn Office Renovation. While I question my sanity sometimes (ugh the never-ending projects), this office looks amazing now and I’m really happy with it.
I wrote this post and never got it up so needless to say, I also renovated the two closed stalls into a larger office space too. Maybe I’ll write that post eventually? My projects are keeping me busy.
Step 10: Concrete Aisles
I know this is a repeat of step 4- but I was told by horse people that the stone dust was a PERFECT option for the aisle. I had IMMEDIATE regrets once I saw my barn cat’s look of pleasure when he discovered it. Y’all it’s one giant litter box.
I wish I’d just spent the money on the concrete aisle to begin with (sigh). It was fairly expensive to have them come back to add it on.
Step 11: Add Electric
Get an electrician to add electric. This makes animal care SO MUCH easier. I can shear sheep in the concrete aisle. Vets and farriers appreciate light on dark days (or late evening calls), and it makes my life SO MUCH EASIER in the winter when it gets dark sooner.
I bought some of my own items for the electrician to install:
- Security Motion Light (2)
- Vapor Tight Light, 40W 4400LM (100W Eq.) Waterproof LED Shop Light, 5000K Daylight, UL Listed, Vapor Proof Fixture for Cold Storage Warehouse, Car Wash, Parking Garage, Pack of 4
Step 12: Add Your Accessories
I had to add a few accessories along the way. Here’s a run down on what I added.
- A wall mounted fan
- Cross ties
- Mats
- Storage brackets for the 5th stall. I use the stall as a storage space and feed room.
Honestly, the process was so low key on our property that I’d repeat the process in a heartbeat for a garage, addition or other structure. Where everything is built off site, you don’t have as much mess and long term chaos, although you do need to add the base.
Please share and pin this post! You can also post your project and tag the DIYDanielle team on Instagram @doityourselfdanielle!

Modular construction has come so far in quality and finish.