
Transform your home with SmartWings automatic blinds. I review the latest Smart Shades and show you how to install them (interior vs. exterior mount) in an easy follow-along video.
Many years ago, before home automation was quite so accessible, my dad hardwired his home with automatic blinds when it was being built. This always struck me as so convenient, but out of grasp, given the cost of those types of systems.
But it’s always been on my mind that I would love to have automatic blinds. I was pleased to discover that they are now more affordable and accessible, particularly as we just finished a home addition and really needed to add blinds to some of the rooms.
While their price point is more than the typical price of blinds, it’s close enough that it’s worth the upgrade if you can manage the cost. And if you can’t afford to do all of your windows, it still makes a lot of sense to install in windows that aren’t easily accessible.
Many thanks to SmartWings for providing three of the blinds for me to review. All opinions are my own and I do not provide reviews for products that I don’t think are a good fit for me or my audience. If it makes it onto my blog, it’s generally a pretty user friendly product.
The TLDR review: We purchased five more of these blinds for other areas because I thought the product worked well.
This post may contain affiliate links which may earn me commissions should you click through them and take certain actions. As an affiliate for Amazon, Cricut, xTool, Home Depot, and other sites, I earn from qualifying purchases. Please DIY carefully. View my full legal disclosures here.
The majority of my content is generated by me, as are 99% of the photos and videos, but I utilize technology for titles, descriptions, video editing out all of my ums, and occasionally for text overlay on images.
Please read the whole post so you don’t miss any important information!
Why Automate Blinds?
I initially was mostly interested in the convenience of these and making sure that I wasn’t the only one raising and lowering blinds all day (I feel like the household butler sometimes and I waste my life away turning off light switches, opening blinds, and generally just doing butler things).
Secondarily, we have a large window above our master bathroom tub and without automation, I would need to climb over the tub to raise and lower blinds. It’s inconvenient and quite frankly, not super safe, particularly for the future if we age in place here. My 45 year old self can manage tight rope walking along the edge of the tile to access the window, but I probably shouldn’t do it twice daily. Instead of installing traditional blinds, we just lived without blinds for many years.
Now that we have an automatic blind in the window, however, it’s convenient to raise and lower them as needed. It also gives us a lot more privacy in a room that really SHOULD be private.
The third perk of automated blinds was something I hadn’t considered though- unlike traditional blinds, automatic blinds are hands off so they avoid the wear and tear of human interaction.
I’m hoping this means they will last longer.
They will not avoid your pets’ interactions so no promises there, but at least my kids aren’t touching them with dirty hands, pulling the cords too hard, etc.
Saving Money on Automated Blinds
While we can’t afford to do every room right now, we prioritized some of the most important rooms to have blinds, and we will buy more as our budget allows.
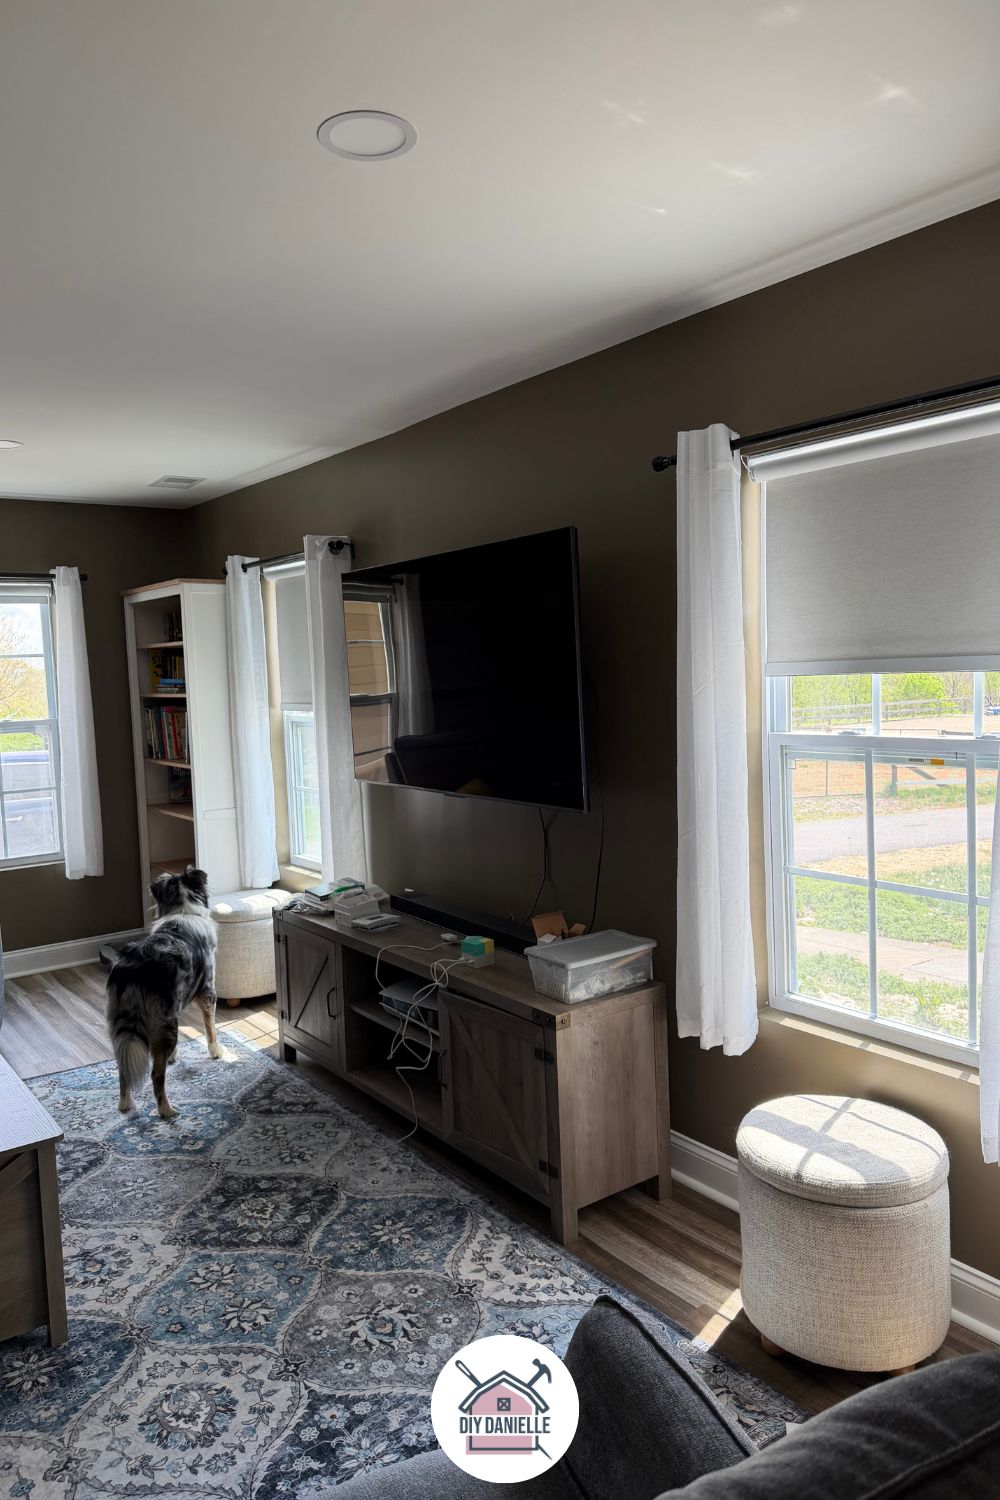
We started with the bathroom with the big window, our master bedroom, and my oldest son’s room, which doesn’t have blinds yet. We also did the family room as it’s right next to the driveway.
I’d like to eventually replace the blinds in the other parts of the house, starting with the corded ones, but it’s on ‘the list.’
SmartWings often runs a small sale on these which is nice to keep an eye out for as well.
What I Ordered
- SmartWings Motorized Roller Shades 100% Blackout Linen, White: https://www.smartwingshome.com/collections/blackout-roller-shades/products/smartwings-motorized-roller-shades-100-blackout-linen?ref=448
- Inside mount, whenever possible. Outside mount for the windows that required this method (these are just slightly more complicated to mount).
- Height/Width by window
- Zigbee Motor
- Standard Valance
- White Square Bottom Bar
- 15 Channel Remote (only order one for each room or you could potentially use one remote for the whole house- maybe?)
- Standard roll
- Standard motor (left side)
- No light blockers
- Hubitat Elevation Model C-8 Pro US Version: https://amzn.to/4vGMzbq
- Wall Outlet with USB Charging: https://amzn.to/3QMacPB
You’ll also need:
- Ryobi Drill https://homedepot.sjv.io/a1EdkQ
- Phillips head drill bit
- Level
- Stud Finder (maybe)
I didn’t get the solar panels because I didn’t think I’d like the look of them on the front of my windows.
The light blockers seemed unnecessary for my needs. So far, these have blocked light well enough that I’m happy with it. Given that I raise and lower my blinds with the sunset/sunrise, it didn’t make sense to get the light blockers.
If my television was opposite the windows though in my living room though, I would have bought the light blockers for those blinds to manage glare.
The included USB charging cord is quite long, allowing you to leave the blinds in place to charge most of the time (at least in my home). It’s a USB cord so you may want a USB wall outlet (I just bought an affordable one to move around as needed). I’m keeping one charging cord stored nearby a blind in each room so I don’t struggle to find it when needed.
Some people just charge them using a charging block which would work fine too.
From what I read, most people were charging these every 5-6 months, but obviously this will depend on your use. If you have kids that like to boop them up and down all day, you’ll be charging a lot more frequently.
Interior vs Exterior Mounted Blinds
The interior mount installs inside the window. This worked for my newer windows (right). For the older window (left) though, there are little strings inside the window and there’s plastic casing on the interior.
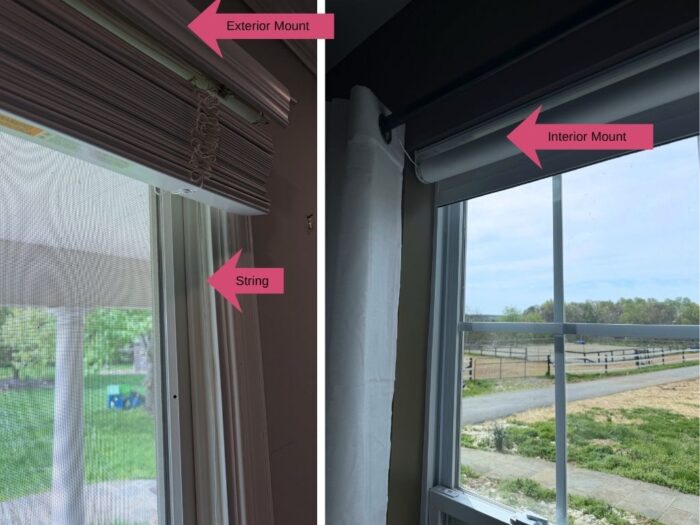
I didn’t *think* I should install the blinds with an interior mount for these older windows so I opted for exterior mount.
The exterior mount is still inside the house (just in case anyone needed that clarification), but it’s outside the window jamb. With the exterior mount method, you mount the brackets for the shades on the window trim or on the wall above the trim.
For my bathroom window, I think exterior mount might be the best option regardless though, because we were able to use one blind for two windows vs. buying two tiny blinds, one for each window.
How to Install Smart Blinds, Interior Mount
These are ridiculously easy to install if you install with the interior mount method. It took minutes so the install video is a bit short and boring. Yay!
The blinds will come with the mounting brackets attached. Hold the blinds up to the top of your window and mark where the brackets are located.
Put the blinds to the side, but remove the brackets.
Screw the brackets into the marked areas.

Grab your blinds and snap them onto the brackets.
Press and hold the button on the left side of your blinds, near the charging port. When it’s connected to your remote, it will move a little bit.
Now you can use your remote with it.
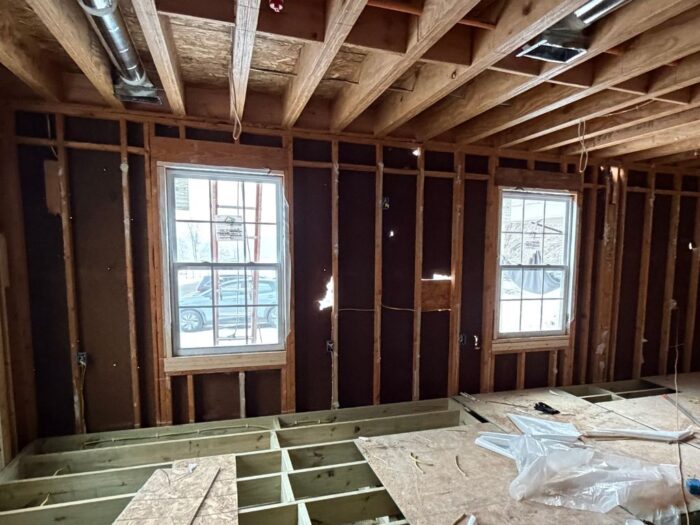
Note: You SHOULD have a stud there if you install your blinds as an interior mount… if not, you’ll need to use drywall anchors to install the screws. But quite frankly, if there isn’t a stud, someone installed your window wrong.
These are two of our living room windows before insulation and drywall (and before they fixed all the holes in the original siding). You can see the 2x4s framing each window… those are all solid wood and shouldn’t require a drywall anchor.
Here’s the video.
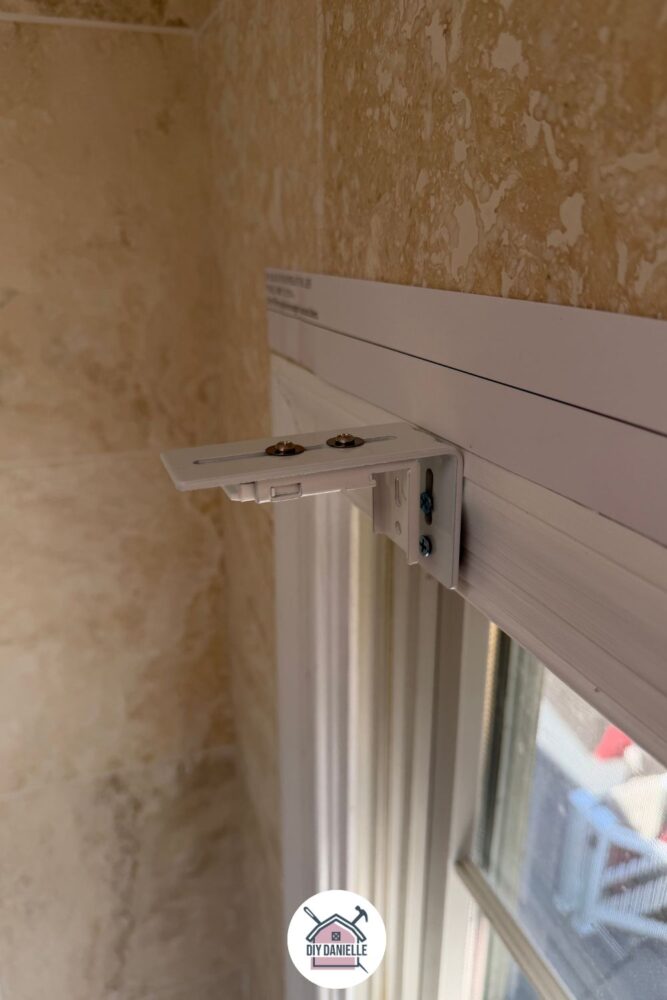
How to Install Smart Blinds, Exterior Mount
Our older windows really need replacing and they needed to be installed as an exterior mount.
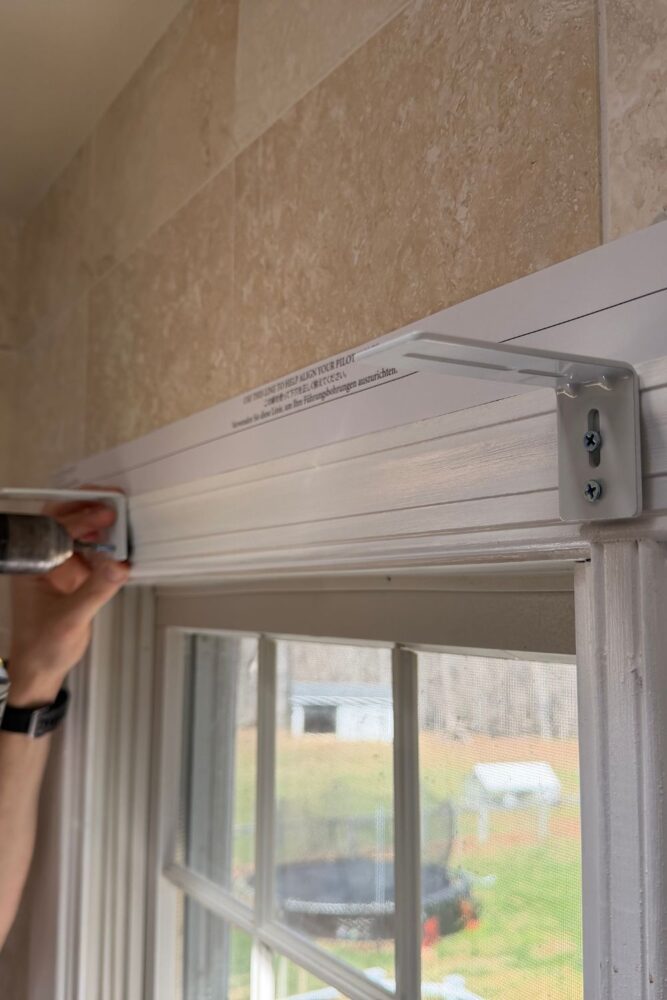
The exterior mount blinds have two types of brackets that need to be installed- there’s the bracket that snaps onto the blind and the bracket that attaches to the wall.
Decide on your placement for the brackets. Mark the spots.
Screw in the long brackets. They can attach to the window trim or to the wall above the window… in this case, we didn’t want to screw into the tile so we used the window trim.
Now you can attach the bracket that the blinds snap onto to the longer bracket… this uses two bolts, two washers, and two nuts per bracket set. You can move the bracket around, depending on how far out that you want the blinds to sit.
Grab your blinds and snap them onto the brackets.
Press and hold the button on the left side of your blinds, near the charging port. When it’s connected to your remote, it will move a little bit.
Now you can use your remote with it.
Here’s the video version if you want it…
Automating the Blinds
While this isn’t particularly tricky, just keep in mind that there are several ways to do this and you may need to use a different method than we did.
I purchased the Hubitat Elevation Model C-8 Pro US Version. I choose this device because it acts locally (on your network) so if your internet goes down, your automations will still work. It also doesn’t require monthly subscription.
These types of hubs help combine all of the smart home devices in your home, and specifically with blinds, you need something that can manage the processing power for these and ‘get’ the type of radio signal that these use. To be honest, I don’t completely understand it. But it worked.
I THINK it’s helpful where we have a lot of different smart devices, many by different companies. I didn’t want to get something that would only work with SOME devices… I haven’t found a brand that makes everything for smart home products (i.e. I’m pretty sure SmartWings doesn’t make smart light bulbs).
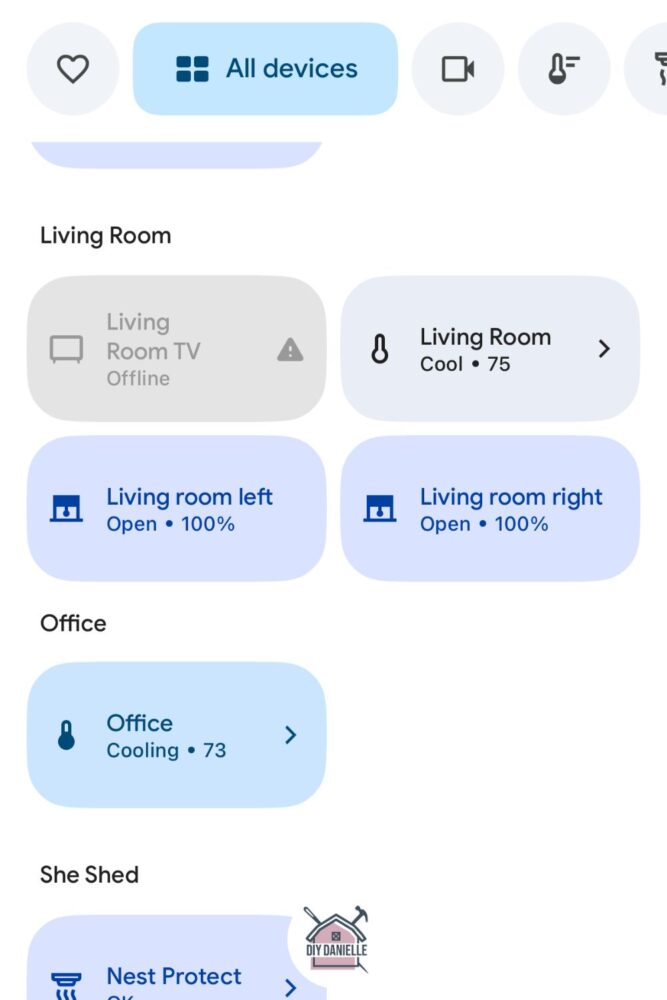
My husband setup the hub and added the blinds, then we were able to set the devices up through our Google Home app. Each set of roller blinds are labeled (i.e. right window, living room).
I clicked the + sign on Google Home to create the automation, then created automations for “close blinds at sunset” and “open blinds at sunrise.” I added each blind to both.
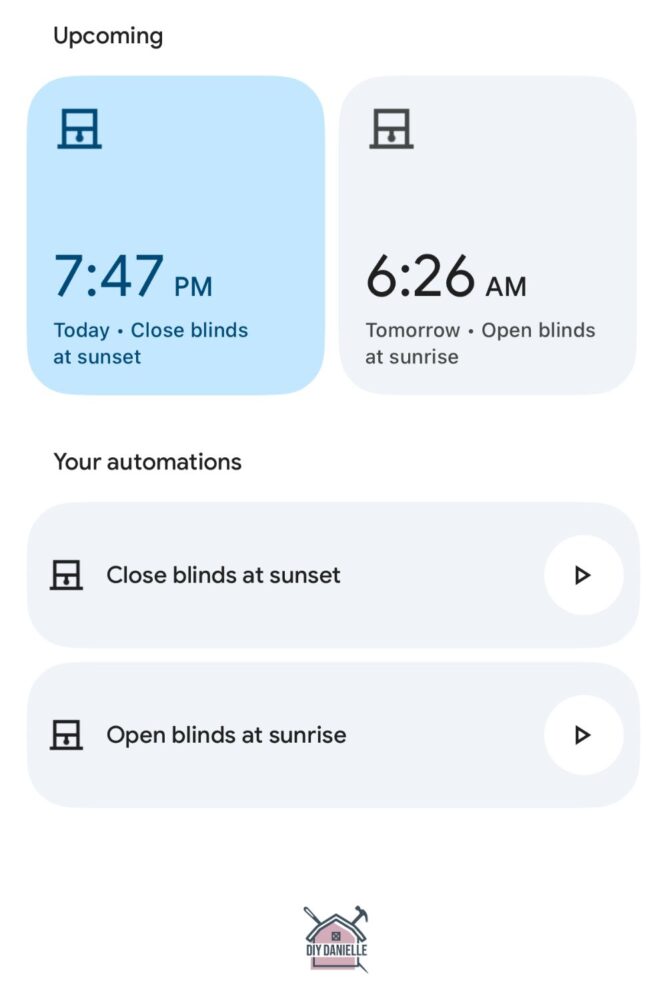
Apparently you can set them up to do more complicated things, like close the blinds when a room gets too hot, but I am not sure I want to make it that complicated yet. That sounds like a problem for future Danielle when it’s summer.
Review of the SmartWings Blinds
This is going to be short because it’s not complicated.
- They open, they close.
- Attractive
- Easy to install.
- Consistently work.
- Easy to charge with a long charging cable.
I like the remote, but to be honest, I will likely automate these and generally ignore the remote. I ended up getting two remotes though.
While I haven’t needed to contact customer service, they contacted me (by email) when I accidentally ordered a remote for every window. When I confirmed that it was accidental, they took off the extra remotes and refunded me for them before my products shipped.
I LOVE customer service like this- it was very proactive and customer-friendly, and they contacted me despite losing money for correcting my mistake. As an overwhelmed mom, it is SUCH a relief to work with companies like this because they take off some of the mental load. It would have taken me a lot of time and labor to correct this mistake and I am extremely grateful that they contacted me.
Please share and pin this post! You can also post your project and tag the DIYDanielle team on Instagram @doityourselfdanielle!

Hi there,
Hope you’re doing well.
I’m reaching out from Kincmo, a smart blinds treatment brand focused on combining functional design, safety, and aesthetic flexibility for modern homes. We would love to collaborate with you on a paid partnership, including a free custom product set and an 5% affiliate commission.
To briefly summarize what Kincmo offers in a more complete way, our product range includes Top-Down Bottom-Up (TDBU) shades, Roman Shades, Woven Wood Shades, and Roller Shades, which cover both functional light control and interior design needs. These styles are available across Motorized, Manual, and No-Drill installation options, allowing flexibility for homeowners, renters, and content scenarios.
What differentiates Kincmo is not only the product variety but also how these products improve daily living. Our motorized systems are designed with cordless operation for child and pet safety, quiet performance suitable for bedrooms and living spaces, and smart automation features such as scheduling and voice control. Many users also choose our shades for energy efficiency, as they help reduce heat gain in summer and heat loss in winter, improving indoor comfort and contributing to lower HVAC energy usage in real environments.
We also maintain clear and transparent quality standards. Our fabrics are certified under OEKO-TEX Standard 100 and GREENGUARD Gold to ensure safe indoor material usage, while our motors comply with CE, FCC, and RoHS certifications for electrical safety and reliability.
If this aligns with your content direction, we would be happy to provide a fully customized set along with fabric swatches so you can select materials and styles before production.
Looking forward to your thoughts.
Best regards,
Kincmo staffs