
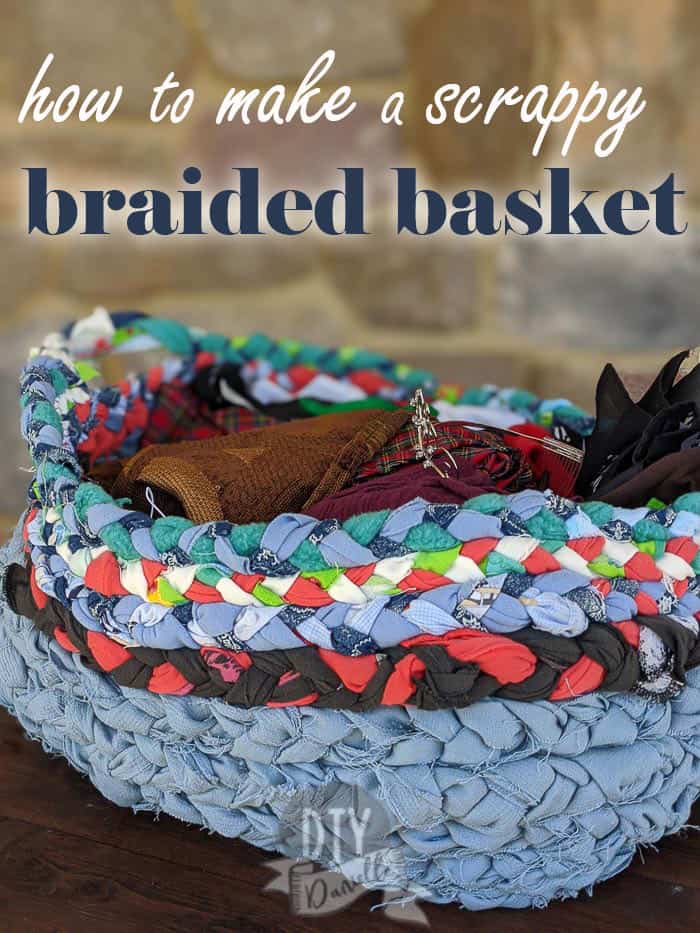
Use scrap fabric, linens, or old clothing and braid them together. Sew them together to create a gorgeous braided basket for storage or decor!
This post may contain affiliate links which may earn me commissions should you click through them and take certain actions. As an affiliate for Amazon, Cricut, xTool, Home Depot, and other sites, I earn from qualifying purchases. Please DIY carefully. View my full legal disclosures here.
Please read the whole post so you don’t miss any important information!
Marie Kondo would hate me. I save allllll the things. My #1 obsession is scrap fabric. I’m just not sure when to give it up. What’s the smallest I should save? I might NEED a 2″ square someday of pretty quilting cotton!
Needless to say, I’m been decluttering, but I have not exactly been throwing the scraps in the garbage. Some pieces get donated to the preschool. The organic scraps that are too tiny to use get composted.
But I found the BEST use for longer strips of scraps. When we were growing up, my mother had a braided rug under our kitchen table; she’d made it a long long time ago. So it stuck with me that I could braid these together.
I didn’t, however, NEED a rug. So I decided to try to make a basket with the braided fabric and it worked!
You can use extra scraps or even cut clothing, bed linens, or other types of upcycled fabric to make baskets.
These might be one of my favorite projects. They’re so PRETTY! I just wish I didn’t have to hand sew them. I may have to try them again with thinner braids to see if I can use my machine.
Table of contents
How to Make a Braided Basket
This one is definitely a time consuming project because of the hand sewing involved. The braiding is pretty simple, but if you use a thicker braid then you won’t be able to sew it together with a machine.
Supply List
- Scrap fabric
- Needle and thread
- Binder clips
As a quick note on supplies, I found that heavy duty thread is a good idea, as you’re pulling it through quite a few layers. I was worried that the friction and movement would cause the thread to snap otherwise. Here’s a good tutorial on sewing thread.
I also recommend a good hand sewing needle that’s SHARP. Personally, I used some hand sewing needles that I inherited from my Grandmother (they came as a little gift set from Farmer’s Insurance!). I probably should have tested to see if a newer needle would have worked better.
This is where I wish I could have used a sewing machine though. I have a much larger variety of sewing machine needles and I think a denim needle might have gone through this like butter. Here’s a tutorial to learn more about sewing needles.
Cutting the Fabric
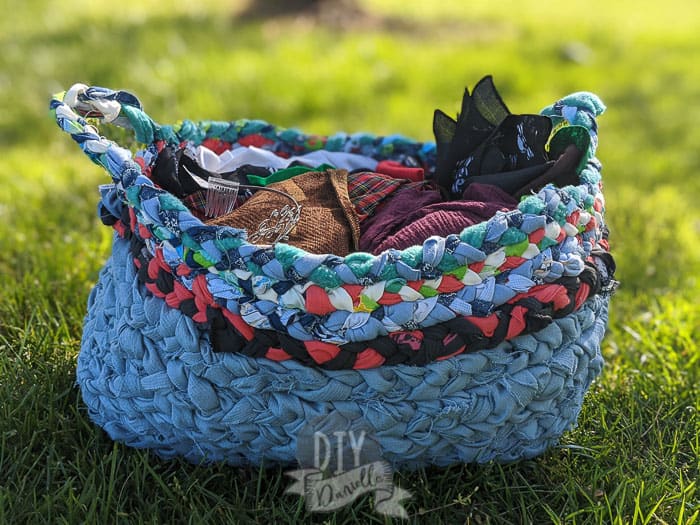
The first thing to do is cut your fabric into long strips. I used EVERY type of scrap fabric I could get my hands on for this. Some of the fabric was leftover pieces of upholstery fabric that I didn’t have a use for. I also have an old t-shirt or two in there; it’s hard to tell because of the braiding.
What is FUN is that I can eyeball the basket and point out exactly where which fabric is! Oh that’s my butterfly shirt! Or “I used the rest of that upholstery fabric on my curtains.”
How wide your strips are will determine how thick your braid is… and if you want a thinner braid so you can use a sewing machine, you’ll want to keep the strips thin.
I wanted a thicker braid because I didn’t want to worry about using a stabilizer. This is a large basket and the thickness gives the sides more stability in my opinion.
You want to strategize your colors for the baskets and where to braid which colors in. The beginning of the braid is the bottom of the basket so I used this plain blue fabric. I made a really long braid of this before adding additional colors into the mix.

The other thing to consider is how important it is for your basket to look polished. I wanted mine to look super scrappy. To get this look, my braid wasn’t consistently the same size. I didn’t cut my strips all the same exact width. I had frayed pieces sticking out. It’s sloppy, but I LOVE that look.
Braiding Your Fabric
Your next step is to braid the fabric. I braided new strips into my braid…. you could, alternatively, sew strips together to get three big long pieces. It’s just unwieldy to do that.
This wasn’t just a weekend project for me. I actually started it with a basket of scraps, then kept increasing my braid when I got new scraps. The long braid was stored in a bucket in my closet and added to occasionally, until I had enough for the large basket.
Whenever I finished braiding my scraps and set them aside for next time, I used a binder clip to hold the braid together. The other end of my braid was sewn together; initially I used a binder clip to attach it to something so I could keep the braid taught while I worked. This became less necessary once the braid was established and grew in length. These are fairly heavy.
The braid is a simple three section braid like you might have learned in elementary school. You could get fancy and use a more complicated braid, but this really is a classic look!
If you want to keep the beginning simple, you can cut a thicker piece of fabric into three sections to start off; don’t snip the ends into three separate pieces. Do you see what I mean in the photo below?

Sewing Your Basket Together
Once you have enough braided fabric, you’ll form the approximate shape that you want.
You need to build your base/bottom first. I just used a simple hand stitch to hold the braids together and in the correct shape.
The center of the bottom is the beginning of my braid. I just keep shuffling the braid around the already braided areas and sewing it into the shape I want. I hope that makes sense… it’s sort of like a lollipop with the swirl, except it’s not round (it could be though!).

Once you build and sew your base pieces together, you can build up the walls. I mostly molded the fabric to go up as I sewed each level on.
I was really worried this wouldn’t work and I’d get a big flat rug like thing, but each time you go around a corner and sew on another side, it helps provide support and stability.


At the end, I made handles on each side by forming the upside down U and hand sewing each side of the U down to the top level of braiding.
You want to sew the handle areas really well as the handles will take much more wear and tear than the other areas.
My fingers were pretty sore from the hand stitching so I had to work in shorter periods of time, but I was so excited to finish it.
The black and pinkish braid is a t-shirt. The teal is leftover fleece from when I sewed my Everest (Paw Patrol) Halloween costume… the light blue fabric towards the top was from that’s costume’s pants. The bottom level is upholstery fabric that I didn’t want to use anywhere because it was boring.

Updated 4/23/2020: This basket is still going strong even though I originally posted this in February 2016. I use it to store lighter weight items in our closet. No issues whatsoever with it tearing or falling apart! I probably wouldn’t haul books or bricks in it as I wouldn’t want to stress the stitching that much; it functions great as a storage basket though!
I made these are DIY Easter Baskets too on a smaller scale. If you want to use full cuts of fabric and avoid braiding/hand sewing, I love these round reversible baskets that I made for my laundry room makeover.
Save it for later!
Please share and pin this post! If you make this project, share it in our Stuff Mama Makes Facebook Group in order to enter to win our monthly giveaway.
How to Make a Simple Braided Fabric Basket with Handles
Materials
- Scrap fabric
- Needle and thread for hand sewing
- Binder clips
Instructions
- Cut scrap fabrics into strips.
- Braid the pieces together, adding pieces of new fabric scraps into the braid.
- Use a binder clip to hold one end together.
- Once you have enough braided fabric, form the shape you want.
- Build your base first and sew your base pieces together.
- Build up the walls with a simple hand stitch to hold the braids together.
- Make handles on each side by forming an upside down U.
- Sew extra support to the handles.
TheKimSix Fix
Monday 29th of February 2016
This is fabulous and what a great way to use up old fabric scraps and leftovers! Thanks so much for sharing at You're Gonna Love it! Pinning!
Elaina Newton
Sunday 28th of February 2016
This is so cool! I've seen baskets like this made with newspaper, but fabric would be much sturdier. P.S. I love the KonMarie method, but that doesn't mean I don't appreciate you keeping things to use for later and recycling. If it's useful and upcycling things brings you joy, then it fits! :)
Danielle
Sunday 28th of February 2016
Haha well I have a nasty habit of keeping *everything* because there so many fun projects to be done. Teehee. I try to upcycle as much as I can though and freecycle the rest. I hate adding to landfills.
Lori@thestonybrookhouse
Thursday 25th of February 2016
Love the idea of using extra scrap fabric! Great idea! Thanks for sharing it at Dishing It & Digging It!
Danielle
Sunday 28th of February 2016
Thank you!
Tiffany | Pretty Real
Thursday 25th of February 2016
what a great way to use extra fabric!
Danielle
Sunday 28th of February 2016
Thank you!
Darlene Nemeth
Tuesday 23rd of February 2016
Hi Danielle. I've made a few rag rugs but not a basket. I'm going to have to add it to my to do list. Thanks for the inspiration. Best wishes, Darlene
Danielle
Sunday 28th of February 2016
Thanks for visiting! It's definitely a fun project if you don't mind the handsewing!