
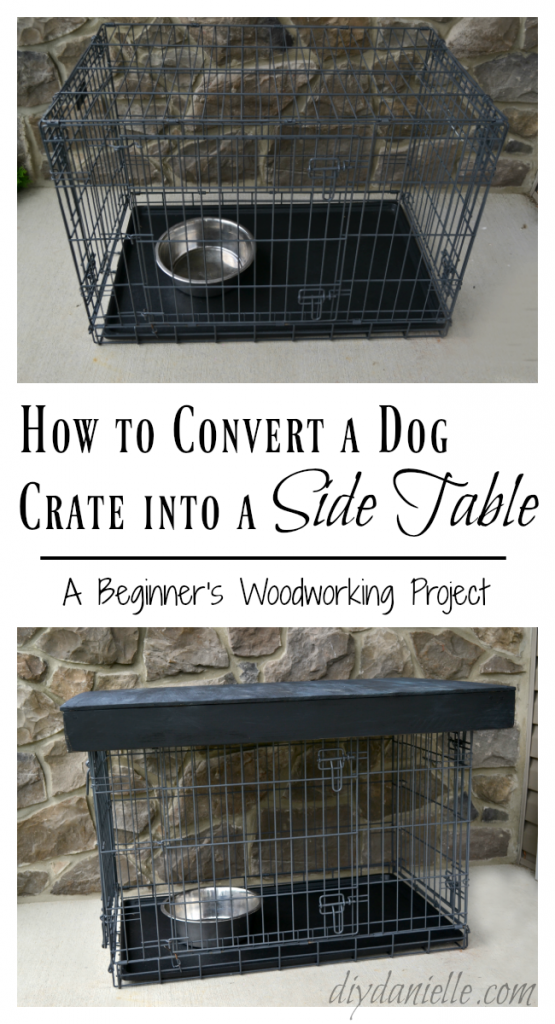
How to build a simple dog crate table topper to convert your dog’s crate into a side table. This is a great way to hide the crate!
This post is sponsored by The Old Fashioned Milk Paint Company. They provided the paint necessary to beautify this piece of furniture. This post may also contain affiliate links.
I have two dogs. Tyson is an old man and mostly trustworthy, but our 1 year old rescue dog Rocky has a passion for chewing. Everything. But in particular, wood. He needs to be in a crate when we’re not home to protect my amazing built-in entertainment center and the Lego storage ottoman that I already needed to fix due to his chewing.
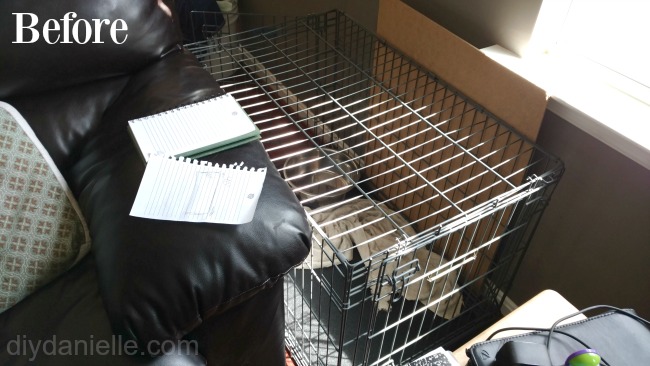
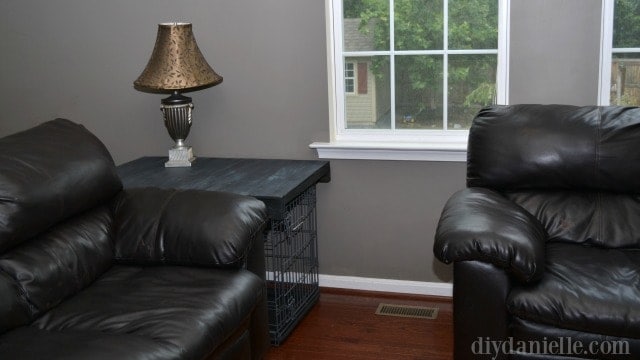
I have been oogling those GORGEOUS wood dog crates forever, but I just couldn’t justify the cost or the work involved to make one. Not when my dog would make it his mission to chew right through it. Instead we have a metal crate that is a giant eyesore in our family room. And we really needed some side tables because we have nowhere to place my blogging overflow a lamp.
As an alternative to the wood crates, I decided to make this super easy dog crate top. It converts the metal dog crate into a side table without giving the dog inside easy access to the wood. I opted to leave off legs, but you can always add legs if you want to add stability.
DIY Dog Crate Table Topper
Supplies
- Old Fashioned Milk Paint: Pitch Black
- SafeCoat (which can also purchased on the OFMP website)
- Wood: I used 2×4’s (scraps) and a thick piece of plywood that my husband had chillin’ in our wood stash.
- Nails, hammer, paint brushes, sander or sandpaper. You know the deal.
- Metal dog crate, naturally.
You might like the following products in my shop! Keep scrolling for the tutorial.
Building Instructions
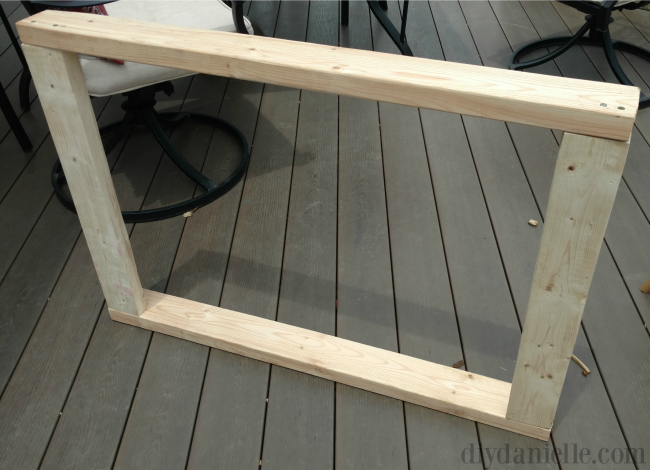
I’m hoping this will be fairly self explanatory from the photos. I am completely new to woodworking and my husband usually does all of the wood projects, but I’m trying to do more and more. I started out measuring my dog crate. I added about 2″ extra for each piece of wood so that the top would sit evenly over the top of the crate.
Once I got the wood cut to the proper lengths, I laid them out and hammered them together to form a base. I ensured this would lay flat by doing this flat on the ground and applying weight to the wood while I hammered (this makes for a fun game of Twister).
After, my husband cut me a piece of plywood to put on top. I hammered this on. Then I just went around the whole piece with a sander to sand off any rough edges.

For paint, I decided to use OFMP in Pitch Black which is non toxic, no VOC, and eco friendly. This was important to me for a couple of reasons. On the chance my dog manages to chew this, I didn’t want him ingesting anything toxic. I also have asthma so I like to stick with no VOC paints as they’re supposed to be safer and less likely to cause breathing issues. Slowly working my way towards painting the house over with no VOC paint. It’s been a slooooow process.
This was fairly simple to mix and apply, according to the directions. I painted my piece. The top is painted with OFMP and I just did a basic ebony stain on the underneath to keep it simple.
Once it was dry, I followed up with a coat of SafeCoat to protect it. I imagine the protection will come in handy where we plan to place drinks and such on it.
I think owning pets comes with the struggle of trying to keep a clean, open home without sacrificing the safety of your pets. This dog crate cover turned side table was my solution for having the dogs fit neatly into our home decor.
The Old Fashioned Milk Paint was SO perfect. I wanted an attractive and non toxic option for paint- and I wanted it to be subtle enough to blend with our decor. This was NOT a piece of furniture that I wanted to “pop”… I like that the pitch black blends with the couches and the black metal of the crate, but up close, I can still appreciate the detail and color that the milk paint brings out.
Next month’s milk paint project is our kitchen table which is turning out ahhhh–mazing. It will sit right near the crate so I’m glad the crate will blend nicely into the background and let the table set be the focal point in that area.
Want more DIY ideas for your pup? Check out these posts: Easy no dig dog run | Personalized gifts for your dog | PVC Dog Bed | Rustic Dog Bowl Holder | Braided Dog Toy
Please share and pin this post!
DIY Dog Crate Table Topper
Build a simple dog crate table topper to easily convert your dog’s crate into a side table. It's also budget-friendly.
Materials
- Old Fashioned Milk Paint
- SafeCoat
- Wood
- Metal dog crate
Tools
- Nails
- Hammer
- Paint brushes
- Sander
- Sandpaper
Instructions
- Measure your dog crate adding about 2″ extra for each piece of wood.
- Cut to the proper lengths.
- Lay them out and hammer them together to form a base.
- Cut a piece of plywood to fit the top.
- Hammer it on.
- Use a sander to sand off any rough edges.
Sheena
Saturday 23rd of July 2016
Cute idea!! I want to take a table and make it to hide my litter box!! Its on my long to do list!! LOL
Danielle
Saturday 23rd of July 2016
Yesss I love that idea. Although when we had cats we had a Cat Genie which is awesome and you can hide it in the laundry room. It cleans itself. Which sort of is a win imho ;)
Laura
Friday 22nd of July 2016
Danielle- this is a great project.Happy TOHOT!
Danielle
Saturday 23rd of July 2016
Thanks!
Made In a Day
Tuesday 19th of July 2016
Very clever idea! I got one sitting in my kitchen! It;s too big for a side table though. Great job!Thanks for linking up to Merry Monday! Sharing on Twitter! Have a great week! Kim
Danielle
Saturday 23rd of July 2016
Mine is huge, haha. It's a lab-size crate. Fortunately, it's hidden pretty well behind the couch.
Terri Steffes
Tuesday 12th of July 2016
Love it! Visiting from BBOB on FB. LOL.
cynthia haller
Tuesday 12th of July 2016
I love this idea, our crate was a huge travel IATA approved crate made of plastic and we ended up selling it as we really couldn't store it in our tiny apartment in Mumbai and the only reason we had it was to relocate to that said tiny flat from across the country :-)
If I had a crate like this one, I could see myself doing this project.