
How to build a DIY duck run. How to build a predator proof outdoor space for your ducks or chickens.
We built our first predator proof duck run in 2016 at our old house. This post was originally published in August 2016 and I’m updating it now because we moved! I built a new run at our current home that is much larger and didn’t have some of the same technical difficulties that our original run did.
I’m going to start off by answering some basic questions about duck runs, then I’ll get into the two different runs and my process for building them.
This post may contain affiliate links which may earn me commissions should you click through them and take certain actions. As an affiliate for Amazon, Cricut, xTool, Home Depot, and other sites, I earn from qualifying purchases. Please DIY carefully. View my full legal disclosures here.
Please read the whole post so you don’t miss any important information!
Duck Run Basics
Duck Run Vs. Free Ranging
You might be wondering why you want a duck run. They’re expensive to put up, even when you’re using whatever materials you have on hand.
The benefit to the duck run is having control over the safety of your flock. While training a livestock guardian dog might be the best option for large flocks, most people with small backyard flocks aren’t looking for another mouth to feed. And training an LGD is pretty time intensive. It’s also not foolproof.
It’s easy to let your animals free range, but neighbors might be irritated when your birds end up in their yard. They might shoot your birds or call in a complaint to the county. And sometimes it’s just better to be on good terms with neighbors.
A covered run also gives you a bit more freedom. Without the run, I was stuck on a strict schedule for letting the ducks out in the morning and putting them in at night. With the run, their coop door can stay open all night and they can come and go as they please. My ducks also hated going into their coop; sometimes I was out there for thirty minutes chasing or luring ducks into the coop. This has saved me a lot of time. It also means you know where all of the eggs will end up- no finding eggs in a planter on your porch!
My favorite part of the run is that I can keep food and water on the outside of the coop, cutting down on the mess inside of it. I don’t need to worry about the ducks getting hungry or thirsty while locked inside.
Even with the run, I can still let my flock free range when we’re outdoors or during the day.
Duck Run Size
While the run didn’t need to be small, I also didn’t want to spend too much money on this project. You want to plan for 15 sq ft of run space per duck compared to 8-10 sq ft for chickens. This is an odd shape and there’s some geometry involved (ewww) so I’m not sure what the EXACT final square footage was… but at one point I guestimated 320 sq ft. This is plenty big for my 7 ducks.
I recommend going as big as your budget here if you can. The more space you have, the less cleaning and maintenance you’ll need to do on the interior of the run. A smaller space will get beaten up pretty fast. A larger space also leaves room if you want to pick up more chickens or ducks later on.
You want the height of your run to be around 8′. Make sure to plan the height of your posts accordingly, seeing you’ll need to bury the posts 2-3′ deep for stability; this means your overall post height needs to be 10-12′ if you aren’t finagling things like I did.
What Type of Flooring Should I Use for a Duck Run?
I tend to lean toward doing what is most natural for the birds. Dirt and grass is a good option- and free. The thing to remember is that the ducks will wear down the grass over time and this may make the ground a mud pit (they won’t mind, but you might).
You also want to make sure the flooring is easy to clean.
Some materials will irritate a duck or chicken’s feet so you want to avoid them. This will help you avoid expensive vet bills and time consuming care.
You have a few options if the dirt/grass don’t suffice:
- Sand
- Wood Chips
- Straw or Wood Shavings
- Pea Gravel
Personally, I use a lot of wood chips around my homestead because they’re free (or cheap) from a local arborist. I get regular deliveries from ChipDrop for my garden so I use the chips in my coop, run, and goat house.
Most of my run is currently grass and I’m hoping it will continue to grow, but I laid wood chips along the exterior of the run, as well as in muddy spots.
Rather than do the bone breaking work of removing dirty wood chips, I cover old wood chips with new ones for fresh bedding, letting the lower chips compost down.
For my coop, I use the deep litter method for a while, then remove the bedding every month or two and place the dirty bedding in my garden (duck poop is okay to use fresh- chicken poop needs to be composted).
Winterizing the Run
For our weather in Maryland, we don’t winterize our run. Ducks are pretty hardy, particularly Muscovy Duck which is the breed I keep. You can certainly add wind breaks and covered areas to keep your ducks protected, but honestly I feel my ducks thrive in the cold and windy yuck.
I do keep a heated water bucket for them in the run. Ideally you want to keep all potential fire hazards out of the coop.
Landscaping around the Run
This is not something that I’ve tackled yet, but once spring comes I’ll start looking at landscaping around the run. I would like to add fast growing vine plants along the exterior of the run. They can grow up the sides of fence and hopefully provide some shade.
If I plant some edible plants and herbs for the ducks, this may provide food for them and cut down on smells from the run. You just need to make sure your ducks or chickens can’t access the roots of the plant so these are perfect to plant on the exterior of the run.
You can add small solar lights to attract bugs inside the coop, giving the ducks a nice snack.
What Type of Supplies Do I Need for Building a Duck Run?
Wood
Any wood that touches the ground needs to be pressure treated and ideally any non pressure treated wood should be stained or painted with the proper outdoor stain/paint. Some people are concerned about the chemicals in pressure treated wood around their animals, but where this is out in the open air I was not too concerned.
Ideally you want to place pressure treated 4x4s as posts for your run like my friend Lisa at Fresh Eggs Daily did, but I didn’t have a truck to get those home. I also wanted to use the 5′ posts that we had leftover from removing my old fence. This cut down on the overall cost of my project (I think/hope), but mostly cut down on how many posts I needed to bury in the freezing cold weather.
Pro tip: Order your wood in advance from Home Depot for easy pickup.
Wire
DO NOT use chicken wire. Chicken wire helps keep chickens in… it does not keep predators out. Chicken wire is a good option for keeping chickens out of your garden and that’s it.
The lower portion of the run needs to have 1/4-1/2″ hardware cloth. This prevents smaller predators from reaching through the fencing to pull pieces of your poultry out. This is a thing so don’t ignore the risk. It’s better to do your fence right.
The upper portion of the run can have wire fencing that is spaced out more.
To attach the wire to fence posts, I use poultry staples. This requires hammering them in and I made sure to use a lot of staples towards the bottom of the run in particular.
Along the bottom exterior of your run, you need something to keep animals from digging under. Wire will do the trick. I decided to opt for the larger spaced (and cheap) wire and it’s 4′ out from the run. Landscape staples hold the wire down so it doesn’t scratch you or rip your clothes. I placed wood chips (free from an arborist) over them to make the run look nicer and help hold the wire down better.
For my run at the new house, I’ll need to add mesh or wire over the top at some point if hawks become an issue.
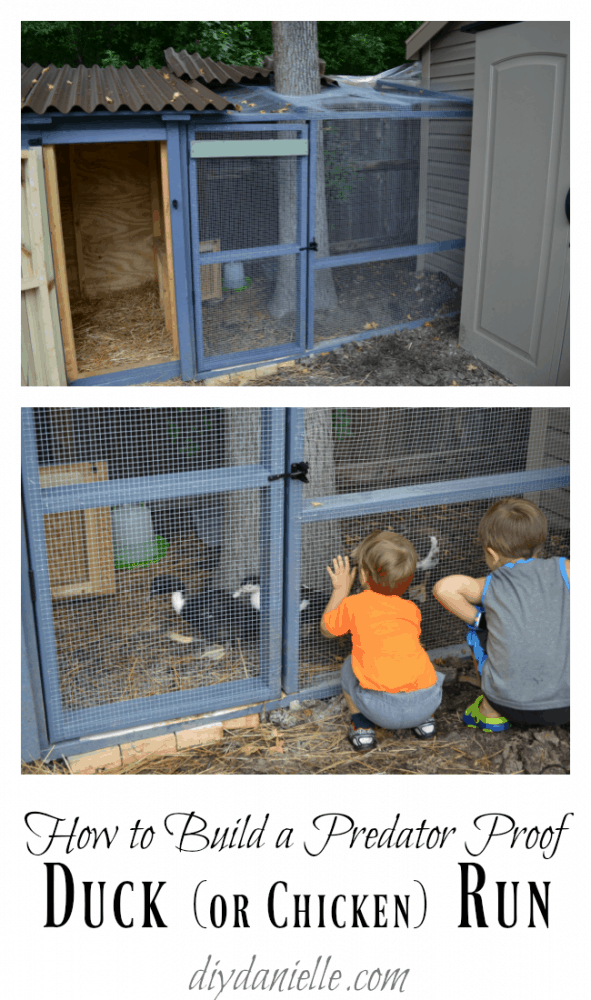
Building the Small DIY Duck Run
When we built our duck house, I wanted to make sure the ducks could also have a predator proof outdoor area attached. My friend Lisa at Fresh Eggs Daily recommended this because ducks are messy and it’s helpful to keep food and water outside so the inside of the house stays dry.
I was trying to keep our duck run as subtle as possible so I decided to build it behind the shed. There was some extra unused space back there and it gave them a decent amount of space without cutting into our yard too much. Of course, when we’re home we let the ducks out in the rest of the yard too.
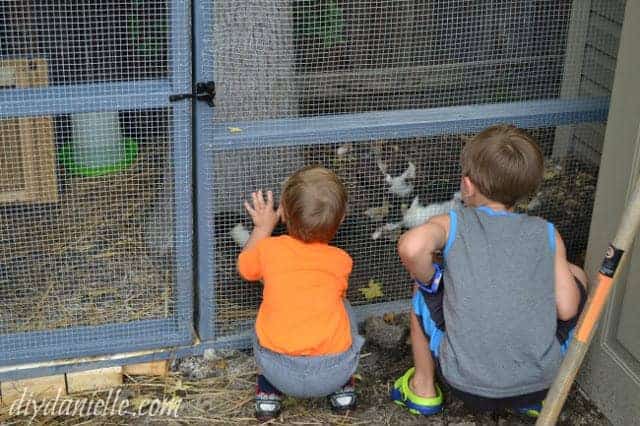
There were, however, some challenges with this run. Runs aren’t terribly complicated when they’re just a long rectangle. But ours is odd shaped and there’s a tree in the middle of it. I had to overlap the hardware cloth in some spots and there’s a small amount of space around the tree.
That said- hardware cloth is really sharp (make sure to use work gloves) and hard to move so the small gaps on the top may not be an issue. And if it is an issue, I may end up with a pet raccoon in our duck run because I doubt he’ll be able to get back out. While I wasn’t sure it was 100% predator proof, I never had issues.
This is the video tour of our original duck run.
Supplies for the original run
- Hardware cloth 1/2″ galvanized steel (1/4″ may be cheaper)
- 2×4’s and something to cut them with.
- Heavy duty staple gun with lots of staples (you should use poultry staples instead)
How I built the smaller run around a tree
Build a frame to attach to your coop. Make sure to use pressure treated wood for the pieces that touch the ground.

I nailed the frame into the coop. Some of these pictures will look a bit lopsided… partly that’s due to the area, but my husband did adjust the frame a bit after I put it in. You can see I added some boards across the top to support my hardware cloth for the “roof.”

Hardware cloth was stapled onto the frame so that the top and sides were covered.
I dug down about 6″ for the hardware cloth to go into the soil vertically, then bent it at an angle to fan out horizontally a bit. Then I covered it all up with dirt again.
So here’s the rough part… I had to bury hardware cloth in several spots… and it was awkward. I buried it along both short sides of my shed (outside the run). I also buried it on the outside of our privacy fence… it was easier to work in that area. Essentially, if something could dig under an area to get to your chickens or ducks, add hardware cloth there. I missed one spot and my dog started digging in it. So I fixed it. I’ve been inspecting the area daily to keep an eye out for areas I need to fix.
My husband built the door. I added the hardware cloth to it, then he put it on. We added a latch. The door ended up being pretty tight- as in, I can barely open it, so we haven’t stressed too much about a lock on it. I usually use a piece of rope in the latch to keep it from being opened easily.
Afterwards, I added the hardware cloth to the top of run, overlapping as necessary. I had some extra cuts of the roofing from the duck run leftover so I laid it on top of the hardware cloth to keep a portion of the run dry.
I had to build a frame for the end of the shed. I wedged that between the shed and privacy fence. It was nice and tight. I added my hardware cloth, again burying it.

This is the finished photo of the duck run at the old house (keep scrolling to see the bigger run at the new house).
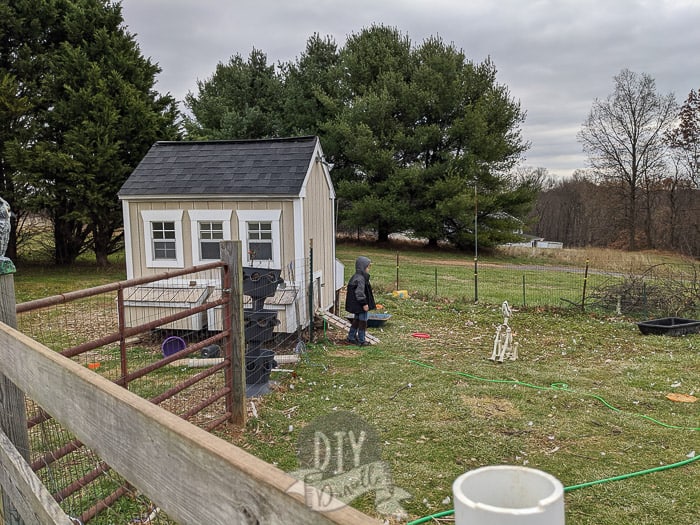
Building Our Larger Duck Run
We moved to a larger property because ducks escalated quickly into me wanting goats, horses, and an enormous garden. Because we have the space for it and we’re allowed to keep them here, we didn’t need the run to be subtle or small.
This was a bit of a panic build. We’ve been successfully free ranging the ducks, but when the weather got colder the local fox found three of my ducks. The ducks spent a lot of time inside their coop for a week while I put this up.
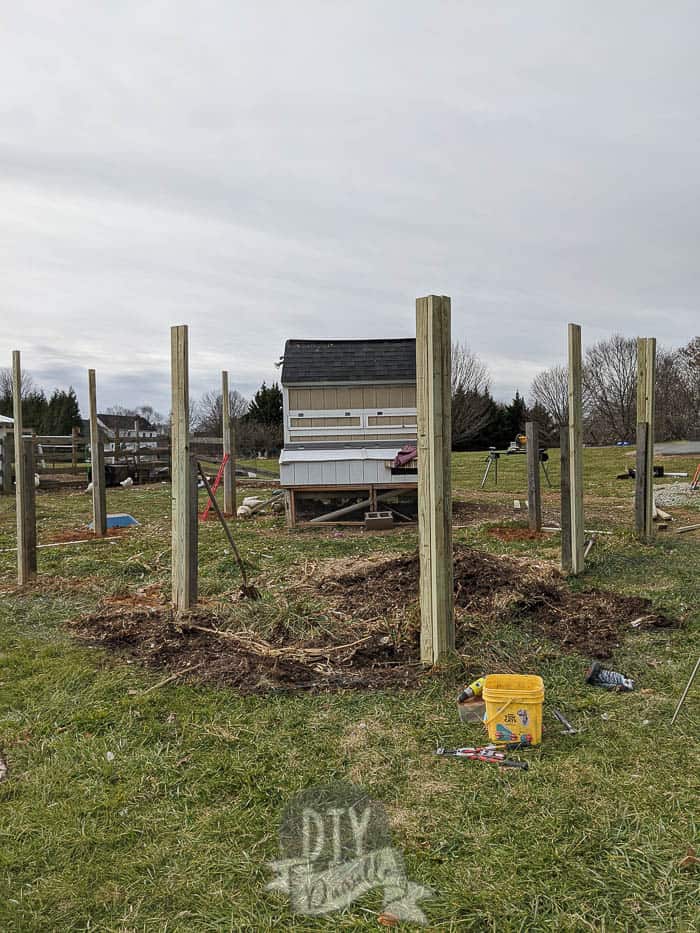
The space before we built the run. We had to pull down the old fence and reuse the posts.
Supplies for the Large Duck Run
- Existing fence posts
- Pressure Treated 2×4s (use 4x4s if you don’t have existing posts to use): Here’s some information on pressure treated wood
- Welded Wire Fencing (old, larger gaps) for top and ground
- Hardware cloth 1/4″ gaps for the lower portion of the run, 100′
- Poultry staples
- Exterior screws (you may want a longer screw if you use 4x4s)
- (3) Heavy Duty Hinges
Tools Used
- Hammer
- Drill
- Miter Saw
- Circular Saw
- Good work gloves to protect your hands while working with the fencing
This is a pretty detailed video tutorial of the process for the larger duck run:
I didn’t want to dig a lot of post holes. They’re pretty time intensive and we dig by hand. I opted to use this line of posts as one side of my run. So the first thing I had to do was pull down the horizontal boards and wire (which I reused). I also nailed in or removed any loose nails or poultry staples. The bottom of the wire in some areas was grown into the ground so I just laid it down to use as the boundary against animals digging in.

For the areas that didn’t have posts already, I reused posts from other areas and placed them every 8′. Then I screwed my 2x4s into those posts so I could increase my run size to 8′. This saved me money, but you’ll probably find that buying 4x4s is more reasonable unless you have a similar situation.
Once my posts were up, I rolled out my hardware cloth for the bottom portion. Use gloves because this stuff is brutal on your hands. You’ll need a helper to pull it taunt while you nail in the poultry staples to hold it in place.
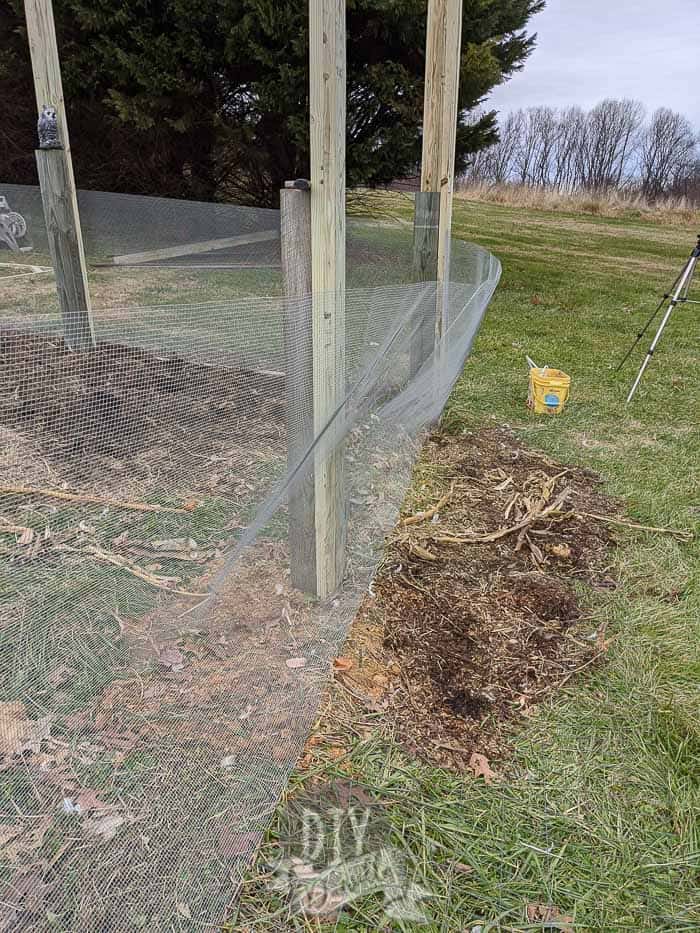
Once the bottom wire was attached, I folded up the ground wire and overlapped it with the hardware cloth. Then I screwed a 2×4 over it. I added poultry staples on inside to hold it all in place. Repeat for the whole bottom of the run.
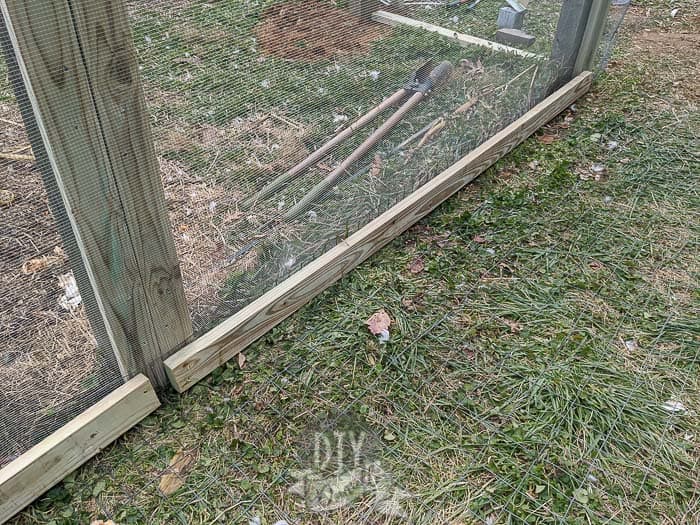
At this point, you need to attach the top 4′ of wire. This is heavy work and you might find it easier to cut the wire into shorter sections unless you have a lot of helpers. Overlap the top wire with the hardware cloth a bit. Hold it all on with poultry staples, then screw in 2x4s to cover where they overlap. You’ll add more poultry staples on the inside of the run into the middle horizontal 2×4.
Eventually we’ll install 2x4s along the top as well and add poultry staples up there as well. This will give us more stability for when we add netting over the run.
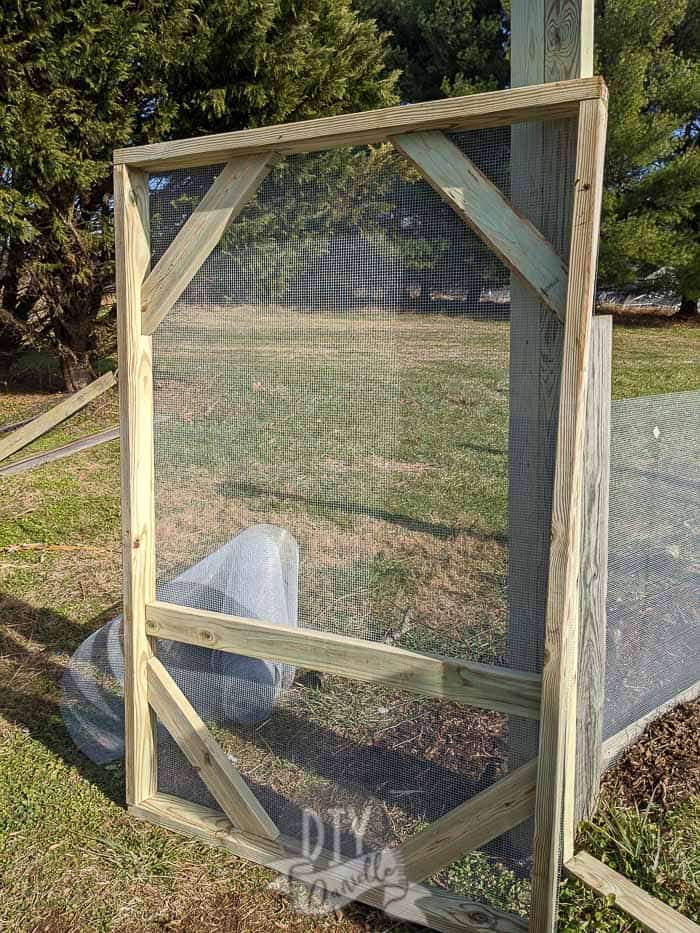
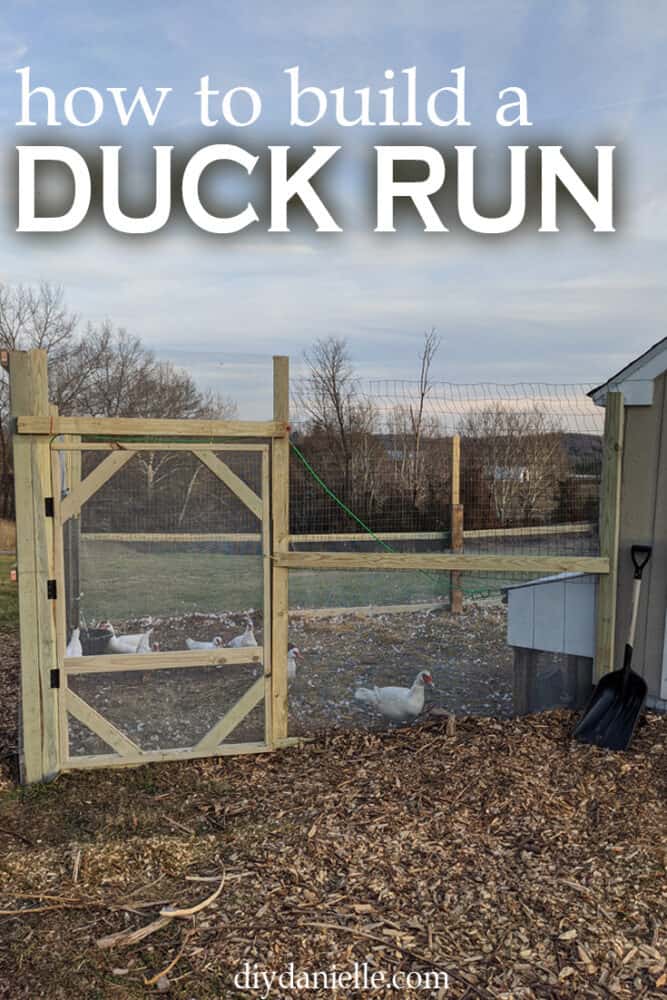
My husband built this 6′ door while I was digging post holes. We needed three heavy duty hinges to hang it properly.
And that’s it. You can see that the run isn’t as attractive as if I’d used brand new wire at the top or 4x4s. I was hoping to spend a little as possible, however, without sacrificing safety.
I also didn’t want it to take too long because the ducks weren’t safe. I couldn’t paint it because the weather was in the 20s and 30s. This did the trick and it looks decent!
In terms of price, PT 4x4s are $12+ depending on the size at my local store and PT 2x4s at $4.68 (I think Home Depot is cheaper). So despite this not being a *cheap* project, I think I still saved money by using the existing posts, as well as the old wire. The hardware cloth was $150. I think I spent under $400 on this run and it’s a pretty good size.
Have any questions? Can you recommend a good netting for over the run? Leave me a comment!
If you like this post, you’ll love my DIY duck waterer, easy to install solar barn lighting, and our outdoor guinea pig hutch. New to raising ducks or chickens for eggs? Here’s a guide to How to Wash and Store Fresh Eggs.
Need an easy shelter and don’t want to DIY? Here’s what you can buy.
Omlet makes a ton of chicken shelters and runs that are movable and have lots of accessories available. You can add wheels and handles to move the run as needed which is nice. The cages look like they’re well predator-proofed, and you can get an attached run up to 13′. They even sell an automatic coop door that opens and closes when the sun rises and sets. The Eglu Go is their easily movable shelter and run. They have perches to add on, swings, treat holders, and even chicken clothing. Totally worth checking out if you like to geek out over your poultry.
Here’s a video showing the Omlet automatic coop door and light.
You might like the following products in my shop!
Please share and pin this post! If you make this project, share it in our Stuff Mama Makes Facebook Group. We have regular giveaways for gift cards to craft stores. You can also tag me on Instagram @doityourselfdanielle; I love seeing everything you make!
How to Build a Predator Proof Space for your Ducks or Chickens
Build a predator proof outdoor area to keep your ducks or chickens safe.
Materials
- Hardware cloth 1/2″ galvanized steel
- 2×4’s
- Nails
- Door latch
Tools
- Heavy duty staple gun with poultry staples
Instructions
- Build a frame to attach to your coop with pressure treated wood.
- Nail the frame into the coop.
- Staple hardware cloth to the frame to cover the top and sides.
- Dig down about 6″ for the hardware cloth to go into the soil.
- Build the door and add hardware cloth to it.
- Add a latch.
- Place hardware cloth to the top of run.
Recommended Products
As an Amazon Associate and member of other affiliate programs, I earn from qualifying purchases.


Mother CLucker
Sunday 18th of June 2023
I wish I could see any of the videos you mention.
Christy
Monday 4th of April 2022
We just took an existing 10x10x6 chain link dog kennel & wrapped the lower 3ft with 1/2” hardware cloth. The roof is the the larger 1x2 green plastic coated wire, and we also buried 2ft of it on the outside to prevent critters digging in. Is there any need for us to also wrap the upper 3ft of the chain link kennel in hardware cloth as well? We bought enough to do so, but after finding your post I’m wondering if it’s necessary or overkill. I do have raccoons & foxes on my cameras at night. I’m new to owning ducks & they will be staying outside in this pen at night now that they are fully feathered. They free-range during the day. The original idea was to build them a floating duck house for the pond, however they are scared of the pond and won’t go in it. So leaving them out at night free-range with the pond & their floating duck house for safety is no longer an option.
Christy
Saturday 14th of May 2022
@Danielle Pientka, thank you, we left it with the hardware cloth only on the lower half & it’s working fine so far. I just got 5 more ducks today. Once they acclimate all of them will stay in this pen at night only. I may have to make some changes if I see the new ducks are doing things a little different. Last week on one night the camera showed a fox, raccoons, opossums & an armadillo. It was a busy wildlife night. I may end up having to get a livestock guardian dog, but so far the pen is doing it’s job keeping the ducks safe at night.
Danielle Pientka
Tuesday 5th of April 2022
I don't think you need to do the top half in hardware cloth too, unless your ducks perch up close to the sides. In that case, maybe. I'd probably just zip tie a small scrap of hardware cloth near the perch area though if I could get away with it. That stuff is pricey.