
How to build an organization system with shelves for your walk-in closet. This basic build will help you save money on a complete closer renovation!
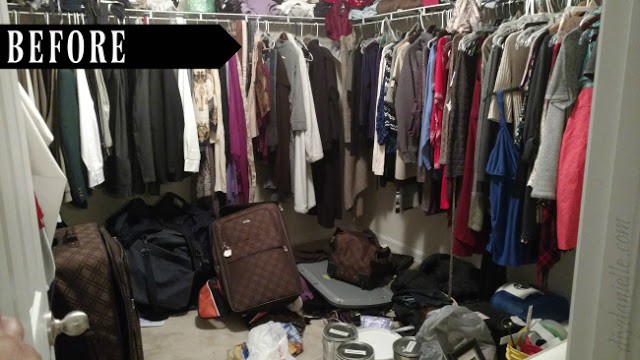
We’ve lived in our house for 3 years now and the master closet was suffering for the lack of an organization system. We’d been planning to put in nice shelves for a while, but never got to it. Check out how bad it was….
But NO MORE. It’s done and it’s amazing and I love it.
The best part is that it’s simple. We put in a few different elements that might be of interest- but they all were basic to build. Nothing complicated. No drawers. No fancy details.
This post may contain affiliate links which may earn me commissions should you click through them and take certain actions. As an affiliate for Amazon, Cricut, xTool, Home Depot, and other sites, I earn from qualifying purchases. Please DIY carefully. View my full legal disclosures here.
Please read the whole post so you don’t miss any important information!
I wanted to build something that wouldn’t require us to learn new things- while that’s fine for a small project, it wasn’t something we wanted to tackle for such a large closet project. It also wasn’t something I felt was necessary because we have bureaus in our master bedroom to hold small clothing items. We are not a big accessory family… we tend to keep our lives fairly practical in terms of the “necessities.”
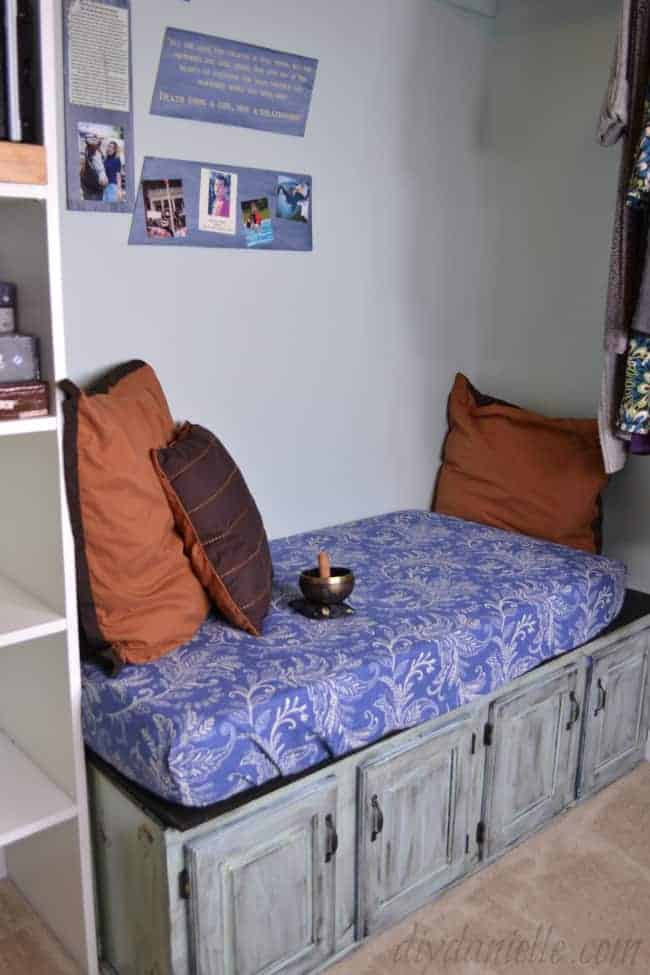
I also added a seating area with a memorial wall. Read more about my Memorial Wall and prayer/meditation area. The seating comes up with hidden storage for suitcases in the back.
Of course, I went through a lot of my clothes to upcycle and donate items that no longer fit. I wrote another post on how to upcycle clothing if you’re interested. I make beautiful baskets from upcycled fabric and it’s something I really enjoy (be warned: lots of hand sewing).
For the record, I did a wonderful job getting rid of all my maternity and nursing clothing… then SURPRISE, found out I was pregnant a month after sending everything to the thrift store. I had to laugh. So I will have some posts coming on how to sew lots of baby and maternity items once I regain some energy.
This post is part of the 31 day series that I did on Organizing Your Home. Note that I did ANOTHER DIY closet project when we moved to our new house so make sure to check that out too!
Supplies for a DIY Closet System
- Plywood: We used high quality 3/4″ plywood that runs about $50 for a 4×8′ board. The store ripped the plywood into (3) 15 7/8″ strips for us so we could get it home in our van (and it saved us a lot of time cutting too). Two of the shelves used those dimensions. The shelf on the back wall, however, is much wider and we had to adjust our measurements for it. We also needed a piece of plywood for the seating area, and more 15 7/8″ wide plywood strips for along the top of the closet shelves.
- Paint, spackling materials
- Curved closet rod for corner
- Old cabinet, painted and distressed
- Upcycled crib mattress with fitted sheet, pillows, and any other decor
- Closet rod sockets (we needed 5 sets)*
- Wood closet rods in lengths needed for closet*
A note on plywood choices: 3/4″ plywood is my favorite choice for shelves. I really like the Purebond 3/4″ 4×8 sheets as they require less prep work, are generally smooth and don’t need a lot of sanding, and are made using environmentally friendly products (ie. they put off less air pollutants).
*As an alternative to the wood closet rods, I recommend trying these metal rods. They’re sturdier and come in various sizes including 28-48″ or 48-84″. There’s less prep work and I think they last longer.
Do you keep track of your home renovation projects, quotes from contractors and more? This is a GREAT printable planner if you like to track this info for your personal records; you can record info on paint colors and appliance warranties too! Keep scrolling for the closet build tutorial!
DIY Closet System
Tutorial
The video shows some of the details of what we did as well as the final tour.
I started by removing all of the wire shelving. I kept those to either give away or reuse in our garage. I’m learning towards using them in the garage to organize more. I did a lot of patching on the walls and painted everything.
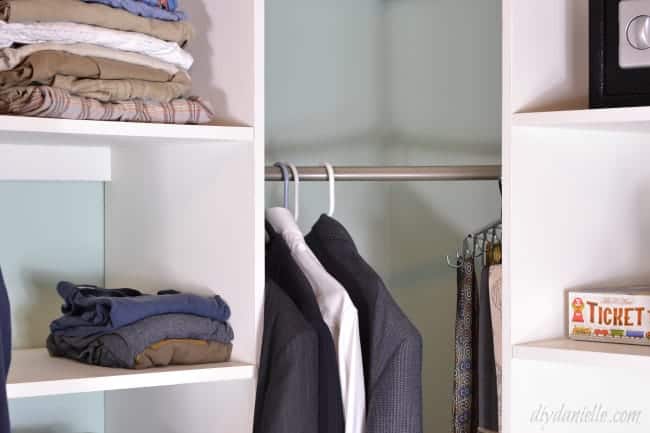
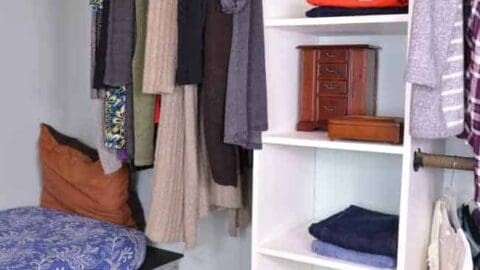
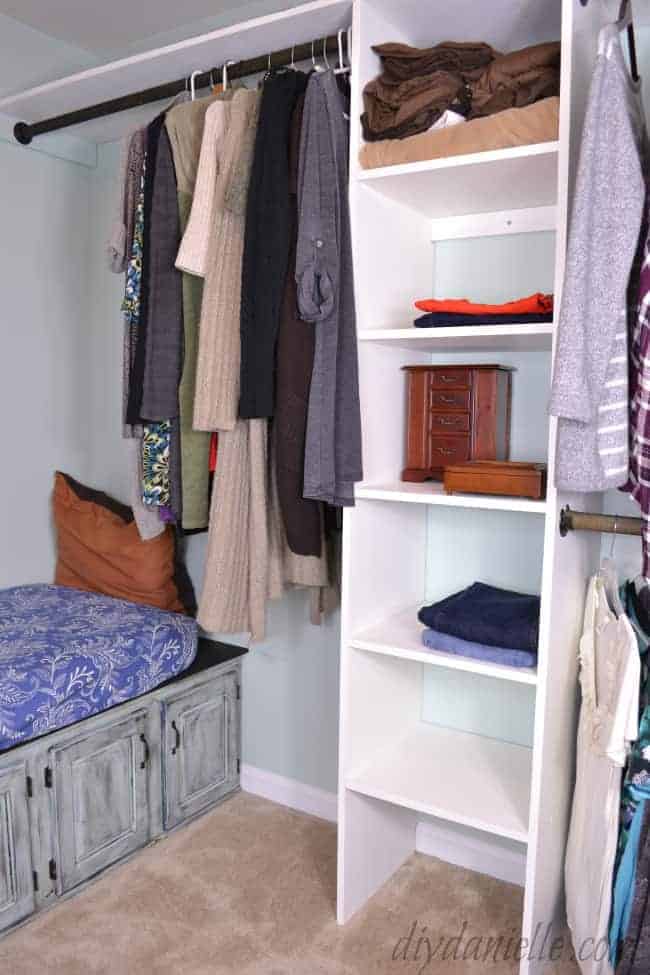
We built the three shelves in the garage and painted them white. I wanted them to be a light color, seeing the closet has no windows and I didn’t want the room to be too dark. Once dry, we brought them up to our closet and decided on placement. The curved rod meant carefully placing the two shelves on the left side so we’d get the maximum space to put clothing on the rod. Once the shelves were mounted to the wall, we added our rods. We used rod sockets with wood dowels. I stained the dowels with ebony stain. This was probably more work than was strictly necessary. Adding the second, lower rod was really helpful for creating extra space.
We added shelving along the top of the closet. It wasn’t something we need usually, but I figured it might come in useful occasionally. Now that we’re having another baby, we’ve been using baskets to store baby items up there until baby is born.
We used a big cabinet that I’d painted for the seating section. There’s a support along the wall and a piece of wood we laid on top of it all to create removable storage. The seat is just an upcycled crib mattress. When we want to get to our suitcases, we just lift up the mattress and remove the piece of wood. It’s not super convenient but it’s easy enough to lift and we don’t need to get into there often.
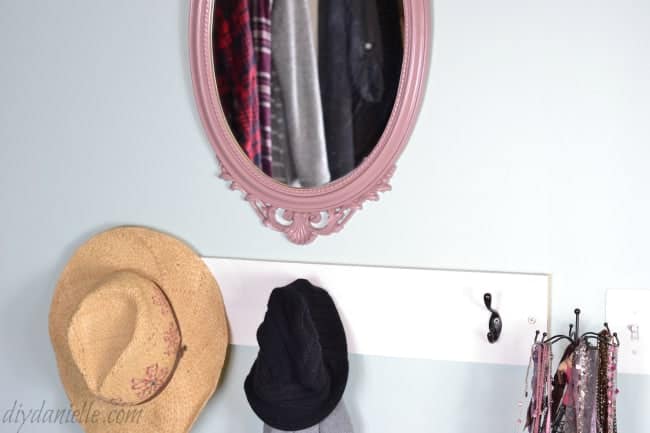
Finally, I painted an old mirror, took a white piece of wood and added hooks for a coat hanger on the shorter wall.
The closet organizer/shelves were made from Ana White’s Closet Organizer from One Sheet of Plywood plan. This was a great plan to follow. I won’t show details of that part of the project in my video because her tutorial has lots of info, but you can follow along for the rest of the project, as well as the “reveal” in the video.
Here are some highlights of the project:
This mirror was a favorite $10 yard sale find, but the pink paint just made me so happy.
I know seating in a closet isn’t traditional, but I love my seating area. My kids want to move into my closet now so it may have defeated the whole point of giving me another place to hide, but it is really cozy!

DIYDanielle Built-In Projects
These are all of the DIY built-in projects that we've done. You can see some progression in our skills and what styles we prefer. I really like simple, farmhouse style projects so you'll see more of that here. Many of these project reveal posts have separate posts walking you through smaller parts of the project (ie. removing baseboard, installing lighting, etc).


DIY Closet Built-Ins: Using Plywood for DIY Closet Shelves
The 2nd closet renovation project that I did.
How to Build a DIY Closet System
Build a DIY closet organization system with shelves for your walk-in closet. This DIY will help you save money on a complete closet renovation!
If you liked this article, you’d also like the following posts:
- Renovating a Small Bathroom
- Small Kitchen Renovation
- Space Saving Condo Renovations
- Adding Shelves to Organize a Water Closet / Toilet Room
- DIY Shoe Storage Ideas
Please share and pin this post!

How to Build a DIY Closet System
Build a DIY closet organization system with shelves for your walk-in closet. This DIY will help you save money on a complete closet renovation!
Materials
- Plywood 4×8′ Board Cut into (3) 15 7/8″ Strips
- Plywood For Seating Area
- 15 7/8″ Wide Plywood Strips
- Paint
- Spackling
- Curved Closet Rod
- Old Cabinet
- Upcycled Crib Mattress
- Closet Rod Sockets - 5 sets
- Wood Closet Rods
Tools
- Paint Brush
Instructions
- Remove all of the wire shelving.
- Build the three shelves and paint them white.
- Mount the shelves to the wall.
- Add the curved rod with rod sockets and wood dowels.
- Stain the dowels with ebony stain.
- Add shelving along the top of the closet.
- Place the painted cabinet in place with the old crib mattress.
- Add hooks for a coat hanger on the shorter wall.
DIY Closet System Google Web Story